Panasonic AG-HPX600PJ Operating Instructions - Page 110
Copying clips, Setting clip metadata
 |
View all Panasonic AG-HPX600PJ manuals
Add to My Manuals
Save this manual to your list of manuals |
Page 110 highlights
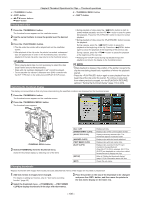
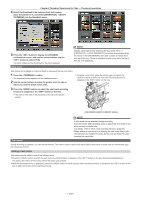
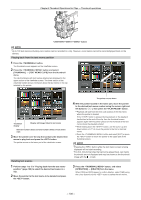
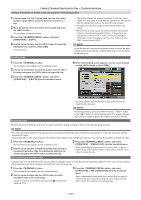
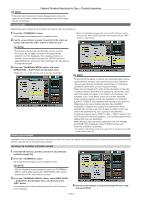
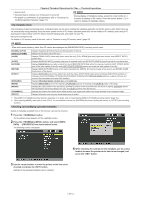
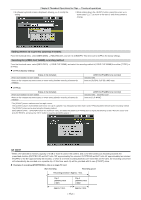
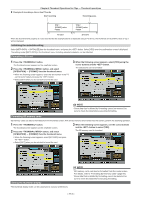
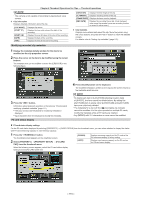
Chapter 6 Thumbnail Operations for Clips - Thumbnail operations @@NOTE tt Incomplete clip indicators will remain displayed when only some clips are reconnected, unless all the constituent clips of the original clip are reconnected. Copying clips Selected clips can be copied to the P2 card or SD memory card in the desired slot. 1 Press the button. The thumbnail screen appears on the viewfinder screen. 2 Use the cursor buttons to move the pointer to the clip to be copied, and press the button to select the clip. ffWhen a confirmation screen asks you to confirm that you want to copy the clip, select [YES] using the cursor buttons and the button to copy the clip. @@NOTE tt If recording using the one-clip recording function in which the clip can be recorded connected to the previous clip (when [1"CLIP] is displayed), then copying of clips is not possible. Close the menu and press the button for approximately two seconds to stop combining to the clip, and try the operations again. 3 Press the button, and select [OPERATION] → [COPY] from the thumbnail menu. ffSelect slot 1, 2, or SD memory card as the copy destination. @@NOTE tt Do not turn off the power or remove a P2 card while data is being copied because doing so may cause the card to fail. If defective clips are generated by accidentally performing one of the above operations, delete them, and then copy them again. tt When clips are copied to P2 cards, all the information on the clips is copied, however, when they are copied to an SD memory card*, video and sound information is not copied, only thumbnails, clip metadata, icons, Voice Memo, proxy and real-time metadata. tt When recording capacity on the copy destination is insufficient, [LACK OF CAPACITY!] is displayed and copying is not performed. When clips to be copied include defective clips, [CANNOT ACCESS!] is displayed and copying is not performed. When selected clips include a clip that has been recorded on the same card as the destination P2 card, copying is not performed. tt To interrupt copying, press button + button or the button to cancel the operation. The clip being copied will be deleted from the copy destination. tt When identical clips exist on the destination card, the message [OVERWRITE?] is displayed. Select [YES] to proceed with overwrite, or [NO] to not proceed. * For details on SD memory cards to be used, refer to "Cautions in using SD memory cards" (page 25). Setting clip metadata Information such as the name of the person who shot the video, the name of the reporter, the shooting location, or a text memo can be read from the SD memory card, and can be recorded as clip metadata. Reading clip metadata (metadata upload) 1 Insert the SD memory card that contains the clip metadata (metadata upload file). 2 Press the button. The thumbnail screen appears on the viewfinder screen. @@NOTE tt With the thumbnail screen displayed, press the button while pushing the switch towards the side to move to step 4. 3 Press the button, select [META DATA] → [LOAD] from the thumbnail menu, and then press the button. The metadata name of the metadata upload file on the SD memory card is displayed. 4 Use the cursor buttons to select the desired file to be read, and select [YES]. - 110 -
-
 1
1 -
2
-
3
-
4
-
5
-
6
-
7
-
8
-
9
-
10
-
11
-
12
-
13
-
14
-
15
-
16
-
17
-
18
-
19
-
20
-
21
-
22
-
23
-
24
-
25
-
26
-
27
-
28
-
29
-
30
-
31
-
32
-
33
-
34
-
35
-
36
-
37
-
38
-
39
-
40
-
41
-
42
-
43
-
44
-
45
-
46
-
47
-
48
-
49
-
50
-
51
-
52
-
53
-
54
-
55
-
56
-
57
-
58
-
59
-
60
-
61
-
62
-
63
-
64
-
65
-
66
-
67
-
68
-
69
-
70
-
71
-
72
-
73
-
74
-
75
-
76
-
77
-
78
-
79
-
80
-
81
-
82
-
83
-
84
-
85
-
86
-
87
-
88
-
89
-
90
-
91
-
92
-
93
-
94
-
95
-
96
-
97
-
98
-
99
-
100
-
101
-
102
-
103
-
104
-
 105
105 -
 106
106 -
 107
107 -
 108
108 -
 109
109 -
 110
110 -
 111
111 -
 112
112 -
 113
113 -
 114
114 -
 115
115 -
116
-
117
-
118
-
119
-
120
-
121
-
122
-
123
-
124
-
125
-
126
-
127
-
128
-
129
-
130
-
131
-
132
-
133
-
134
-
135
-
136
-
137
-
138
-
139
-
140
-
141
-
142
-
143
-
144
-
145
-
146
-
147
-
148
-
149
-
150
-
151
-
152
-
153
-
154
-
155
-
156
-
157
-
158
-
159
-
160
-
161
-
162
-
163
-
164
-
165
-
166
-
167
-
168
-
169
-
170
-
171
-
172
-
173
-
174
-
175
-
176
-
177
-
178
 |
 |
