Panasonic WJ-HD716/1000 Operating Instructions - Page 10
A/F HDD access/failure, HDD indicators HDD1 - HDD4
 |
View all Panasonic WJ-HD716/1000 manuals
Add to My Manuals
Save this manual to your list of manuals |
Page 10 highlights
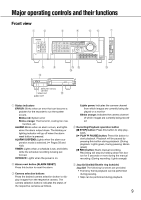
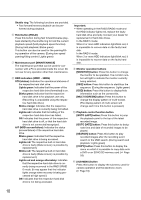
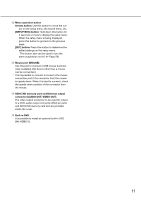
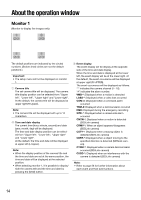
Shuttle ring: The following functions are provided. • Fast forward/reverse playback can be performed during playback. y Hold button [HOLD] Press this button during fast forward/reverse play- back started by the shuttle ring to hold the current playback speed (hold playback speed function). (During hold playback: Blinks green) This button can also be used for the panning/tilting operation of the camera. (During low-speed panning/tilting control: Lights green) u Maintenance port [MAINTENANCE] The maintenance port that can be used for con- nection with a PC is provided inside the cover. Do not use for any operation other than maintenance. i HDD indicators (HDD1 - HDD4) STS (status): Indicates the operational statuses of the respective hard disk drive. Lights green: Indicates that the power of the respective hard disk drive (formatted) is on. Blinks green: Indicates that the respective hard disk drive is for playback use only. (Recording is unavailable using the respective hard disk drive.) Blinks orange: Indicates that the respective hard disk drive is currently being formatted. Lights red: Indicates that formatting of the respective hard disk drive has failed. Off: Indicates that the power of the respective hard disk drive is off, or that the hard disk drive is not connected/recognized. A/F (HDD access/failure): Indicates the status (access/failure) of the respective hard disk drive. Blinks green: Indicates that the respective hard disk drive is being accessed. Lights red: The respective built-in hard disk drive is faulty (Data recovery is possible by replacement.) Blinks red: The respective built-in hard disk drive is faulty (Data recovery is possible by replacement.) Lights red and orange alternately: Indicates that the respective hard disk drive is currently being recovered in the RAID 5/RAID 6 mode. (It may appear that the indicator lights orange when recovery is being processed at high speed.) Off: Indicates that the respective hard disk drive is not being accessed. 10 Important: • When operating in the RAID5/RAID6 mode and the HDD indicator lights red, replace the faulty hard disk drive promptly. Contact your dealer for replacement of hard disk drives. In the RAID 5 mode: When 2 or more HDD indicators light/blink red, it is impossible to recover data on the faulty hard disk. In the RAID 6 mode: When 3 or more HDD indicators light/blink red, it is impossible to recover data on the faulty hard disk. o Monitor operation buttons [MONITOR] button: Press this button to change the monitor to be operated. The monitor number will light to indicate the monitor currently being selected. [SEQ] button: Press this button to start/stop the sequence. (During the sequence: Lights green) [OSD] button: Press this button to display/hide information such as the camera title. [MULTI SCREEN] button: Press this button to change the display pattern of multi-screen. (The display pattern of multi-screen will change each time this button is pressed.) !0 Playback control function button [GOTO LAST] button: Press this button to jump the playback point to the top of the latest recorded image. [GOTO DATE] button: Press this button to designate time and date of recorded images to be played. [SEARCH] button: Press this button to play recorded images after the recording event search or the VMD search. (During search and playback: Lights green) [COPY] button: Press this button to display the menu on which it is possible to copy data onto a DVD or an SDHC/SD memory card. (☞ Page 59) !1 [SUB MENU] button Press this button to display the submenu used for camera operation and the electronic zoom. (☞ Page 16)
-
 1
1 -
2
-
3
-
4
-
 5
5 -
 6
6 -
 7
7 -
 8
8 -
 9
9 -
 10
10 -
 11
11 -
 12
12 -
 13
13 -
 14
14 -
 15
15 -
16
-
17
-
18
-
19
-
20
-
21
-
22
-
23
-
24
-
25
-
26
-
27
-
28
-
29
-
30
-
31
-
32
-
33
-
34
-
35
-
36
-
37
-
38
-
39
-
40
-
41
-
42
-
43
-
44
-
45
-
46
-
47
-
48
-
49
-
50
-
51
-
52
-
53
-
54
-
55
-
56
-
57
-
58
-
59
-
60
-
61
-
62
-
63
-
64
-
65
-
66
-
67
-
68
-
69
-
70
-
71
-
72
-
73
-
74
-
75
-
76
-
77
-
78
-
79
-
80
-
81
-
82
-
83
-
84
-
85
-
86
-
87
-
88
-
89
-
90
-
91
-
92
-
93
-
94
-
95
-
96
-
97
-
98
-
99
-
100
-
101
-
102
-
103
-
104
-
105
-
106
-
107
-
108
-
109
-
110
-
111
-
112
-
113
-
114
-
115
-
116
-
117
-
118
-
119
-
120
-
121
-
122
-
123
-
124
-
125
-
126
-
127
-
128
-
129
-
130
-
131
-
132
-
133
 |
 |