Panasonic WJ-HD716/1000 Operating Instructions - Page 104
Step 1, Date and time range, REC event, Camera, Copy drive, Alter detect, Data size
 |
View all Panasonic WJ-HD716/1000 manuals
Add to My Manuals
Save this manual to your list of manuals |
Page 104 highlights
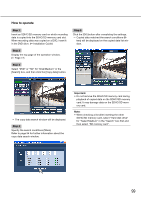
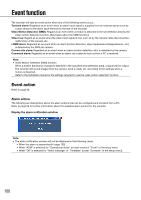
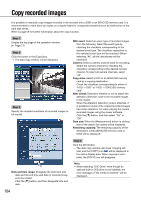
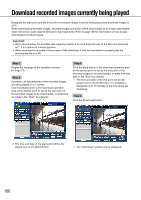
Copy recorded images It is possible to manually copy images recorded in the recorder onto a DVD or an SDHC/SD memory card. It is recommended to make back-up copies on a regular basis for unexpected situations such as malfunction of the hard disk drives. Refer to page 59 for further information about the copy function. Step 1 Display the top page of the operation window. (☞ Page 77) Step 2 Click the button in the [Copy] box. → The data copy window will be displayed. Step 3 Specify the detailed conditions of recorded images to be copied. REC event: Select an event type of recorded images from the following. Select the event type by checking the checkbox corresponding to the desired event type. The checkbox respective to the selected event type will be checked. (When selecting "All", all the checkboxes will be checked.) Camera: Select a camera channel used for recording. Select the camera channel by checking the checkbox corresponding to the desired camera channel. To select all camera channels, select "All". Copy drive: Select a DVD or an SDHC/SD memory card as a copying destination. Check the checkbox corresponding to either of "HDD → DVD" or "HDD → SDHC/SD memory card". Alter detect: Determine whether or not to attach the alteration detection code to the recorded images to be copied. When the alteration detection code is attached, it is possible to check if the copied recorded images have been altered or not when playing the copied recorded images using the viewer software. Click the [C] button, and then select "On" or "Off". Data size: When the [Measurement] button is clicked, size of the data to be copied will be displayed. Remaining capacity: The remaining capacity of the destination media (SDHC/SD memory card or DVD) will be displayed. Step 4 Click the [OK] button. → The data copy window will close. Copying will start and the [COPY] icon will be displayed in the status display area. When copying is complete, the [COPY] icon will disappear. Date and time range: Designate the start time and date and the end time and date of recorded images to be copied. Click the [C] button, and then designate time and date. Note: • When selecting "DVD Drive" even though an optional built-in DVD drive is not installed, the error message of "No media is inserted" will be displayed. 104
-
 1
1 -
2
-
3
-
4
-
5
-
6
-
7
-
8
-
9
-
10
-
11
-
12
-
13
-
14
-
15
-
16
-
17
-
18
-
19
-
20
-
21
-
22
-
23
-
24
-
25
-
26
-
27
-
28
-
29
-
30
-
31
-
32
-
33
-
34
-
35
-
36
-
37
-
38
-
39
-
40
-
41
-
42
-
43
-
44
-
45
-
46
-
47
-
48
-
49
-
50
-
51
-
52
-
53
-
54
-
55
-
56
-
57
-
58
-
59
-
60
-
61
-
62
-
63
-
64
-
65
-
66
-
67
-
68
-
69
-
70
-
71
-
72
-
73
-
74
-
75
-
76
-
77
-
78
-
79
-
80
-
81
-
82
-
83
-
84
-
85
-
86
-
87
-
88
-
89
-
90
-
91
-
92
-
93
-
94
-
95
-
96
-
97
-
98
-
 99
99 -
 100
100 -
 101
101 -
 102
102 -
 103
103 -
 104
104 -
 105
105 -
 106
106 -
 107
107 -
 108
108 -
 109
109 -
110
-
111
-
112
-
113
-
114
-
115
-
116
-
117
-
118
-
119
-
120
-
121
-
122
-
123
-
124
-
125
-
126
-
127
-
128
-
129
-
130
-
131
-
132
-
133
 |
 |