Panasonic WJ-HD716/1000 Operating Instructions - Page 70
Operate the setup menu of the camera
 |
View all Panasonic WJ-HD716/1000 manuals
Add to My Manuals
Save this manual to your list of manuals |
Page 70 highlights
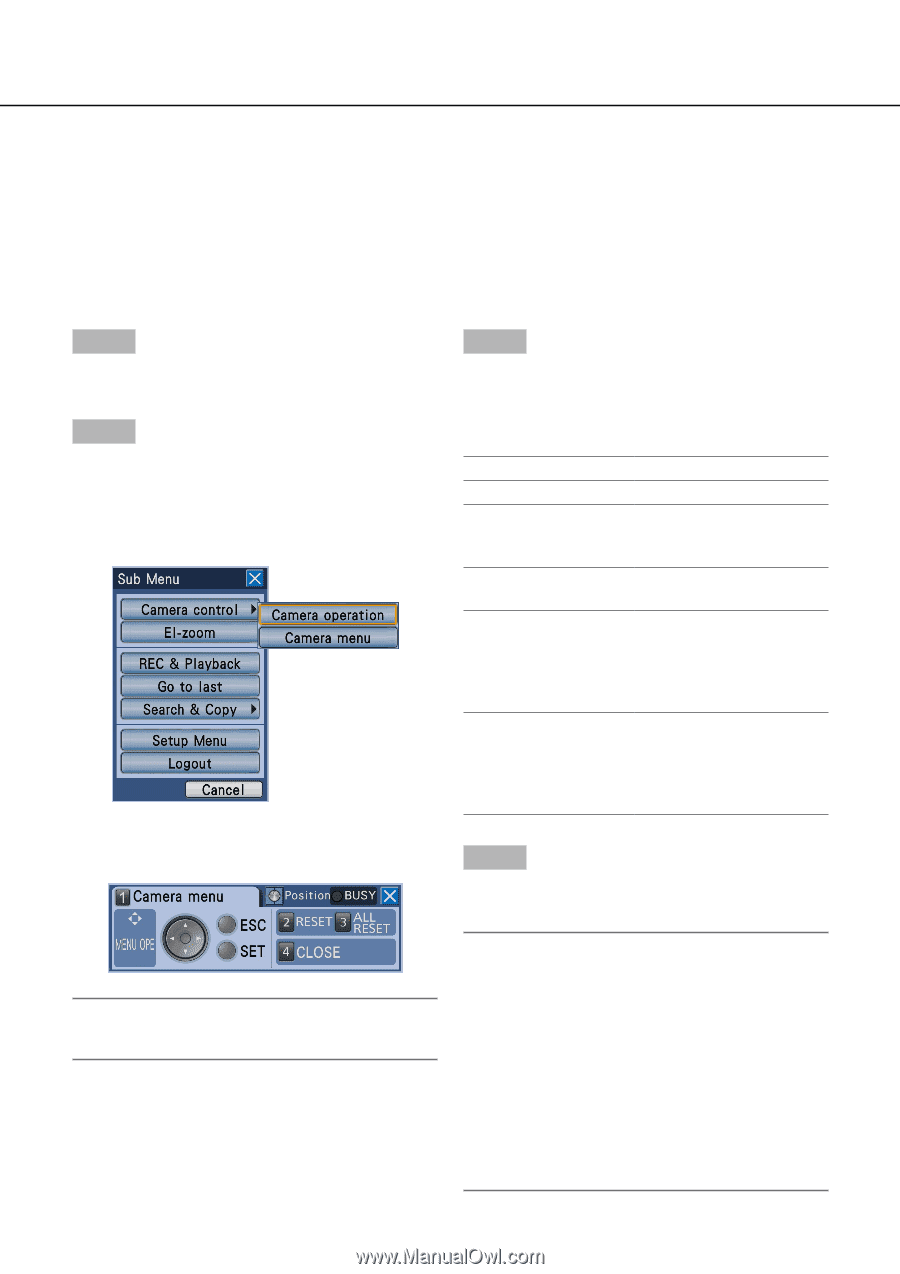
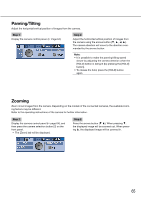
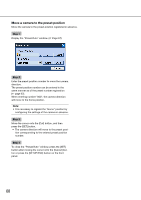
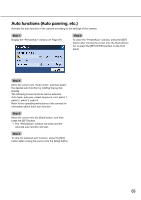
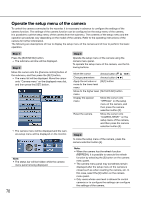
Operate the setup menu of the camera To control the camera connected to the recorder, it is necessary in advance to configure the settings of the camera function. The settings of the camera function can be configured on the setup menu of the camera. It is possible to call the setup menu of the camera from the submenu. The contents of the setup menu and the operation procedures vary depending on the model of the camera. Refer to the operating instructions of the camera for further information. The following are descriptions of how to display the setup menu of the camera and of how to perform the basic operation. Step 1 Step 3 Press the [SUB MENU] button. → The submenu window will be displayed. Step 2 Operate the setup menu of the camera using the camera menu panel. To operate the setup menu of the camera, use the following buttons. Move the cursor onto the [Camera control] button of the submenu, and then press the [SET] button. → The menu list will be displayed. Move the cursor onto "Camera menu" on the displayed menu list, and then press the [SET] button. Move the cursor Arrows button (C D A B) Change parameters Arrows button (A B) Apply the set value or [SET] button move to the lower level menu Move to the higher level [SETUP/ESC] button menu Display the special menu Move the cursor onto "SPECIAL" on the setup menu of the camera, and then press the camera selection button [2]. Reset the camera Move the cursor onto "CAMERA RESET" on the setup menu of the camera, and then press the camera selection button [3]. → The camera menu will be displayed and the camera setup menu will be displayed on the monitor. Step 4 To close the setup menu of the camera, press the camera selection button [4]. Note: • The status bar will be hidden while the camera menu panel is being displayed. 70 Note: • When the camera has the refresh function (REFRESH), it is possible to execute the refresh function by selecting the [2] button on the camera menu panel. • The camera menu panel may sometimes remain displayed after the setup menu of the camera is closed such as when resetting the camera, etc. In this case, select the [4] button on the camera menu panel. • Only users whose user level is allowed to control cameras or to configure the settings can configure the settings of the camera.
-
 1
1 -
2
-
3
-
4
-
5
-
6
-
7
-
8
-
9
-
10
-
11
-
12
-
13
-
14
-
15
-
16
-
17
-
18
-
19
-
20
-
21
-
22
-
23
-
24
-
25
-
26
-
27
-
28
-
29
-
30
-
31
-
32
-
33
-
34
-
35
-
36
-
37
-
38
-
39
-
40
-
41
-
42
-
43
-
44
-
45
-
46
-
47
-
48
-
49
-
50
-
51
-
52
-
53
-
54
-
55
-
56
-
57
-
58
-
59
-
60
-
61
-
62
-
63
-
64
-
 65
65 -
 66
66 -
 67
67 -
 68
68 -
 69
69 -
 70
70 -
 71
71 -
 72
72 -
 73
73 -
 74
74 -
 75
75 -
76
-
77
-
78
-
79
-
80
-
81
-
82
-
83
-
84
-
85
-
86
-
87
-
88
-
89
-
90
-
91
-
92
-
93
-
94
-
95
-
96
-
97
-
98
-
99
-
100
-
101
-
102
-
103
-
104
-
105
-
106
-
107
-
108
-
109
-
110
-
111
-
112
-
113
-
114
-
115
-
116
-
117
-
118
-
119
-
120
-
121
-
122
-
123
-
124
-
125
-
126
-
127
-
128
-
129
-
130
-
131
-
132
-
133
 |
 |