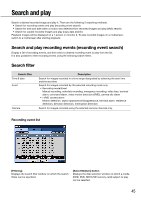
Panasonic WJ-HD716/1000 Operating Instructions - Page 47
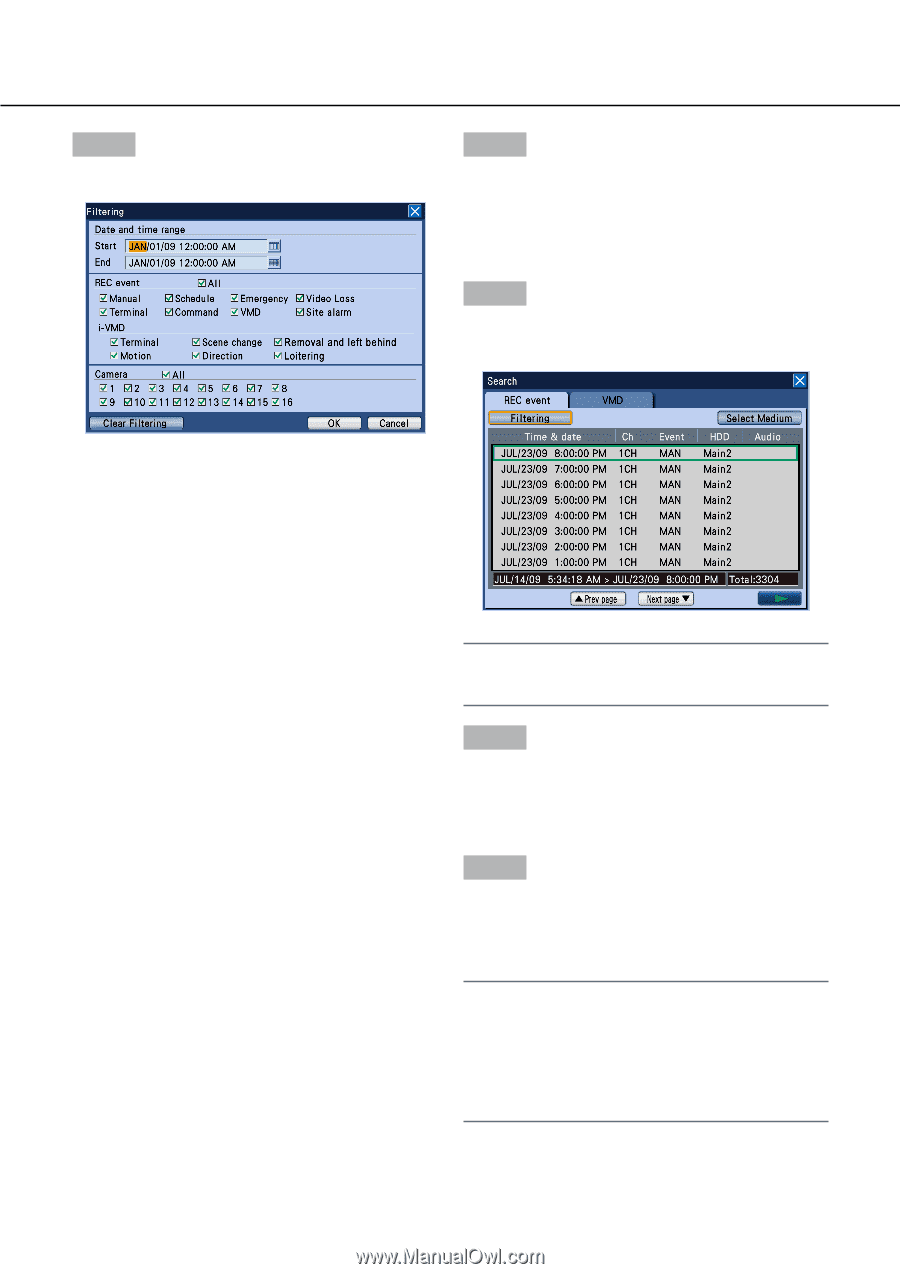
Step 3, Date and time range, REC event, Camera, Clear Filtering] button
 |
View all Panasonic WJ-HD716/1000 manuals
Add to My Manuals
Save this manual to your list of manuals |
Page 47 highlights
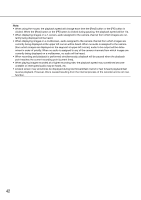
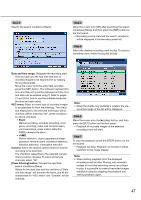
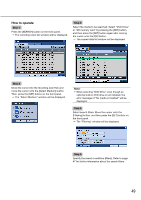
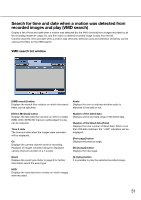
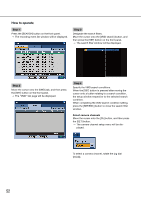
Step 3 Specify the search conditions (filters). Step 4 Move the cursor onto [OK] after specifying the search conditions (filters), and then press the [SET] button on the front panel. → Recording events matched the search conditions will be displayed in the recording event list. Step 5 Select the desired recording event to play. To select a recording event, rotate the jog dial (inside). Date and time range: Designate the recording start time and date and the end time and date of recorded images to be searched for by rotating the jog dial (inside). Move the cursor onto the entry field, and then press the [SET] button. The software keyboard (for time and date entry) will be displayed and the time and date can be entered using it. Refer to pages 21 and 25 for how to use the software keyboard (for time and date entry). REC event: Select an event type of recorded images to be searched for from the following. The checkbox respective to the selected event type will be checked. (When selecting "All", all the checkboxes will be checked.) • Event Manual recording, schedule recording, emergency recording, video loss, terminal alarm, command alarm, video motion detection (VMD), camera site alarm • i-VMD Motion detection, object appearance/disap- pearance, terminal alarm, residence detection, direction detection, interruption detection Camera: Select the desired camera channel used for recording to be searched. The checkbox respective to the selected camera channel will be checked. To select all camera channels, select "All". [Clear Filtering] button: Cancels the specified search conditions (filters). Values for the start time and the end time of "Date and time range" will become the same, and all the checkboxes for "REC event" and "Camera" will be checked. Note: • When the shuttle ring (outside) is rotated, the pre- vious/next page of the list will be displayed. Step 6 Move the cursor onto the [B] (play) button, and then press the [SET] button on the front panel. → Playback of recorded images of the selected recording event will start. Step 7 To stop the playback, press the [STOP] button on the front panel. → Playback will stop. Playback on monitor 2 will be switched to live image display. Note: • When starting playback from the displayed recording event list after filtering, only recorded images of the listed recording events are subject to play. It is possible to make all recorded images available to play by stopping the playback and starting playback again. 47
-
 1
1 -
2
-
3
-
4
-
5
-
6
-
7
-
8
-
9
-
10
-
11
-
12
-
13
-
14
-
15
-
16
-
17
-
18
-
19
-
20
-
21
-
22
-
23
-
24
-
25
-
26
-
27
-
28
-
29
-
30
-
31
-
32
-
33
-
34
-
35
-
36
-
37
-
38
-
39
-
40
-
41
-
 42
42 -
 43
43 -
 44
44 -
 45
45 -
 46
46 -
 47
47 -
 48
48 -
 49
49 -
 50
50 -
 51
51 -
 52
52 -
53
-
54
-
55
-
56
-
57
-
58
-
59
-
60
-
61
-
62
-
63
-
64
-
65
-
66
-
67
-
68
-
69
-
70
-
71
-
72
-
73
-
74
-
75
-
76
-
77
-
78
-
79
-
80
-
81
-
82
-
83
-
84
-
85
-
86
-
87
-
88
-
89
-
90
-
91
-
92
-
93
-
94
-
95
-
96
-
97
-
98
-
99
-
100
-
101
-
102
-
103
-
104
-
105
-
106
-
107
-
108
-
109
-
110
-
111
-
112
-
113
-
114
-
115
-
116
-
117
-
118
-
119
-
120
-
121
-
122
-
123
-
124
-
125
-
126
-
127
-
128
-
129
-
130
-
131
-
132
-
133
 |
 |