Panasonic WJ-HD716/1000 Operating Instructions - Page 72
Step 4, Move the cursor onto the [Delete] button, and then
 |
View all Panasonic WJ-HD716/1000 manuals
Add to My Manuals
Save this manual to your list of manuals |
Page 72 highlights
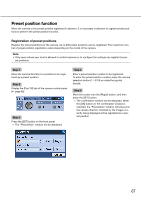
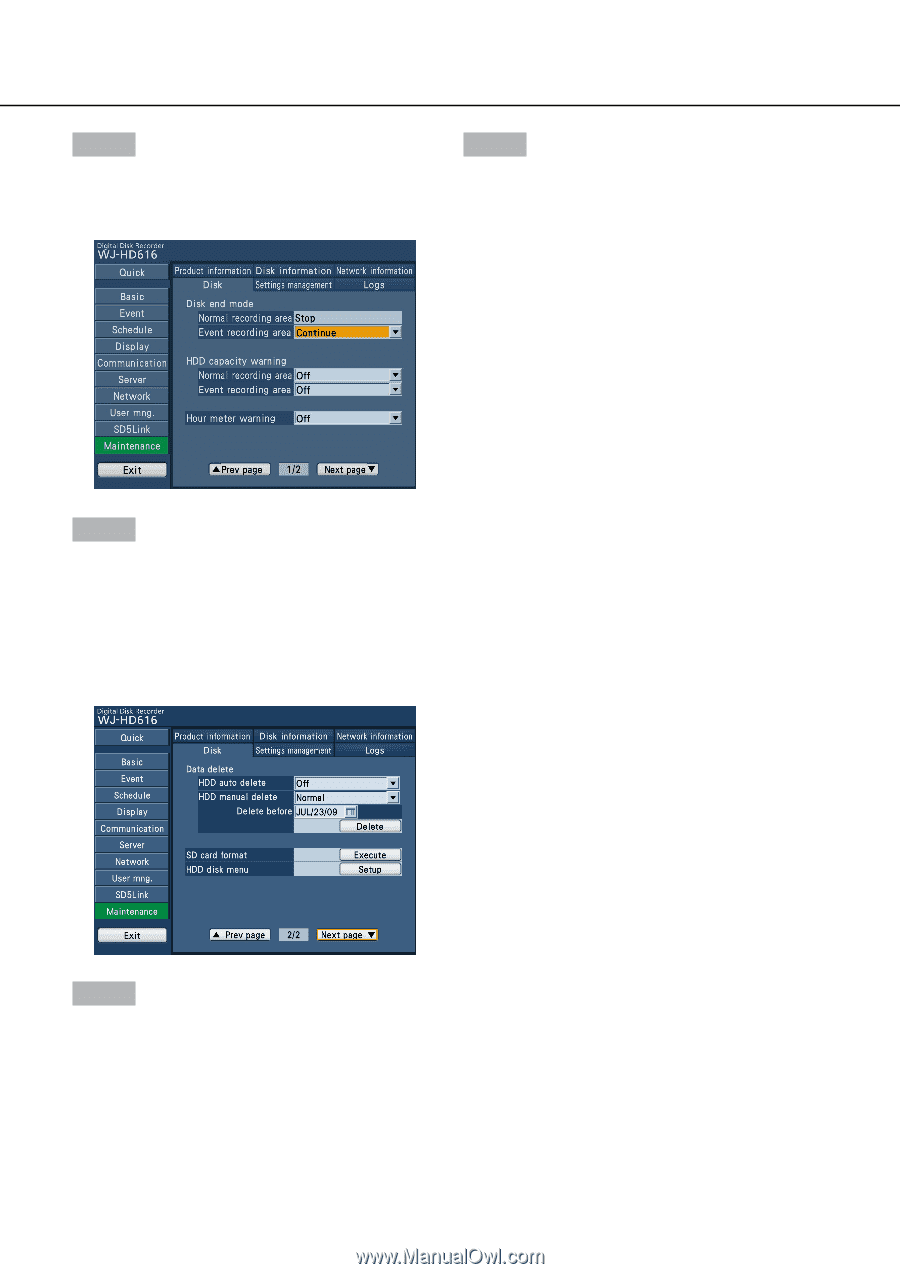
Step 4 Move the cursor onto "Disk", and then press the [SET] button. → The [Disk] tab will be displayed. Step 7 Move the cursor onto [OK], and then press the [SET] button. → Images recorded until the day before the set date will be deleted. Step 5 Move the cursor onto [Next page C], and then press the [SET] button to display the next page. Select the recording area on which data to be deleted from "Normal recording area" or "Event recording area", and then set the date by rotating the jog dial (inside). Images recorded until the day before the set date are subject to deletion. Step 6 Move the cursor onto the [Delete] button, and then press the [SET] button. → The confirmation window will be displayed. 72
-
 1
1 -
2
-
3
-
4
-
5
-
6
-
7
-
8
-
9
-
10
-
11
-
12
-
13
-
14
-
15
-
16
-
17
-
18
-
19
-
20
-
21
-
22
-
23
-
24
-
25
-
26
-
27
-
28
-
29
-
30
-
31
-
32
-
33
-
34
-
35
-
36
-
37
-
38
-
39
-
40
-
41
-
42
-
43
-
44
-
45
-
46
-
47
-
48
-
49
-
50
-
51
-
52
-
53
-
54
-
55
-
56
-
57
-
58
-
59
-
60
-
61
-
62
-
63
-
64
-
65
-
66
-
 67
67 -
 68
68 -
 69
69 -
 70
70 -
 71
71 -
 72
72 -
 73
73 -
 74
74 -
 75
75 -
 76
76 -
 77
77 -
78
-
79
-
80
-
81
-
82
-
83
-
84
-
85
-
86
-
87
-
88
-
89
-
90
-
91
-
92
-
93
-
94
-
95
-
96
-
97
-
98
-
99
-
100
-
101
-
102
-
103
-
104
-
105
-
106
-
107
-
108
-
109
-
110
-
111
-
112
-
113
-
114
-
115
-
116
-
117
-
118
-
119
-
120
-
121
-
122
-
123
-
124
-
125
-
126
-
127
-
128
-
129
-
130
-
131
-
132
-
133
 |
 |
72
Step 4
Move the cursor onto "Disk", and then press the
[SET] button.
→
The [Disk] tab will be displayed.
Step 5
Move the cursor onto [Next page
C
], and then press
the [SET] button to display the next page.
Select the recording area on which data to be deleted
from "Normal recording area" or "Event recording
area", and then set the date by rotating the jog dial
(inside). Images recorded until the day before the set
date are subject to deletion.
Step 6
Move the cursor onto the [Delete] button, and then
press the [SET] button.
→
The confirmation window will be displayed.
Step 7
Move the cursor onto [OK], and then press the [SET]
button.
→
Images recorded until the day before the set date
will be deleted.