Panasonic WJ-HD716/1000 Operating Instructions - Page 61
Step 5, Important, copy completion process ended, the completion
 |
View all Panasonic WJ-HD716/1000 manuals
Add to My Manuals
Save this manual to your list of manuals |
Page 61 highlights
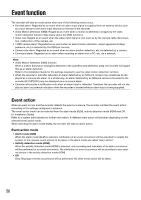
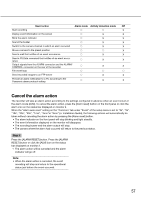
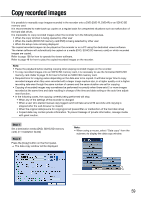
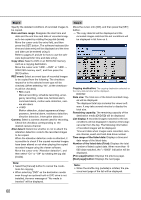
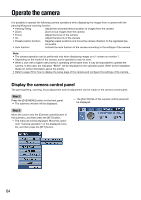
Step 5 After checking the size of the data to be copied and the remaining capacity, press the [SET] button after moving the cursor onto the [Copy] button. → The copy data list window will close. Copying will start and the [COPY] icon will be displayed on the task bar on monitor 2. When copying is complete, the [COPY] icon will disappear. Important: • Do not remove the SDHC/SD memory card during copying data onto the SDHC/SD memory card. It may damage data on the SDHC/SD memory card. • In the following cases, copying will not start even when the [SET] button is pressed after moving the cursor onto the [Copy] button. • When the end time is set earlier than the start time • Copying will be performed even when the remaining capacity of the destination media is not enough for copying. • When pressing the [COPY] button on the front panel during copying, the confirmation window for cancellation of the current copying will be displayed. It is possible to cancel the current copying on this window. Copying continues even during the confirmation window is being displayed. When the power of the recorder is turned off during copying, the media used for copying may become unusable. Step 6 When copying on a DVD, it is necessary to complete copying by removing the DVD. (When copying on an SDHC/SD memory card, it is unnecessary to take the following procedures to complete copying.) When the [Copy] button on the front panel is pressed, the "Eject media" menu will be displayed. Select "Eject media", and then press the [SET] button. Note: • It is impossible to play copied data if the copied data is finalized by the copy completion process even when copying onto a DVD is complete. • It is also possible to remove the DVD in the following procedures. • Move the cursor onto the [Search & Copy] button of the submenu. → The menu list will be displayed. • Move the cursor onto "Eject media" on the displayed menu list, and then press the [SET] button. Step 7 The DVD can be removed when the tray lock is released by pressing the button at the center of the DVD drive. 1 2 5 3 9 6 4 13 10 14 7 11 8 15 12 16 Eject button Important: • Once a DVD is used for copying and removed from the recorder, it is impossible to copy another data on it. Note: • The tray will not come out even when the eject button is pressed if the operation described in step 6 is not performed to complete copying. → The copy completion process will start. When the copy completion process ended, the completion notification window will be displayed and the DVD will become ready to remove. 61
-
 1
1 -
2
-
3
-
4
-
5
-
6
-
7
-
8
-
9
-
10
-
11
-
12
-
13
-
14
-
15
-
16
-
17
-
18
-
19
-
20
-
21
-
22
-
23
-
24
-
25
-
26
-
27
-
28
-
29
-
30
-
31
-
32
-
33
-
34
-
35
-
36
-
37
-
38
-
39
-
40
-
41
-
42
-
43
-
44
-
45
-
46
-
47
-
48
-
49
-
50
-
51
-
52
-
53
-
54
-
55
-
 56
56 -
 57
57 -
 58
58 -
 59
59 -
 60
60 -
 61
61 -
 62
62 -
 63
63 -
 64
64 -
 65
65 -
 66
66 -
67
-
68
-
69
-
70
-
71
-
72
-
73
-
74
-
75
-
76
-
77
-
78
-
79
-
80
-
81
-
82
-
83
-
84
-
85
-
86
-
87
-
88
-
89
-
90
-
91
-
92
-
93
-
94
-
95
-
96
-
97
-
98
-
99
-
100
-
101
-
102
-
103
-
104
-
105
-
106
-
107
-
108
-
109
-
110
-
111
-
112
-
113
-
114
-
115
-
116
-
117
-
118
-
119
-
120
-
121
-
122
-
123
-
124
-
125
-
126
-
127
-
128
-
129
-
130
-
131
-
132
-
133
 |
 |