Pioneer AVIC-Z110BT Owner's Manual - Page 102
Adjusting the response, positions of the touch panel, touch panel calibration
 |
UPC - 012562956404
View all Pioneer AVIC-Z110BT manuals
Add to My Manuals
Save this manual to your list of manuals |
Page 102 highlights
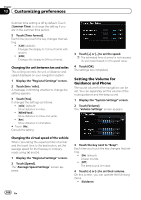
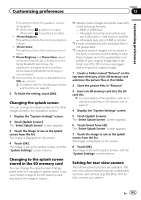
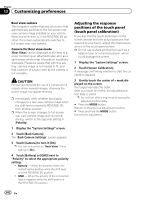
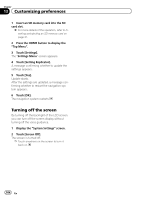
Chapter 13 Customizing preferences Rear view camera The navigation system features a function that automatically switches to the full-screen rear view camera image installed on your vehicle. When the shift lever is in the REVERSE (R) position, the screen automatically switches to full-screen rear view camera. Camera for Rear view mode [Rear View] can be displayed at all times (e.g. when monitoring an attached trailer, etc.) as a split screen where map information is partially displayed. Please be aware that with this setting, camera image is not resized to fit, and that a portion of what is seen by the camera is not viewable. CAUTION Pioneer recommends the use of a camera which outputs mirror reversed images, otherwise the screen image may appear reversed. p Immediately verify whether the display changes to a rear view camera image when the shift lever is moved to REVERSE (R) from another position. p When the screen changes to full-screen rear view camera image during normal driving, switch to the opposite setting in [Polarity]. 1 Display the "System Settings" screen. 2 Touch [Back Camera]. The "Back Camera Settings" screen appears. 3 Touch [Camera] to turn it [On]. p You can only switch to "Rear View" if this setting is [On]. 4 Touch [Battery] or [GND] next to "Polarity" to select the appropriate polarity setting. ! Battery - When the polarity of the connected lead is positive while the shift lever is in the REVERSE (R) position ! GND - When the polarity of the connected lead is negative while the shift lever is in the REVERSE (R) position Adjusting the response positions of the touch panel (touch panel calibration) If you feel that the touch panel keys on the screen deviate from the actual positions that respond to your touch, adjust the response positions of the touch panel screen. p Do not use a sharp pointed tool such as a ballpoint pen or a mechanical pen, which could damage the screen. 1 Display the "System Settings" screen. 2 Touch [Screen Calibration]. A message confirming whether to start the calibration appears. 3 Gently touch the center of + mark displayed on the screen. The target indicates the order. After you touch all marks, the adjusted position data is saved. p Do not turn off the engine while saving the adjusted position data. # Press the MODE button. Returns to the previous adjustment position. # Press and hold the MODE button. Cancels the adjustment. 102 En
-
 1
1 -
2
-
3
-
4
-
5
-
6
-
7
-
8
-
9
-
10
-
11
-
12
-
13
-
14
-
15
-
16
-
17
-
18
-
19
-
20
-
21
-
22
-
23
-
24
-
25
-
26
-
27
-
28
-
29
-
30
-
31
-
32
-
33
-
34
-
35
-
36
-
37
-
38
-
39
-
40
-
41
-
42
-
43
-
44
-
45
-
46
-
47
-
48
-
49
-
50
-
51
-
52
-
53
-
54
-
55
-
56
-
57
-
58
-
59
-
60
-
61
-
62
-
63
-
64
-
65
-
66
-
67
-
68
-
69
-
70
-
71
-
72
-
73
-
74
-
75
-
76
-
77
-
78
-
79
-
80
-
81
-
82
-
83
-
84
-
85
-
86
-
87
-
88
-
89
-
90
-
91
-
92
-
93
-
94
-
95
-
96
-
 97
97 -
 98
98 -
 99
99 -
 100
100 -
 101
101 -
 102
102 -
 103
103 -
 104
104 -
 105
105 -
 106
106 -
 107
107 -
108
-
109
-
110
-
111
-
112
-
113
-
114
-
115
-
116
-
117
-
118
-
119
-
120
-
121
-
122
-
123
-
124
-
125
-
126
-
127
-
128
-
129
-
130
-
131
-
132
-
133
-
134
-
135
-
136
-
137
-
138
-
139
-
140
-
141
-
142
-
143
-
144
-
145
-
146
-
147
-
148
-
149
-
150
-
151
-
152
-
153
-
154
-
155
-
156
-
157
-
158
-
159
-
160
-
161
-
162
-
163
-
164
-
165
-
166
-
167
-
168
-
169
-
170
-
171
-
172
-
173
-
174
-
175
-
176
-
177
-
178
-
179
-
180
-
181
-
182
-
183
-
184
-
185
-
186
-
187
-
188
-
189
-
190
-
191
-
192
-
193
-
194
-
195
-
196
-
197
-
198
-
199
-
200
-
201
-
202
-
203
-
204
-
205
-
206
-
207
-
208
-
209
-
210
-
211
-
212
-
213
-
214
-
215
-
216
 |
 |