Pioneer AVIC-Z110BT Owner's Manual - Page 30
Adjusting the LCD panel angle, Inserting and ejecting a disc, Basic operation - mute
 |
UPC - 012562956404
View all Pioneer AVIC-Z110BT manuals
Add to My Manuals
Save this manual to your list of manuals |
Page 30 highlights
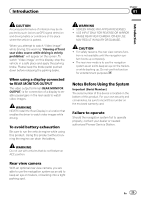
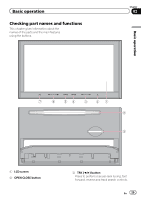
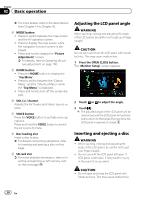
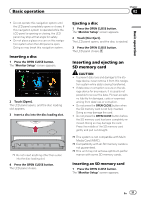
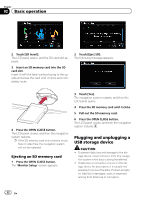
Chapter 02 Basic operation = For more details, refer to the descriptions from Chapter 14 to Chapter 30. 4 MODE button ! Press to switch between the map screen and the AV operation screen. ! Press to display the map screen while the navigation function screen is displayed. ! Press and hold to display the "Picture Adjustment" screen. = For details, refer to Operating the picture adjustment on page 160. 5 HOME button ! Press the HOME button to display the "Top Menu". ! Press to switch between the "Classic Menu" and the "Shortcut Menu" while the "Top Menu" is displayed. ! Press and hold to turn off the screen display. 6 VOL (+/-) button Adjusts the AV (Audio and Video) source volume. 7 VOICE button Press the VOICE button to activate voice operations. Press and hold the VOICE button to switch the AV source to mute. 8 Disc loading slot Insert a disc to play. = For details concerning operations, refer to Inserting and ejecting a disc on this page. 9 SD card slot = For more detailed information, refer to Inserting and ejecting an SD memory card on the next page. Adjusting the LCD panel angle WARNING When opening, closing and adjusting the angle of the LCD panel, be careful not to get your finger caught. CAUTION Do not open and close the LCD panel with hands by force. This may cause malfunction. 1 Press the OPEN CLOSE button. The "Monitor Setup" screen appears. 2 Touch or to adjust the angle. 3 Touch . p The adjusted angle of the LCD panel will be memorized and the LCD panel will automatically return to that angle the next time the LCD panel is opened or closed. Inserting and ejecting a disc WARNING ! When opening, closing and adjusting the angle of the LCD panel, be careful not to get your finger caught. ! Do not use with the LCD panel left open. If LCD panel is left open, it may result in injury in the event of an accident. CAUTION ! Do not open and close the LCD panel with hands by force. This may cause malfunction. 30 En
-
 1
1 -
2
-
3
-
4
-
5
-
6
-
7
-
8
-
9
-
10
-
11
-
12
-
13
-
14
-
15
-
16
-
17
-
18
-
19
-
20
-
21
-
22
-
23
-
24
-
 25
25 -
 26
26 -
 27
27 -
 28
28 -
 29
29 -
 30
30 -
 31
31 -
 32
32 -
 33
33 -
 34
34 -
 35
35 -
36
-
37
-
38
-
39
-
40
-
41
-
42
-
43
-
44
-
45
-
46
-
47
-
48
-
49
-
50
-
51
-
52
-
53
-
54
-
55
-
56
-
57
-
58
-
59
-
60
-
61
-
62
-
63
-
64
-
65
-
66
-
67
-
68
-
69
-
70
-
71
-
72
-
73
-
74
-
75
-
76
-
77
-
78
-
79
-
80
-
81
-
82
-
83
-
84
-
85
-
86
-
87
-
88
-
89
-
90
-
91
-
92
-
93
-
94
-
95
-
96
-
97
-
98
-
99
-
100
-
101
-
102
-
103
-
104
-
105
-
106
-
107
-
108
-
109
-
110
-
111
-
112
-
113
-
114
-
115
-
116
-
117
-
118
-
119
-
120
-
121
-
122
-
123
-
124
-
125
-
126
-
127
-
128
-
129
-
130
-
131
-
132
-
133
-
134
-
135
-
136
-
137
-
138
-
139
-
140
-
141
-
142
-
143
-
144
-
145
-
146
-
147
-
148
-
149
-
150
-
151
-
152
-
153
-
154
-
155
-
156
-
157
-
158
-
159
-
160
-
161
-
162
-
163
-
164
-
165
-
166
-
167
-
168
-
169
-
170
-
171
-
172
-
173
-
174
-
175
-
176
-
177
-
178
-
179
-
180
-
181
-
182
-
183
-
184
-
185
-
186
-
187
-
188
-
189
-
190
-
191
-
192
-
193
-
194
-
195
-
196
-
197
-
198
-
199
-
200
-
201
-
202
-
203
-
204
-
205
-
206
-
207
-
208
-
209
-
210
-
211
-
212
-
213
-
214
-
215
-
216
 |
 |