Pioneer AVIC-Z110BT Owner's Manual - Page 105
Reading the screen, Using the touch panel keys, Using the radio
 |
UPC - 012562956404
View all Pioneer AVIC-Z110BT manuals
Add to My Manuals
Save this manual to your list of manuals |
Page 105 highlights
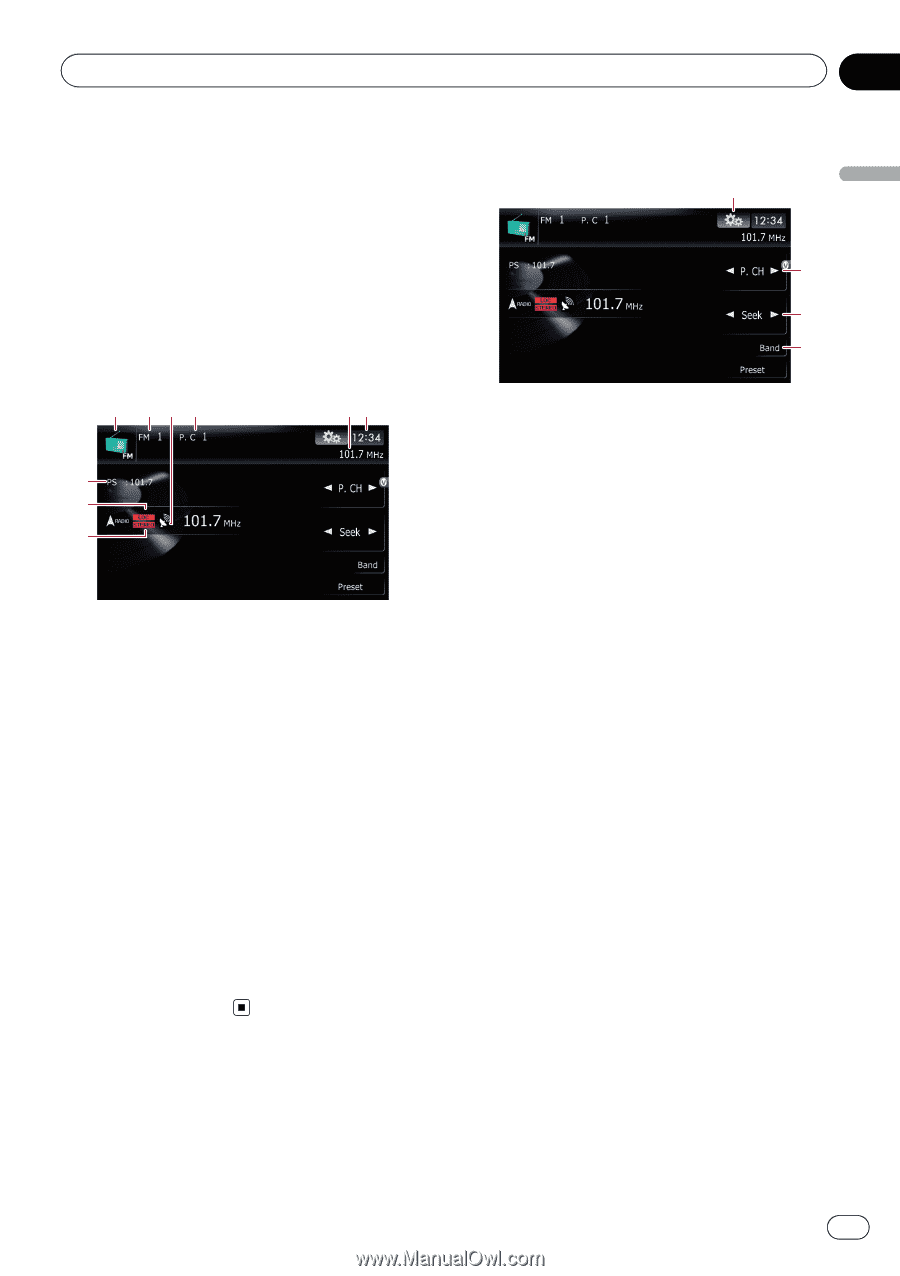
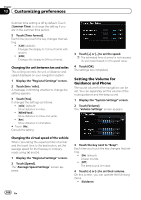
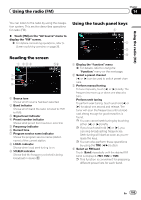
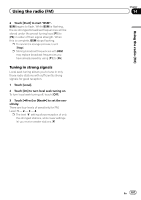
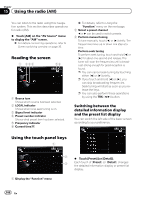
Using the radio (FM) Chapter 14 Using the radio (FM) You can listen to the radio by using the navigation system. This section describes operations for radio (FM). % Touch [FM] on the "AV Source" menu to display the "FM" screen. = For details concerning operations, refer to Screen switching overview on page 36. Reading the screen 1 23 4 56 7 8 9 1 Source icon Shows which source has been selected. 2 Band indicator Shows which band the radio is tuned to: FM1 to FM3. 3 Signal level indicator 4 Preset number indicator Shows what preset item has been selected. 5 Frequency indicator 6 Current time 7 Program service name indicator Shows the program service name (station name) of the current station. 8 LOCAL indicator Shows when local seek tuning is on. 9 STEREO indicator Shows that the frequency selected is being broadcast in stereo. Using the touch panel keys 1 2 3 4 1 Display the "Function" menu = For details, refer to Using the "Function" menu on the next page. 2 Select a preset channel [c] or [d] can be used to switch preset channels. 3 Perform manual tuning To tune manually, touch [c] or [d] briefly. The frequencies move up or down one step at a time. Perform seek tuning To perform seek tuning, touch and hold [c] or [d] for about one second and release. The tuner will scan the frequencies until a broadcast strong enough for good reception is found. p You can cancel seek tuning by touching either [c] or [d] briefly. p If you touch and hold [c] or [d], you can skip broadcasting frequencies. Seek tuning will start as soon as you release the keys. p You can also perform these operations by using the TRK (c/d) button. 4 Select an FM band Touch [Band] repeatedly until the desired FM band is displayed, FM1, FM2 or FM3. p This function is convenient for preparing different preset lists for each band. En 105
-
 1
1 -
2
-
3
-
4
-
5
-
6
-
7
-
8
-
9
-
10
-
11
-
12
-
13
-
14
-
15
-
16
-
17
-
18
-
19
-
20
-
21
-
22
-
23
-
24
-
25
-
26
-
27
-
28
-
29
-
30
-
31
-
32
-
33
-
34
-
35
-
36
-
37
-
38
-
39
-
40
-
41
-
42
-
43
-
44
-
45
-
46
-
47
-
48
-
49
-
50
-
51
-
52
-
53
-
54
-
55
-
56
-
57
-
58
-
59
-
60
-
61
-
62
-
63
-
64
-
65
-
66
-
67
-
68
-
69
-
70
-
71
-
72
-
73
-
74
-
75
-
76
-
77
-
78
-
79
-
80
-
81
-
82
-
83
-
84
-
85
-
86
-
87
-
88
-
89
-
90
-
91
-
92
-
93
-
94
-
95
-
96
-
97
-
98
-
99
-
 100
100 -
 101
101 -
 102
102 -
 103
103 -
 104
104 -
 105
105 -
 106
106 -
 107
107 -
 108
108 -
 109
109 -
 110
110 -
111
-
112
-
113
-
114
-
115
-
116
-
117
-
118
-
119
-
120
-
121
-
122
-
123
-
124
-
125
-
126
-
127
-
128
-
129
-
130
-
131
-
132
-
133
-
134
-
135
-
136
-
137
-
138
-
139
-
140
-
141
-
142
-
143
-
144
-
145
-
146
-
147
-
148
-
149
-
150
-
151
-
152
-
153
-
154
-
155
-
156
-
157
-
158
-
159
-
160
-
161
-
162
-
163
-
164
-
165
-
166
-
167
-
168
-
169
-
170
-
171
-
172
-
173
-
174
-
175
-
176
-
177
-
178
-
179
-
180
-
181
-
182
-
183
-
184
-
185
-
186
-
187
-
188
-
189
-
190
-
191
-
192
-
193
-
194
-
195
-
196
-
197
-
198
-
199
-
200
-
201
-
202
-
203
-
204
-
205
-
206
-
207
-
208
-
209
-
210
-
211
-
212
-
213
-
214
-
215
-
216
 |
 |