Samsung SGH-I997 User Manual (user Manual) (ver.f8) (English) - Page 16
Setting up your Phone, Use Google location - phones
 |
View all Samsung SGH-I997 manuals
Add to My Manuals
Save this manual to your list of manuals |
Page 16 highlights
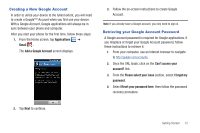
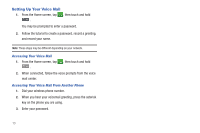
Setting up your Phone When you first turn on your phone, you will need to set up a few things. 1. The Welcome! screen of the Setup Wizard is displayed. Tap Next to continue. Note: If at any time during the Setup procedure you need to quit to make an emergency call, tap Emergency call from any of the five Setup Wizard pages. 2. At the Set up Wi-Fi screen, the available Wi-Fi networks are displayed. Tap the network you want to connect to. For more information, refer to "Wi-Fi" on page 132. 3. Tap Next. 4. At the Set up accounts screen, tap one of the following options or tap Next to continue. You can set up accounts later if you prefer. • Google account: allows you to set up a Google account. For more information, refer to "Creating a New Google Account" on page 12. • Exchange account: allows you to set up email with an exchange server. For more information, refer to "Synchronizing a Corporate Email Account" on page 97. 11 • Other email accounts: allows you to set up other email accounts such as Yahoo, Hotmail, etc. For more information, refer to "Using Email" on page 96. 5. Tap Next. 6. At the Set up Social Networks screen, tap a Social Network that you would like to connect to. Choose Facebook, Twitter, or MySpace. You can set up Social Networks later if you prefer. For more information, refer to "Synchronizing Accounts" on page 67. 7. Tap Next. 8. At the Use Google location screen, a green checkmark appears next to the text that explains that you allow Google's location service to collect anonymous location data from your phone. If you disagree, tap the checkmark to remove it. 9. Tap Finish. Note: If you do not have a network connection, the Set up accounts screen and the Set up Social Networks screen will be skipped.
-
 1
1 -
2
-
3
-
4
-
5
-
6
-
7
-
8
-
9
-
10
-
 11
11 -
 12
12 -
 13
13 -
 14
14 -
 15
15 -
 16
16 -
 17
17 -
 18
18 -
 19
19 -
 20
20 -
 21
21 -
22
-
23
-
24
-
25
-
26
-
27
-
28
-
29
-
30
-
31
-
32
-
33
-
34
-
35
-
36
-
37
-
38
-
39
-
40
-
41
-
42
-
43
-
44
-
45
-
46
-
47
-
48
-
49
-
50
-
51
-
52
-
53
-
54
-
55
-
56
-
57
-
58
-
59
-
60
-
61
-
62
-
63
-
64
-
65
-
66
-
67
-
68
-
69
-
70
-
71
-
72
-
73
-
74
-
75
-
76
-
77
-
78
-
79
-
80
-
81
-
82
-
83
-
84
-
85
-
86
-
87
-
88
-
89
-
90
-
91
-
92
-
93
-
94
-
95
-
96
-
97
-
98
-
99
-
100
-
101
-
102
-
103
-
104
-
105
-
106
-
107
-
108
-
109
-
110
-
111
-
112
-
113
-
114
-
115
-
116
-
117
-
118
-
119
-
120
-
121
-
122
-
123
-
124
-
125
-
126
-
127
-
128
-
129
-
130
-
131
-
132
-
133
-
134
-
135
-
136
-
137
-
138
-
139
-
140
-
141
-
142
-
143
-
144
-
145
-
146
-
147
-
148
-
149
-
150
-
151
-
152
-
153
-
154
-
155
-
156
-
157
-
158
-
159
-
160
-
161
-
162
-
163
-
164
-
165
-
166
-
167
-
168
-
169
-
170
-
171
-
172
-
173
-
174
-
175
-
176
-
177
-
178
-
179
-
180
-
181
-
182
-
183
-
184
-
185
-
186
-
187
-
188
-
189
-
190
-
191
-
192
-
193
-
194
-
195
-
196
-
197
-
198
-
199
-
200
-
201
-
202
-
203
-
204
-
205
 |
 |