Sharp MX-C300W Operating Guide - Page 125
The Base Screen Of Scanner Mode
 |
View all Sharp MX-C300W manuals
Add to My Manuals
Save this manual to your list of manuals |
Page 125 highlights
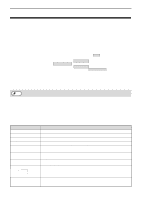
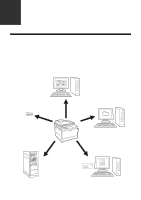
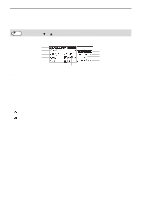
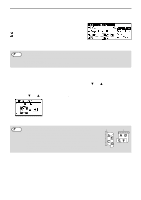
SCANNER FUNCTIONS THE BASE SCREEN OF SCANNER MODE The base screen of scan mode is displayed by pressing the [SCAN] key from the base screen of copy mode or fax mode. hz If a screen appears asking you what type of connection you are using after you press the [SCAN] key, select Note "Network" with the [ ] or [ ] key and press the [OK] key. Base screen of scan mode (1) (2) (6) (3) (7) (4) (8) (9) (1) Message display Messages appear here to indicate the current status of the machine. (2) Destination display This shows the selected destination. There are scanner transmission modes: Scan to E-mail, Scan to Network Folder, Scan to FTP, Scan to Desktop, and USB Memory Scan. This shows the currently selected destination and transmission mode. (3) Original scanning mode / Original size display Shows the currently selected original scanning mode and scanning size. : One-sided scanning in the document feeder. : Two-sided scanning in the document feeder (Models with the two-sided scanning function). None: Document glass (4) File format display This shows the image data file type and file method to be created. (5) (5) Resolution display The shows the scanning resolution. (6) Original size (p.130) This is used to set the size of the original to be transmitted. (7) Resolution (p.130) This is used to select the scanning resolution. (8) Format (p.130) This is used to select the image data file type and file method to be created. (9) Mono/Gray (p.131) Set whether an original is scanned in Mono2 or grayscale when the [BLACK & WHITE START] key is pressed. 125
-
 1
1 -
2
-
3
-
4
-
5
-
6
-
7
-
8
-
9
-
10
-
11
-
12
-
13
-
14
-
15
-
16
-
17
-
18
-
19
-
20
-
21
-
22
-
23
-
24
-
25
-
26
-
27
-
28
-
29
-
30
-
31
-
32
-
33
-
34
-
35
-
36
-
37
-
38
-
39
-
40
-
41
-
42
-
43
-
44
-
45
-
46
-
47
-
48
-
49
-
50
-
51
-
52
-
53
-
54
-
55
-
56
-
57
-
58
-
59
-
60
-
61
-
62
-
63
-
64
-
65
-
66
-
67
-
68
-
69
-
70
-
71
-
72
-
73
-
74
-
75
-
76
-
77
-
78
-
79
-
80
-
81
-
82
-
83
-
84
-
85
-
86
-
87
-
88
-
89
-
90
-
91
-
92
-
93
-
94
-
95
-
96
-
97
-
98
-
99
-
100
-
101
-
102
-
103
-
104
-
105
-
106
-
107
-
108
-
109
-
110
-
111
-
112
-
113
-
114
-
115
-
116
-
117
-
118
-
119
-
 120
120 -
 121
121 -
 122
122 -
 123
123 -
 124
124 -
 125
125 -
 126
126 -
 127
127 -
 128
128 -
 129
129 -
 130
130 -
131
-
132
-
133
-
134
-
135
-
136
-
137
-
138
-
139
-
140
-
141
-
142
-
143
-
144
-
145
-
146
-
147
-
148
-
149
-
150
-
151
-
152
-
153
-
154
-
155
-
156
-
157
-
158
-
159
-
160
-
161
-
162
-
163
-
164
-
165
-
166
-
167
-
168
-
169
-
170
-
171
-
172
-
173
-
174
-
175
-
176
-
177
-
178
-
179
-
180
-
181
-
182
-
183
-
184
-
185
-
186
-
187
-
188
-
189
-
190
-
191
-
192
-
193
-
194
-
195
-
196
-
197
-
198
-
199
-
200
-
201
-
202
-
203
-
204
-
205
-
206
-
207
-
208
-
209
-
210
 |
 |
