Sharp MX-C300W Operating Guide - Page 60
Macintosh, Windows, INCREASING THE MARGIN Margin Shift
 |
View all Sharp MX-C300W manuals
Add to My Manuals
Save this manual to your list of manuals |
Page 60 highlights
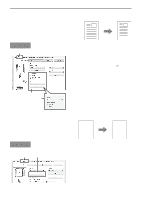
Macintosh (1) (2) PRINTER (1) Select [Printer Features]. (2) Select the "Binding Edge". (3) Select [Tiled Pamphlet] or [2-Up Pamphlet]. (3) INCREASING THE MARGIN (Margin Shift) This function is used to shift the print image to increase the margin at the left, right, or top of the paper. This is convenient when you wish to staple or punch the output but the binding area overlaps the text. Windows (1) (2) (1) Configure the settings on the [Main] tab. (2) Select the "Binding Edge". (3) Select the "Margin Shift". Select from the "Margin Shift" menu. If you wish to configure another numeric setting, select the setting from the pull-down menu and click the [Settings] button. Click the button or directly enter the number. Macintosh (1) (3) (2) (1) Select the "Printer Features". (2) Select the "Binding Edge". (3) Select the "Margin Shift". (3) 60
-
 1
1 -
2
-
3
-
4
-
5
-
6
-
7
-
8
-
9
-
10
-
11
-
12
-
13
-
14
-
15
-
16
-
17
-
18
-
19
-
20
-
21
-
22
-
23
-
24
-
25
-
26
-
27
-
28
-
29
-
30
-
31
-
32
-
33
-
34
-
35
-
36
-
37
-
38
-
39
-
40
-
41
-
42
-
43
-
44
-
45
-
46
-
47
-
48
-
49
-
50
-
51
-
52
-
53
-
54
-
 55
55 -
 56
56 -
 57
57 -
 58
58 -
 59
59 -
 60
60 -
 61
61 -
 62
62 -
 63
63 -
 64
64 -
 65
65 -
66
-
67
-
68
-
69
-
70
-
71
-
72
-
73
-
74
-
75
-
76
-
77
-
78
-
79
-
80
-
81
-
82
-
83
-
84
-
85
-
86
-
87
-
88
-
89
-
90
-
91
-
92
-
93
-
94
-
95
-
96
-
97
-
98
-
99
-
100
-
101
-
102
-
103
-
104
-
105
-
106
-
107
-
108
-
109
-
110
-
111
-
112
-
113
-
114
-
115
-
116
-
117
-
118
-
119
-
120
-
121
-
122
-
123
-
124
-
125
-
126
-
127
-
128
-
129
-
130
-
131
-
132
-
133
-
134
-
135
-
136
-
137
-
138
-
139
-
140
-
141
-
142
-
143
-
144
-
145
-
146
-
147
-
148
-
149
-
150
-
151
-
152
-
153
-
154
-
155
-
156
-
157
-
158
-
159
-
160
-
161
-
162
-
163
-
164
-
165
-
166
-
167
-
168
-
169
-
170
-
171
-
172
-
173
-
174
-
175
-
176
-
177
-
178
-
179
-
180
-
181
-
182
-
183
-
184
-
185
-
186
-
187
-
188
-
189
-
190
-
191
-
192
-
193
-
194
-
195
-
196
-
197
-
198
-
199
-
200
-
201
-
202
-
203
-
204
-
205
-
206
-
207
-
208
-
209
-
210
 |
 |
