Western Digital WDBACG0020HCH User Manual - Page 100
Setting up the Drive, Creating a MioNet Account and Registering the Drive
 |
UPC - 718037767963
View all Western Digital WDBACG0020HCH manuals
Add to My Manuals
Save this manual to your list of manuals |
Page 100 highlights
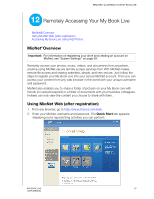
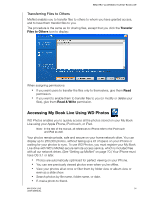
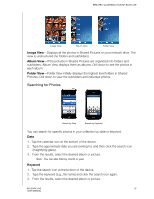
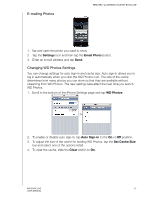
REMOTELY ACCESSING YOUR MY BOOK LIVE „ Assign a photo to a contact. „ Add a photo to the Camera Roll. Setting up the Drive 1. Make sure your WD network drive is connected to your network and turned on. 2. Load your photos (in JPEG format only) into the Shared Photos folder in the Public folder on the network drive. Creating a MioNet Account and Registering the Drive MioNet is WD's remote access service. It's included free with the My Book Live drive and enabled on your drive by default. If you have not already created a MioNet account or registered your My Book Live on MioNet, see the instructions in "Setting up MioNet" on page 70. Installing the WD Photos App 1. Using your iPhone, download WD Photos from the App Store and install it on your Apple device. 2. Launch WD Photos from your Apple device and click the Login button. 3. At the login screen, enter the MioNet Account username and password that you previously associated with your My Book Live. If you have problems installing WD Photos, please visit http://websupport.wdc.com/ rn/wdphoto.asp. Viewing Your Photos Note: With WD Photos open, tap Learn More and then Help for more information. If you still have questions, click Additional support. WD Photos finds all the JPEG images in the drive's Shared Pictures folder in the drive's Public share. Other folders, file formats, or pictures outside of the Shared Pictures folder do not display. 1. Copy or move all the pictures you want to view into the Shared Pictures folder on your WD My Book Live. Do not change the name of the folder. 2. The first time you connect to your drive, your pictures are automatically optimized for crisp, clear display on your iPhone. This process may take a few minutes to several hours depending on the number of pictures in your Shared Pictures folder. 3. Tap WD Photos on your iPhone. You can view your pictures in three ways: Image View, Album View, and Folder View. Tap the eye at the bottom of the WD Photos home screen to change views. Each time you tap, a message identifies the view you are seeing. MY BOOK LIVE 95 USER MANUAL
-
 1
1 -
2
-
3
-
4
-
5
-
6
-
7
-
8
-
9
-
10
-
11
-
12
-
13
-
14
-
15
-
16
-
17
-
18
-
19
-
20
-
21
-
22
-
23
-
24
-
25
-
26
-
27
-
28
-
29
-
30
-
31
-
32
-
33
-
34
-
35
-
36
-
37
-
38
-
39
-
40
-
41
-
42
-
43
-
44
-
45
-
46
-
47
-
48
-
49
-
50
-
51
-
52
-
53
-
54
-
55
-
56
-
57
-
58
-
59
-
60
-
61
-
62
-
63
-
64
-
65
-
66
-
67
-
68
-
69
-
70
-
71
-
72
-
73
-
74
-
75
-
76
-
77
-
78
-
79
-
80
-
81
-
82
-
83
-
84
-
85
-
86
-
87
-
88
-
89
-
90
-
91
-
92
-
93
-
94
-
 95
95 -
 96
96 -
 97
97 -
 98
98 -
 99
99 -
 100
100 -
 101
101 -
 102
102 -
 103
103 -
 104
104 -
 105
105 -
106
-
107
-
108
-
109
-
110
-
111
-
112
-
113
-
114
-
115
-
116
-
117
-
118
-
119
-
120
-
121
-
122
-
123
-
124
-
125
-
126
 |
 |