Western Digital WDBACG0020HCH User Manual - Page 26
Using Mac OS X Leopard/Snow Leopard
 |
UPC - 718037767963
View all Western Digital WDBACG0020HCH manuals
Add to My Manuals
Save this manual to your list of manuals |
Page 26 highlights
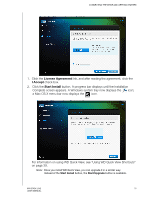
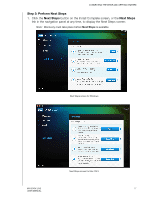
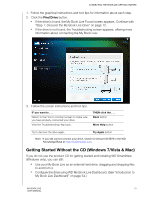
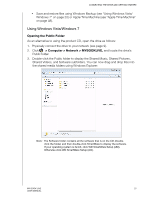
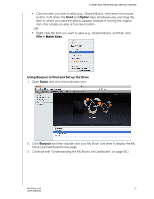
CONNECTING THE DRIVE AND GETTING STARTED Launching the My Book Live Dashboard to Set Up Your Drive To access the WD My Book Live Dashboard to set up your drive: 1. Physically connect the drive to your network (see page 9). 2. Open a browser, and enter http:/// as the address. Example: http://195.168.1.10/ or http://mybooklive/ 3. Continue with "Understanding the My Book Live Dashboard" on page 56. Using Mac OS X Leopard/Snow Leopard Using Finder to Open the Public Folder 1. In a Finder window, click MyBookLive under the shared items in the side bar. 2. If presented with an authorization screen, select Guest, and then click Connect to display the Public share: 3. Double-click the Public folder to display the media subfolders: Shared Music, Shared Pictures, and Shared Videos. You can now drag and drop files into the shared folders using Finder: Note: The Public folder icon automatically displays on the desktop. Note: The Software folder contains all the software that is on the CD. Doubleclick the folder, and then double-click the SmartWare folder to display a list of WD SmartWare and other files. Although you cannot install WD SmartWare on a Mac at this time, you may want to use the other software files. 4. If you want to make a shared drive icon permanent on your desktop, create an alias. Following are two ways to do that: Note: Before creating an alias, click Finder > Preferences and make sure Connected Servers is checked. MY BOOK LIVE 21 USER MANUAL
-
 1
1 -
2
-
3
-
4
-
5
-
6
-
7
-
8
-
9
-
10
-
11
-
12
-
13
-
14
-
15
-
16
-
17
-
18
-
19
-
20
-
 21
21 -
 22
22 -
 23
23 -
 24
24 -
 25
25 -
 26
26 -
 27
27 -
 28
28 -
 29
29 -
 30
30 -
 31
31 -
32
-
33
-
34
-
35
-
36
-
37
-
38
-
39
-
40
-
41
-
42
-
43
-
44
-
45
-
46
-
47
-
48
-
49
-
50
-
51
-
52
-
53
-
54
-
55
-
56
-
57
-
58
-
59
-
60
-
61
-
62
-
63
-
64
-
65
-
66
-
67
-
68
-
69
-
70
-
71
-
72
-
73
-
74
-
75
-
76
-
77
-
78
-
79
-
80
-
81
-
82
-
83
-
84
-
85
-
86
-
87
-
88
-
89
-
90
-
91
-
92
-
93
-
94
-
95
-
96
-
97
-
98
-
99
-
100
-
101
-
102
-
103
-
104
-
105
-
106
-
107
-
108
-
109
-
110
-
111
-
112
-
113
-
114
-
115
-
116
-
117
-
118
-
119
-
120
-
121
-
122
-
123
-
124
-
125
-
126
 |
 |
