Western Digital WDBACG0020HCH User Manual - Page 52
Backing Up Without WD SmartWare, Windows Backup
 |
UPC - 718037767963
View all Western Digital WDBACG0020HCH manuals
Add to My Manuals
Save this manual to your list of manuals |
Page 52 highlights
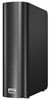
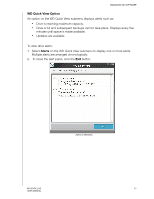
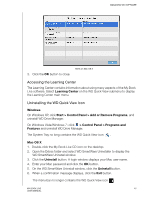
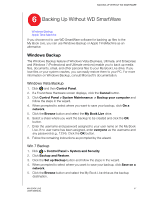
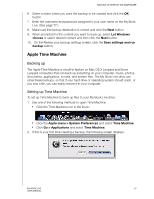
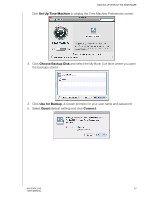
BACKING UP WITHOUT WD SMARTWARE 6 Backing Up Without WD SmartWare Windows Backup Apple Time Machine If you choose not to use WD SmartWare software for backing up files to the My Book Live, you can use Windows Backup or Apple TimeMachine as an alternative. Windows Backup The Windows Backup feature of Windows Vista (Business, Ultimate, and Enterprise) and Windows 7 (Professional and Ultimate versions) enable you to back up media files, documents, email, and other personal files to your My Book Live drive. If you lose files or your system crashes, you can easily restore them to your PC. For more information on Windows Backup, consult Microsoft's documentation. Windows Vista Backup 1. Click and then Control Panel. 2. If a Found New Hardware screen displays, click the Cancel button. 3. Click Control Panel > System Maintenance > Backup your computer and follow the steps in the wizard. 4. When prompted to select where you want to save your backup, click On a network. 5. Click the Browse button and select the My Book Live drive. 6. Select a share where you want the backup to be created and click the OK button. 7. Enter the username and password assigned to your user name on the My Book Live. If no user name has been assigned, enter everyone as the username and any password (e.g., 1234). Click the OK button. 8. Follow the remaining instructions as prompted by the wizard. Win 7 Backup 1. Click > Control Panel > System and Security. 2. Click Backup and Restore. 3. Click the Set up Backup button and follow the steps in the wizard. 4. When prompted to select where you want to save your backup, click Save on a network. 5. Click the Browse button and select the My Book Live drive as the backup destination. MY BOOK LIVE 47 USER MANUAL
-
 1
1 -
2
-
3
-
4
-
5
-
6
-
7
-
8
-
9
-
10
-
11
-
12
-
13
-
14
-
15
-
16
-
17
-
18
-
19
-
20
-
21
-
22
-
23
-
24
-
25
-
26
-
27
-
28
-
29
-
30
-
31
-
32
-
33
-
34
-
35
-
36
-
37
-
38
-
39
-
40
-
41
-
42
-
43
-
44
-
45
-
46
-
 47
47 -
 48
48 -
 49
49 -
 50
50 -
 51
51 -
 52
52 -
 53
53 -
 54
54 -
 55
55 -
 56
56 -
 57
57 -
58
-
59
-
60
-
61
-
62
-
63
-
64
-
65
-
66
-
67
-
68
-
69
-
70
-
71
-
72
-
73
-
74
-
75
-
76
-
77
-
78
-
79
-
80
-
81
-
82
-
83
-
84
-
85
-
86
-
87
-
88
-
89
-
90
-
91
-
92
-
93
-
94
-
95
-
96
-
97
-
98
-
99
-
100
-
101
-
102
-
103
-
104
-
105
-
106
-
107
-
108
-
109
-
110
-
111
-
112
-
113
-
114
-
115
-
116
-
117
-
118
-
119
-
120
-
121
-
122
-
123
-
124
-
125
-
126
 |
 |
