Adobe 25520388 User Guide - Page 180
Drag video and audio to a sequence, Video2Brain by Maxim Jago.
 |
UPC - 718659493202
View all Adobe 25520388 manuals
Add to My Manuals
Save this manual to your list of manuals |
Page 180 highlights
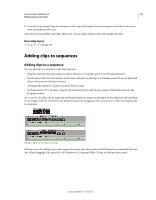
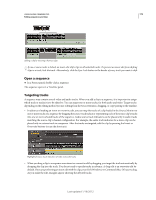
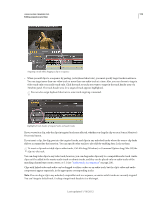
USING ADOBE PREMIERE PRO 175 Editing sequences and clips For more information about targeting and patching tracks in Premiere Pro, see this video by Learn by Video and Video2Brain by Maxim Jago. Andrew Devis shows how to use Sync Lock and track targeting in this video on the Creative COW website. Frank Rohmer provides a video tutorial on the Adobe website that explains mapping source tracks to target tracks. Drag video and audio to a sequence By default, when dropped into a sequence, the video and audio components of linked clips appear in corresponding tracks (for example, Video 1 and Audio 1), unless the audio channel type of the clip is incompatible with the target track. In this case, the linked audio appears in the next compatible track, or a compatible track is created automatically. Note: An audio clip dragged to an incompatible track automatically shifts to the next compatible track, even if the track is occupied by another audio clip. Therefore, take care not to disturb clips already in the sequence. However, you can alter this behavior by holding the Shift key while you drag. Note: For information about creating tracks that are compatible with your assets, see "Work with tracks" on page 138 and "Create a custom sequence preset" on page 147. The Program Monitor can help you determine where to position a clip you're adding to a sequence. During an overwrite edit, it displays the frames in the sequence adjacent to the new clip's head and tail. During an insert edit, it displays the frames adjacent to the insertion point. 1 (Optional) Open a clip in the Source Monitor, and mark its In and Out points. (See "Working with In and Out points" on page 183.) If you don't want to set In and Out points, you can drag the clip directly from a bin or the preview thumbnail in the Project panel. 2 To make clip edges align when you drag them, make sure that the Snap button is active in a Timeline panel. 3 Do one of the following: • To drag the video and audio portions of a clip to specific tracks, drag the clip from the Source Monitor or Project panel into a Timeline. When the video portion of the clip lies above the desired video track, press and hold Shift. Continue holding shift, and drag downward past the bar separating video and audio tracks. When the audio portion of the clip lies above the desired audio track, release the mouse and release Shift. • To drag the video portion of a clip to the Video 1 track and the audio to any audio track, drag the clip from the Source Monitor or Project panel past the line that separates the video tracks from the audio tracks. Drop the clip above the audio track where you want the audio portion to land. The video portion of the clip will remain in the Video 1 track, and the audio portion lands in the desired audio track. • To perform an overwrite edit, drag the clip from the Source Monitor or Project panel to an appropriate track in a Timeline panel at the point you want the clip to start. The destination area is highlighted, and the pointer appears with the Overwrite icon . • To perform an insert edit, Ctrl-drag (Windows) or Command-drag (Mac OS) the clip from the Source Monitor or Project panel to an appropriate track in a Timeline panel at the point you want the clip to start. The destination area is highlighted, and the pointer appears with the Insert icon . Arrows appear at the insertion point in all tracks. • To perform an insert edit and shift only target tracks, Ctrl+Alt-drag (Windows) or Command+Option-drag (Mac OS) the clip from the Source Monitor or Project panel to an appropriate track in a Timeline panel at the point you want the clip to start. The destination area is highlighted, and the pointer appears with the Insert icon . Arrows appear at the insertion point only in the tracks to which the clip is added. Last updated 1/16/2012
-
 1
1 -
2
-
3
-
4
-
5
-
6
-
7
-
8
-
9
-
10
-
11
-
12
-
13
-
14
-
15
-
16
-
17
-
18
-
19
-
20
-
21
-
22
-
23
-
24
-
25
-
26
-
27
-
28
-
29
-
30
-
31
-
32
-
33
-
34
-
35
-
36
-
37
-
38
-
39
-
40
-
41
-
42
-
43
-
44
-
45
-
46
-
47
-
48
-
49
-
50
-
51
-
52
-
53
-
54
-
55
-
56
-
57
-
58
-
59
-
60
-
61
-
62
-
63
-
64
-
65
-
66
-
67
-
68
-
69
-
70
-
71
-
72
-
73
-
74
-
75
-
76
-
77
-
78
-
79
-
80
-
81
-
82
-
83
-
84
-
85
-
86
-
87
-
88
-
89
-
90
-
91
-
92
-
93
-
94
-
95
-
96
-
97
-
98
-
99
-
100
-
101
-
102
-
103
-
104
-
105
-
106
-
107
-
108
-
109
-
110
-
111
-
112
-
113
-
114
-
115
-
116
-
117
-
118
-
119
-
120
-
121
-
122
-
123
-
124
-
125
-
126
-
127
-
128
-
129
-
130
-
131
-
132
-
133
-
134
-
135
-
136
-
137
-
138
-
139
-
140
-
141
-
142
-
143
-
144
-
145
-
146
-
147
-
148
-
149
-
150
-
151
-
152
-
153
-
154
-
155
-
156
-
157
-
158
-
159
-
160
-
161
-
162
-
163
-
164
-
165
-
166
-
167
-
168
-
169
-
170
-
171
-
172
-
173
-
174
-
 175
175 -
 176
176 -
 177
177 -
 178
178 -
 179
179 -
 180
180 -
 181
181 -
 182
182 -
 183
183 -
 184
184 -
 185
185 -
186
-
187
-
188
-
189
-
190
-
191
-
192
-
193
-
194
-
195
-
196
-
197
-
198
-
199
-
200
-
201
-
202
-
203
-
204
-
205
-
206
-
207
-
208
-
209
-
210
-
211
-
212
-
213
-
214
-
215
-
216
-
217
-
218
-
219
-
220
-
221
-
222
-
223
-
224
-
225
-
226
-
227
-
228
-
229
-
230
-
231
-
232
-
233
-
234
-
235
-
236
-
237
-
238
-
239
-
240
-
241
-
242
-
243
-
244
-
245
-
246
-
247
-
248
-
249
-
250
-
251
-
252
-
253
-
254
-
255
-
256
-
257
-
258
-
259
-
260
-
261
-
262
-
263
-
264
-
265
-
266
-
267
-
268
-
269
-
270
-
271
-
272
-
273
-
274
-
275
-
276
-
277
-
278
-
279
-
280
-
281
-
282
-
283
-
284
-
285
-
286
-
287
-
288
-
289
-
290
-
291
-
292
-
293
-
294
-
295
-
296
-
297
-
298
-
299
-
300
-
301
-
302
-
303
-
304
-
305
-
306
-
307
-
308
-
309
-
310
-
311
-
312
-
313
-
314
-
315
-
316
-
317
-
318
-
319
-
320
-
321
-
322
-
323
-
324
-
325
-
326
-
327
-
328
-
329
-
330
-
331
-
332
-
333
-
334
-
335
-
336
-
337
-
338
-
339
-
340
-
341
-
342
-
343
-
344
-
345
-
346
-
347
-
348
-
349
-
350
-
351
-
352
-
353
-
354
-
355
-
356
-
357
-
358
-
359
-
360
-
361
-
362
-
363
-
364
-
365
-
366
-
367
-
368
-
369
-
370
-
371
-
372
-
373
-
374
-
375
-
376
-
377
-
378
-
379
-
380
-
381
-
382
-
383
-
384
-
385
-
386
-
387
-
388
-
389
-
390
-
391
-
392
-
393
-
394
-
395
-
396
-
397
-
398
-
399
-
400
-
401
-
402
-
403
-
404
-
405
-
406
-
407
-
408
-
409
-
410
-
411
-
412
-
413
-
414
-
415
-
416
-
417
-
418
-
419
-
420
-
421
-
422
-
423
-
424
-
425
-
426
-
427
-
428
-
429
-
430
-
431
-
432
-
433
-
434
-
435
-
436
-
437
-
438
-
439
-
440
-
441
-
442
-
443
-
444
-
445
-
446
-
447
-
448
-
449
-
450
-
451
-
452
-
453
-
454
-
455
-
456
-
457
-
458
-
459
-
460
-
461
-
462
-
463
-
464
 |
 |