Adobe 25520388 User Guide - Page 183
Insert or Overwrite by dragging a clip to the Program panel, Make three-point and four-point edits
 |
UPC - 718659493202
View all Adobe 25520388 manuals
Add to My Manuals
Save this manual to your list of manuals |
Page 183 highlights
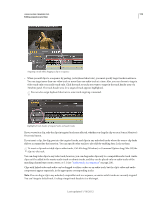
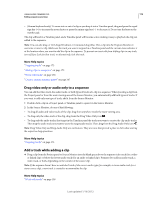
USING ADOBE PREMIERE PRO 178 Editing sequences and clips Insert or Overwrite by dragging a clip to the Program panel In Adobe Premiere Pro CS5.5 and later, you can select and drag a clip from the Project panel, Source panel, or Media Browser into the Program monitor. When doing so, an overlay appears in monitor to provide a visual depiction of Overwrite versus Insert edits. A tool tip appears to describe the modifier key used to toggle between these different types of edits. To perform an Insert or Overwrite edit by dragging a clip to the Program panel, do the following: • Drag-and-drop to overwrite edit (default drag, no modifier). • Drag-and-drop to Insert edit (hold down Cmd/Ctr key modifier). The clip, or clips that can be dragged to the Program panel can either be from the Project panel, or the Media Browser. They can be AV, video only, or audio only clips. When a clip is dragged from the Project panel or the Media Browser into the Program monitor's video display area, the Overwrite overlay appears by default when no modifier key is held down. A tool tip is displayed underneath the clip's thumbnail image, to drop (mouse release) to create an overwrite edit, and that holding down the Cmd/Ctrl key creates an insert edit instead. Multiple clips dragged to the Program monitor do not display a multiple clip stack icon. The file stack clip icon does not truly depict the number of clips being dragged. When the modifier key is held down, the overlay updates to display the Insert edit overlay. You can toggle back and forth between the Overwrite/Insert modes in the middle of the drag-and-drop action. Hold down the modifier key and the overlay displays update. Make three-point and four-point edits The Source and Program Monitors provide controls to perform three-point and four-point edits-standard techniques in traditional video editing. In a three-point edit, you mark either two In points and one Out point, or two Out points and one In point. You don't have to actively set the fourth point; it's inferred by the other three. For example, in a typical three-point edit you would specify the starting and ending frames of the source clip (the source In and Out points), and when you want the clip to begin in the sequence (the sequence In point). Where the clip ends in the sequence-the unspecified sequence Out point-is automatically determined by the three points you defined. However, any combination of three points accomplishes an edit. For example, sometimes the point where a clip ends in a sequence is more critical than where it begins. In this case, the three points include source In and Out points, and a sequence Out point. On the other hand, if you need the clip to begin and end at particular points in the sequence-say, perfectly over a line of voice-over narration-you could set two points in the sequence, and only one point in the source. Maxim Jago explains and demonstrates three-point edits in this video from "Adobe Premiere Pro CS5: Learn By Video." In a four-point edit, you mark source In and Out points and sequence In and Out points. A four-point edit is useful when the starting and ending frames in both the source clip and sequence are critical. If the marked source and sequence durations are different, Premiere Pro alerts you to the discrepancy and provides alternatives to resolve it. More Help topics "Working with In and Out points" on page 183 Make a three-point edit 1 In a Project panel, double-click a clip to open it in the Source Monitor. 2 Click the headers of the tracks in a Timeline panel into which you want to add the clip to target them. Last updated 1/16/2012
-
 1
1 -
2
-
3
-
4
-
5
-
6
-
7
-
8
-
9
-
10
-
11
-
12
-
13
-
14
-
15
-
16
-
17
-
18
-
19
-
20
-
21
-
22
-
23
-
24
-
25
-
26
-
27
-
28
-
29
-
30
-
31
-
32
-
33
-
34
-
35
-
36
-
37
-
38
-
39
-
40
-
41
-
42
-
43
-
44
-
45
-
46
-
47
-
48
-
49
-
50
-
51
-
52
-
53
-
54
-
55
-
56
-
57
-
58
-
59
-
60
-
61
-
62
-
63
-
64
-
65
-
66
-
67
-
68
-
69
-
70
-
71
-
72
-
73
-
74
-
75
-
76
-
77
-
78
-
79
-
80
-
81
-
82
-
83
-
84
-
85
-
86
-
87
-
88
-
89
-
90
-
91
-
92
-
93
-
94
-
95
-
96
-
97
-
98
-
99
-
100
-
101
-
102
-
103
-
104
-
105
-
106
-
107
-
108
-
109
-
110
-
111
-
112
-
113
-
114
-
115
-
116
-
117
-
118
-
119
-
120
-
121
-
122
-
123
-
124
-
125
-
126
-
127
-
128
-
129
-
130
-
131
-
132
-
133
-
134
-
135
-
136
-
137
-
138
-
139
-
140
-
141
-
142
-
143
-
144
-
145
-
146
-
147
-
148
-
149
-
150
-
151
-
152
-
153
-
154
-
155
-
156
-
157
-
158
-
159
-
160
-
161
-
162
-
163
-
164
-
165
-
166
-
167
-
168
-
169
-
170
-
171
-
172
-
173
-
174
-
175
-
176
-
177
-
 178
178 -
 179
179 -
 180
180 -
 181
181 -
 182
182 -
 183
183 -
 184
184 -
 185
185 -
 186
186 -
 187
187 -
 188
188 -
189
-
190
-
191
-
192
-
193
-
194
-
195
-
196
-
197
-
198
-
199
-
200
-
201
-
202
-
203
-
204
-
205
-
206
-
207
-
208
-
209
-
210
-
211
-
212
-
213
-
214
-
215
-
216
-
217
-
218
-
219
-
220
-
221
-
222
-
223
-
224
-
225
-
226
-
227
-
228
-
229
-
230
-
231
-
232
-
233
-
234
-
235
-
236
-
237
-
238
-
239
-
240
-
241
-
242
-
243
-
244
-
245
-
246
-
247
-
248
-
249
-
250
-
251
-
252
-
253
-
254
-
255
-
256
-
257
-
258
-
259
-
260
-
261
-
262
-
263
-
264
-
265
-
266
-
267
-
268
-
269
-
270
-
271
-
272
-
273
-
274
-
275
-
276
-
277
-
278
-
279
-
280
-
281
-
282
-
283
-
284
-
285
-
286
-
287
-
288
-
289
-
290
-
291
-
292
-
293
-
294
-
295
-
296
-
297
-
298
-
299
-
300
-
301
-
302
-
303
-
304
-
305
-
306
-
307
-
308
-
309
-
310
-
311
-
312
-
313
-
314
-
315
-
316
-
317
-
318
-
319
-
320
-
321
-
322
-
323
-
324
-
325
-
326
-
327
-
328
-
329
-
330
-
331
-
332
-
333
-
334
-
335
-
336
-
337
-
338
-
339
-
340
-
341
-
342
-
343
-
344
-
345
-
346
-
347
-
348
-
349
-
350
-
351
-
352
-
353
-
354
-
355
-
356
-
357
-
358
-
359
-
360
-
361
-
362
-
363
-
364
-
365
-
366
-
367
-
368
-
369
-
370
-
371
-
372
-
373
-
374
-
375
-
376
-
377
-
378
-
379
-
380
-
381
-
382
-
383
-
384
-
385
-
386
-
387
-
388
-
389
-
390
-
391
-
392
-
393
-
394
-
395
-
396
-
397
-
398
-
399
-
400
-
401
-
402
-
403
-
404
-
405
-
406
-
407
-
408
-
409
-
410
-
411
-
412
-
413
-
414
-
415
-
416
-
417
-
418
-
419
-
420
-
421
-
422
-
423
-
424
-
425
-
426
-
427
-
428
-
429
-
430
-
431
-
432
-
433
-
434
-
435
-
436
-
437
-
438
-
439
-
440
-
441
-
442
-
443
-
444
-
445
-
446
-
447
-
448
-
449
-
450
-
451
-
452
-
453
-
454
-
455
-
456
-
457
-
458
-
459
-
460
-
461
-
462
-
463
-
464
 |
 |