| Section |
Page |
| Legal notices |
2 |
| Contents |
3 |
| Chapter 1: What's new |
6 |
| What’s new (CS5.5) |
6 |
| What’s new (CS5) |
7 |
| Chapter 2: User interface |
10 |
| Workspaces |
10 |
| Import a workspace with a project |
10 |
| Customizing workspaces |
10 |
| About workspaces |
10 |
| Choose a workspace |
11 |
| Dock, group, or float panels |
11 |
| Resize panel groups |
13 |
| Open, close, and scroll to panels |
14 |
| Working with multiple monitors |
15 |
| Save, reset, or delete workspaces |
15 |
| Brighten or darken the interface |
15 |
| Working with Panels |
16 |
| Navigate the panels |
16 |
| Display any panel full-screen |
16 |
| Display panel options |
16 |
| Display context and panel menus |
16 |
| Tools panel and Options panel |
17 |
| Tools |
17 |
| Open the Options panel |
18 |
| Dock the Tools panel to the Options panel |
18 |
| Undock the Tools panel from the Options panel |
18 |
| Clip details in the Info panel |
18 |
| Preferences |
20 |
| Change preferences |
20 |
| General preferences |
20 |
| Appearance preferences |
21 |
| Audio Preferences |
21 |
| Audio Hardware preferences |
22 |
| Audio Output Mapping preferences |
22 |
| Change the Auto Save settings |
22 |
| Capture preferences |
23 |
| Device Control preferences |
23 |
| Label Colors preferences |
23 |
| Label Defaults preferences |
23 |
| Media preferences |
24 |
| Memory preferences |
24 |
| Player Settings preferences |
24 |
| Titler preferences |
25 |
| Trim preferences |
25 |
| Chapter 3: Workflows and setup |
26 |
| Basic workflow |
26 |
| Cross-platform workflow |
32 |
| Cross-application workflows |
33 |
| Edit a clip in its original application |
33 |
| Working with Photoshop and Premiere Pro |
33 |
| Create and edit Photoshop files |
35 |
| Copy between After Effects and Adobe Premiere Pro |
35 |
| Copy from After Effects to Adobe Premiere Pro |
36 |
| Results of pasting into Adobe Premiere Pro |
36 |
| Copy from Adobe Premiere Pro to After Effects |
37 |
| Results of pasting into After Effects |
37 |
| Working with Adobe Premiere Pro and Adobe Flash |
38 |
| Working with Adobe Story, Adobe OnLocation, and Adobe Premiere Pro |
38 |
| Import clips with In and Out points set in Adobe OnLocation |
39 |
| Working with Encore and Premiere Pro |
39 |
| Add Encore chapter markers |
39 |
| Send to Encore or to an MPEG-2 file |
39 |
| Working with Final Cut Pro and Adobe Premiere Pro |
40 |
| Working with Avid Media Composer and Premiere Pro |
40 |
| Adobe Dynamic Link |
41 |
| About Dynamic Link (Production Premium or Master Collection only) |
41 |
| Dynamic Link performance (Production Premium or Master Collection only) |
43 |
| Create and link to After Effects compositions with Dynamic Link (Production Premium or Master Collection only) |
43 |
| Create a composition from clips in Adobe Premiere Pro |
43 |
| Create a dynamically linked composition from Adobe Premiere Pro or Encore |
44 |
| Link to an existing composition |
44 |
| Delete a dynamically linked composition or clip (Production Premium or Master Collection only) |
44 |
| Modify a dynamically linked composition in After Effects (Production Premium or Master Collection only) |
45 |
| Create an After Effects composition from clips in Premiere Pro (Production Premium only) |
45 |
| Offline compositions and Dynamic Link (Production Premium or Master Collection only) |
45 |
| Take a dynamically linked composition offline |
46 |
| Relink a dynamically linked composition |
46 |
| Setting up your system |
46 |
| Premiere Pro trial versions |
47 |
| Set up a DV or HDV system |
47 |
| Set up an SD-SDI, HD-SDI, or component system |
48 |
| Set up a file-based system |
49 |
| Set up an S-Video or composite system |
50 |
| Specify the default audio device |
51 |
| Audio Hardware Settings (Windows only) |
51 |
| Set up a USB microphone (Mac OS) |
51 |
| Specify ASIO device settings (Windows only) |
52 |
| Specify whether to render audio when rendering video |
52 |
| Specify the duration for preroll and postroll pauses |
52 |
| Specify scratch disks to improve system performance |
52 |
| Specify scratch disks |
53 |
| Optimizing scratch disk performance |
54 |
| Online resources for improving system performance |
54 |
| Move or clean the Media Cache Database |
54 |
| Optimize rendering for available memory |
55 |
| Chapter 4: Project setup |
56 |
| Creating and changing projects |
56 |
| Create a project |
57 |
| Review project settings |
57 |
| Project Settings dialog box |
57 |
| Open a project |
58 |
| Delete a project file |
59 |
| Moving a project to another computer |
59 |
| Archiving projects |
59 |
| Trim or copy your project |
60 |
| Chapter 5: Importing, transferring, capturing, and digitizing |
63 |
| Transferring and importing files |
63 |
| File formats supported for import |
63 |
| About transferring files |
66 |
| About importing files |
67 |
| Import files with the Media Browser |
68 |
| Import files with the Import commands |
69 |
| Import files using Adobe Bridge |
69 |
| Start Adobe Bridge from Adobe Premiere Pro |
69 |
| Import files from Adobe Bridge |
69 |
| Channel support |
70 |
| Importing assets from tapeless formats |
70 |
| Import assets from file-based sources with Media Browser |
71 |
| About spanned clips |
72 |
| Importing still images |
72 |
| Preparing still images before importing |
73 |
| Importing Photoshop and Illustrator files |
73 |
| Import a layered Photoshop file |
74 |
| Importing Illustrator images |
74 |
| Import numbered still-image sequences as video clips |
75 |
| Importing digital audio |
75 |
| Using audio from audio CDs |
75 |
| Using compressed audio formats |
75 |
| Using audio from Adobe Soundbooth |
76 |
| Audio sample rates supported |
76 |
| Conforming audio |
76 |
| Importing sequences, clip lists, libraries, and compositions |
77 |
| Import clips from Adobe OnLocation projects using the Media Browser |
77 |
| Importing earlier Premiere Pro projects |
78 |
| Import selected sequences from Premiere Pro projects |
78 |
| Import a Premiere Elements project (Windows only) |
78 |
| Importing libraries (Windows only) |
78 |
| Importing After Effects compositions |
79 |
| Import After Effects compositions |
79 |
| Import CMX3600 EDL projects |
79 |
| Importing XML project files from Final Cut Pro |
79 |
| Import an XML file from Final Cut Pro |
80 |
| Final Cut Pro clip data |
80 |
| Final Cut Pro effects and transitions |
80 |
| Conversion of Final Cut Pro video effects |
81 |
| Conversion of Final Cut Pro video transitions |
81 |
| Conversion of Final Cut Pro audio effects |
81 |
| Conversion of Final Cut Pro audio transitions |
82 |
| Final Cut Pro composite modes |
82 |
| Final Cut Pro Multiclips |
82 |
| Capturing and digitizing |
83 |
| About capturing and digitizing |
83 |
| System requirements for capturing |
83 |
| Set capture format, preferences, and tracks |
84 |
| Specify capture settings |
85 |
| Set capture preferences |
85 |
| Select tracks for capture |
85 |
| Capture from stereo sources to mono tracks |
85 |
| File size limits |
85 |
| Set up device control |
86 |
| Disable device control |
89 |
| Capture without device control |
89 |
| Capture with device control |
89 |
| Capture an entire tape or portion of a tape |
90 |
| Select and capture a clip |
90 |
| Determine whether your device is online |
91 |
| Log clips with automatic scene detection |
91 |
| Common capture issues |
92 |
| Capturing DV or HDV video |
93 |
| Capturing HD video |
93 |
| Create clips for offline editing |
94 |
| Create low-resolution clips for offline editing |
94 |
| Replace low-resolution clips with high-resolution clips for online editing |
95 |
| Digitizing analog video |
95 |
| About capture card settings |
95 |
| Digitize analog video |
96 |
| Capturing content for DVD |
96 |
| Batch capturing and recapturing |
97 |
| About logging clips |
97 |
| Log clips for batch capturing |
97 |
| Log clips interactively |
98 |
| Tips for logging clips interactively |
98 |
| About batch capturing |
99 |
| Choosing batch-capture settings |
100 |
| Determine whether an offline clip has capture settings |
100 |
| Change capture settings for an offline clip |
100 |
| Remove capture settings from an offline clip |
100 |
| Batch capture clips |
101 |
| Troubleshooting batch capturing |
101 |
| Import and export batch lists |
102 |
| Recapture clips |
102 |
| Working with timecode |
103 |
| About timecode |
103 |
| Choose timecode display format |
103 |
| Change how timecode is displayed |
104 |
| Stripe tape or replace timecode |
104 |
| Stripe a tape with timecode |
104 |
| Replace DV timecode |
105 |
| Capturing timecode |
105 |
| Set timecode manually for a clip |
105 |
| Enter timecode |
106 |
| View timecode as a burn-in |
106 |
| View clip timecode as a burn-in |
106 |
| View sequence timecode as a burn-in |
106 |
| View source timecode in the Program Monitor |
107 |
| Chapter 6: Managing assets |
108 |
| Customizing the Project panel |
108 |
| Change Project panel views |
108 |
| Customize List view columns |
109 |
| Edit the display of columns in the Project panels |
109 |
| Rearrange columns |
109 |
| Change the width of a column |
109 |
| Sort by a column |
109 |
| Add a column |
109 |
| List view columns |
109 |
| Select format for timecode display in the Project panel |
110 |
| Organizing assets in the Project panel |
111 |
| Work with bins |
111 |
| Change bin behaviors |
112 |
| Label assets |
112 |
| Rename assets |
113 |
| Rename a clip |
113 |
| Rename an original source file |
113 |
| Jump to an asset in the Project panel |
113 |
| Find assets in the Project panel |
113 |
| Find assets matching criteria |
114 |
| Finding clips with Face Detection |
114 |
| Identify clips containing faces |
114 |
| Find clips containing faces |
115 |
| Remove assets from a project |
115 |
| Remove an asset from the Project panel |
115 |
| Remove unused assets from the Project panel |
115 |
| Define a different thumbnail for a clip |
115 |
| Edit cells in the Project panel |
116 |
| Viewing clip properties |
116 |
| View the properties of a clip |
116 |
| Change the frame rate of a clip |
117 |
| Managing metadata |
117 |
| About the Metadata panel and XMP |
117 |
| About schemas and properties |
118 |
| About the XMP standard |
118 |
| About the Metadata panel in Premiere Pro |
118 |
| About file, clip, and project XMP metadata |
119 |
| Using clip metadata and file metadata |
119 |
| Edit XMP metadata |
120 |
| Search XMP metadata |
120 |
| Show or hide XMP metadata |
121 |
| Save, switch, or delete metadata sets |
121 |
| Create schemas and properties |
121 |
| View clip data in the Metadata panel |
121 |
| Link clip data to XMP metadata |
122 |
| Working with aspect ratios |
122 |
| About aspect ratios |
122 |
| Using assets with various aspect ratios |
124 |
| Fix aspect ratio distortion |
125 |
| Correct individual aspect ratio misinterpretations |
125 |
| Correct recurring aspect ratio misinterpretations |
126 |
| Common pixel aspect ratios |
126 |
| Chapter 7: Monitoring assets |
127 |
| Using the Source Monitor and Program Monitor |
127 |
| Source Monitor and Program Monitor overview |
127 |
| Setting display quality for the Source and Program Monitors |
127 |
| Change magnification |
128 |
| Open or clear a clip in the Source Monitor |
128 |
| Navigate clips in the Source Monitor |
129 |
| Using the Source Monitor and Program Monitor time controls |
129 |
| View safe zones in the monitors |
130 |
| Choose fields in the Source and Program Monitors |
131 |
| Choose a display mode |
131 |
| Playing assets |
132 |
| Play video in the Source Monitor and Program Monitor |
132 |
| Play a sequence or clip with preroll and postroll pauses |
132 |
| Jog or shuttle playback |
133 |
| Move to a different frame in the Source Monitor and Program Monitor |
133 |
| Using the J, K, and L keys to shuttle video |
134 |
| Match a frame with its source |
134 |
| Using the Waveform monitors and vectorscope |
134 |
| View a scope |
135 |
| Vectorscope |
136 |
| YC Waveform |
136 |
| YCbCr Parade |
137 |
| RGB Parade |
138 |
| Using the Reference Monitor |
138 |
| Open a Reference Monitor |
139 |
| Gang the Reference Monitor and Program Monitor |
139 |
| Chapter 8: Editing sequences and clips |
140 |
| Creating and changing sequences |
140 |
| Timeline panels |
141 |
| Open additional Timeline panels |
141 |
| Open a sequence in a Timeline panel |
141 |
| Navigate in a sequence |
141 |
| Position the current-time indicator in a Timeline panel |
142 |
| Move the current-time indicator using timecode |
143 |
| Snap to clip edges and markers |
143 |
| Zoom into or out of a sequence in a Timeline panel |
143 |
| Scroll through a sequence in a Timeline panel |
143 |
| Work with tracks |
143 |
| Add tracks |
144 |
| Delete tracks |
144 |
| Rename a track |
144 |
| Specify the tracks to change with Sync Lock |
144 |
| Prevent changes with Track Lock |
145 |
| Exclude tracks in a sequence |
145 |
| Set track display |
146 |
| Expand and resize a track |
146 |
| Set the display style of the video track |
146 |
| Set the default keyframe display of video tracks |
146 |
| Set the default keyframe display of audio tracks |
146 |
| Set the display style of the audio track |
146 |
| Resize the track header section |
147 |
| Adjust visible area of video and audio tracks |
147 |
| Create a sequence |
147 |
| Sequence presets and settings |
148 |
| Selecting a sequence preset |
152 |
| Create a custom sequence preset |
152 |
| Change sequence settings |
153 |
| Change sequence preview resolution settings |
153 |
| Create a widescreen sequence |
153 |
| Create an HDV or HD sequence |
154 |
| Create a sequence with uncompressed video playback |
155 |
| Create a sequence for RED camera footage |
155 |
| 24p sequences |
156 |
| About 24p footage and sequences |
156 |
| About 3:2 and 24pA pulldown |
156 |
| Create a 24p sequence |
157 |
| Set 24p playback options |
157 |
| Disable 24p pulldown to simulate film-video transfer |
158 |
| Display 24p source timecode |
158 |
| Start a mobile device sequence |
159 |
| Using multiple sequences |
159 |
| Nest sequences |
159 |
| Nest a sequence in another sequence |
160 |
| Create a nested sequence from a selection of clips |
160 |
| Open the source of a nested sequence |
161 |
| Reveal a source frame from a nested sequence |
161 |
| Attach closed caption files (CS5.5 and later) |
161 |
| Editing multi-camera sequences |
162 |
| About multi-camera editing |
162 |
| About the Multi-Camera Monitor |
163 |
| Display the Multi-Camera Monitor |
163 |
| Add clips for multi-camera editing |
163 |
| Synchronize clips with markers |
163 |
| Create a multi-camera target sequence |
164 |
| Record multi-camera edits |
164 |
| Play nested multi-camera clips in the Program Monitor |
165 |
| Play clips in the Multi-Camera Monitor |
165 |
| Rerecord multi-camera edits |
165 |
| Adjust multi-camera edits in a Timeline panel |
165 |
| Insert or overwrite clips in a multi-camera sequence |
166 |
| Creating and playing clips |
166 |
| Source clips, clip instances, subclips, and duplicate clips |
166 |
| Duplicate a clip |
167 |
| Creating subclips |
167 |
| Create a subclip from the Project panel |
167 |
| Create a subclip from a Timeline panel |
168 |
| Adjust media start and end times of a subclip |
168 |
| Convert a subclip to a master clip |
168 |
| Play back a clip in the Project panel |
168 |
| Synchronizing audio and video with Merge Clips (CS5.5 and later) |
169 |
| Merge clips in the Project panel |
169 |
| Merge clips in the Timeline panel |
170 |
| Synchronize clips in the Timeline panel |
170 |
| Editing with merged clips |
170 |
| Editing merged clips with gaps into the Timeline |
171 |
| Trimming merged clips |
171 |
| Merged clips and the Metadata panel |
171 |
| Merged Clips limitations |
171 |
| Working with offline clips |
172 |
| Create an offline clip |
172 |
| Edit an offline clip |
173 |
| Relink an offline clip |
173 |
| Convert an online clip to an offline clip |
174 |
| Modifying clip properties with Interpret Footage |
174 |
| Interpret footage |
174 |
| Creating special clips (synthetics) |
175 |
| Create a counting leader (Windows only) |
175 |
| Create color bars and a 1-kHz tone |
175 |
| Create black video |
176 |
| Create a color matte |
176 |
| Create a transparent video clip |
176 |
| Adding clips to sequences |
177 |
| Adding clips to a sequence |
177 |
| Open a sequence |
178 |
| Targeting tracks |
178 |
| Drag video and audio to a sequence |
180 |
| Drag video only or audio only to a sequence |
181 |
| Add a track while adding a clip |
181 |
| Insert a clip into a sequence |
182 |
| Overwrite a clip into a sequence |
182 |
| Insert or Overwrite by dragging a clip to the Program panel |
183 |
| Make three-point and four-point edits |
183 |
| Make a three-point edit |
183 |
| Make a four-point edit |
184 |
| Add clips to a sequence automatically |
184 |
| Mixing clip types in a sequence |
185 |
| Replace one clip with another in a Timeline |
186 |
| Replace the source footage for a clip |
186 |
| Set or remove sequence In and Out points |
187 |
| Set sequence In and Out points |
187 |
| Set sequence In and Out points around a selection |
187 |
| Remove sequence In and Out points |
187 |
| Set sequence start time |
187 |
| Trimming clips |
187 |
| Working with In and Out points |
188 |
| Scrub the waveform in the Source Monitor |
188 |
| Zoom in or out on a waveform in the Source Monitor |
188 |
| Return to default vertical zoom level |
189 |
| Return to previous vertical zoom level |
189 |
| Trim in the Source Monitor |
189 |
| Open a clip in the Source Monitor |
189 |
| Select a clip to view in the Source Monitor |
189 |
| Set In points and Out points in the Source Monitor |
189 |
| Move In point and Out point together |
189 |
| View In and Out frames in the Source Monitor |
190 |
| Cue to an In point or Out point |
190 |
| Remove source clip In point or Out point |
190 |
| Trim with Trim-in and Trim-out tools |
191 |
| Trim with the current-time indicator |
191 |
| Set keyboard commands to trim with the current-time indicator |
191 |
| Set In and Out Points with the current-time indicator |
192 |
| Trim with Speech Analysis |
192 |
| Making rolling and ripple edits |
192 |
| About rolling and ripple edits |
192 |
| Make a rolling edit using the Rolling Edit tool |
193 |
| Make a rolling edit using the Trim Monitor |
194 |
| Make rolling edits with the current-time indicator |
194 |
| Make a ripple edit using the Ripple Edit tool |
195 |
| Make a ripple edit using the Trim Monitor |
196 |
| Make slip and slide edits |
196 |
| Make a slip edit |
197 |
| Make a slide edit |
197 |
| Making split edits |
198 |
| Work in the Trim Monitor |
198 |
| Open or close the Trim Monitor |
198 |
| Display the edit point you want to trim |
198 |
| Preview the edit in the Trim Monitor |
198 |
| Cancel an edit |
198 |
| Set trim preferences |
199 |
| Working with clips in a sequence |
199 |
| Find a clip in any sequence with Clip Usage |
199 |
| View the source of a sequence clip in the Project panel |
199 |
| Analyze speech for text XMP metadata |
199 |
| Analyze speech to create text metadata |
200 |
| Navigate to a specific word in speech metadata |
201 |
| Edit speech metadata |
201 |
| Copy text from speech metadata to the clipboard for use in a text editor |
201 |
| Improve speech analysis with reference scripts |
201 |
| Improve speech analysis with Adobe Story scripts (CS5.5 and later) |
202 |
| Select one or more clips |
202 |
| Enable or disable a clip |
203 |
| Group clips |
203 |
| Snap clips |
204 |
| Enable and disable the snap feature |
204 |
| Snap a clip to a clip edge, marker, or current-time indicator |
204 |
| Rearranging clips in a sequence |
204 |
| Move clips |
204 |
| Move clips in a Timeline panel |
205 |
| Move clips using the keypad |
205 |
| Move clips to a different track |
206 |
| Rearrange clips in a Timeline panel |
206 |
| Split or cut one or more clips with the Razor tool |
206 |
| Remove clips from a sequence |
206 |
| Lift and paste frames |
206 |
| Extract and paste frames |
207 |
| Delete clips and close gaps simultaneously |
207 |
| Delete gaps between clips |
208 |
| Find gaps in sequences and tracks |
208 |
| Copy and paste at the current-time indicator |
208 |
| Delete all clips on one track |
209 |
| Rendering and previewing sequences |
209 |
| Define the work area for rendering |
210 |
| Render a preview file for a section of a sequence |
211 |
| Render audio when rendering video |
211 |
| Work with preview files |
211 |
| Use preview files when rendering |
212 |
| Delete preview files |
212 |
| Play a sequence from start to finish |
212 |
| Scroll a sequence during preview |
212 |
| Previewing on a television monitor |
212 |
| Previewing on a television monitor via video card |
212 |
| Preview on a television monitor via camcorder or deck |
213 |
| Ensure that Adobe video applications use the same cached files |
213 |
| Correcting mistakes |
214 |
| Correct mistakes |
214 |
| History panel |
214 |
| Remove alerts with the Events panel |
215 |
| Working with markers |
215 |
| Add markers |
215 |
| Add an unnumbered clip marker |
216 |
| Add an unnumbered sequence marker |
216 |
| Add a numbered marker |
217 |
| Create markers in the Effect Controls panel |
217 |
| Find, move, and delete markers |
217 |
| Go to a clip marker in the Source Monitor |
217 |
| Go to a clip or sequence marker in a Timeline panel |
217 |
| Move a marker |
217 |
| Delete a marker |
218 |
| Add comments, chapters, and links to sequence markers |
218 |
| Read marker comments in tool tips |
219 |
| Sharing markers with After Effects, Encore, and Flash |
219 |
| Add Encore chapter markers |
220 |
| Chapter 9: Editing Audio |
221 |
| Overview of audio and the Audio Mixer |
221 |
| Audio tracks in a sequence |
221 |
| Channels in audio clips |
222 |
| Mixing audio tracks and clips |
222 |
| Processing order for audio |
222 |
| Making quick audio adjustments |
223 |
| View audio data |
223 |
| View audio clips |
224 |
| View time in audio time units |
224 |
| Audio Mixer overview |
224 |
| Modify the Audio Mixer |
225 |
| Monitor specific tracks in the Audio Mixer |
225 |
| Open the Audio Master Meters panel |
226 |
| Customize a VST effect in an options window |
226 |
| Working with clips, channels, and tracks |
226 |
| Mapping source and output audio channels |
226 |
| Map source audio channels on import |
226 |
| Change the source audio channel mapping for one or more clips |
227 |
| Map P2 clip audio for export to P2 |
227 |
| Map sequence audio channels to audio output device hardware channels |
228 |
| Audio channel icons |
228 |
| Extract audio from clips |
229 |
| Render and replace audio |
229 |
| Break a stereo track into mono tracks |
229 |
| Break all stereo tracks into mono tracks |
230 |
| Use a mono clip as stereo |
230 |
| Placing sound from one channel of a stereo clip into both channels |
230 |
| Linking multiple audio clips |
230 |
| Link audio clips |
232 |
| Edit a multi-clip link in the Source Monitor |
232 |
| Editing audio in a Timeline panel |
232 |
| Set sample-based audio In and Out points |
232 |
| Switch a time ruler to audio units in the Source or Program Monitor |
233 |
| Navigate audio in sample view |
233 |
| Trim audio in sample view in a Timeline panel |
233 |
| Link and unlink video and audio clips |
234 |
| Link or unlink video and audio |
234 |
| Edit tracks of linked clips individually |
234 |
| Automatically synchronize clips that were moved out of sync |
235 |
| Create split edits |
235 |
| Create a split edit |
235 |
| Set source In and Out points for a split edit |
236 |
| Recording audio |
236 |
| Capturing analog audio |
236 |
| Set the location for captured audio |
237 |
| Preparing the audio input channel for recording |
237 |
| Record audio from a microphone or another analog source |
237 |
| Mute input during recording |
239 |
| Adjusting volume levels |
239 |
| Monitor volume level from Timeline, or Program Monitor |
239 |
| Monitor volume level while capturing |
239 |
| Specify whether to play audio while scrubbing |
239 |
| Adjusting gain and volume |
240 |
| Normalize one or more clips |
240 |
| Normalize the Master track |
241 |
| Adjust volume with keyframes |
242 |
| Changing volume over time with keyframes |
242 |
| Apply a volume level to several clips |
243 |
| Adjust volume in Effect Controls |
243 |
| Set track volume in the Audio Mixer |
243 |
| Mute a track in the Audio Mixer |
243 |
| Mix tracks in the Audio Mixer |
244 |
| Recording audio mixes |
244 |
| Record changes to sound tracks |
245 |
| Preserve a track property while recording an audio mix |
245 |
| Audio Mixer automation modes |
245 |
| Set Automatch Time for Touch mode and Read mode |
246 |
| Specify automated keyframe creation |
247 |
| Panning and balancing |
247 |
| Panning and balancing in the Audio Mixer |
248 |
| Pan or balance a stereo track |
249 |
| Pan or balance a 5.1 surround track |
249 |
| Pan or balance a 16-channel track |
249 |
| Pan or balance a track in a Timeline panel |
250 |
| Advanced mixing |
250 |
| Work with submixes |
250 |
| Create a submix in a Timeline panel |
250 |
| Simultaneously create a submix and assign a send |
250 |
| Route a track’s output to a submix |
251 |
| Route tracks with sends |
251 |
| Send a track to a submix |
251 |
| Edit Send settings |
252 |
| Work with sends |
252 |
| Downmixing to fewer channels |
253 |
| Change 5.1 audio to stereo or mono |
253 |
| Routing track output |
253 |
| Route or turn off track output |
253 |
| Editing audio in Adobe Soundbooth |
254 |
| Edit audio in Adobe Soundbooth |
254 |
| Undoing edits made in Adobe Soundbooth |
254 |
| Editing and mixing audio in Adobe Audition |
255 |
| Edit audio in Adobe Audition (CS5.5) |
255 |
| Export sequence tracks to Adobe Audition (CS5.5) |
255 |
| Editing audio clips in Adobe Audition (CS5.5) |
256 |
| Export a multitrack mix to Adobe Premiere Pro |
256 |
| Chapter 10: Titling and the Titler |
257 |
| Creating and editing titles |
257 |
| Create new titles |
257 |
| Create a title |
257 |
| Create a title based on the current title |
257 |
| Open, import, or export a title |
258 |
| Open a title for editing |
258 |
| Import a title file |
258 |
| Export a title as an independent file |
258 |
| About safe margins in the Titler |
258 |
| Choose, create, and import title templates |
258 |
| Load a template for a new title |
259 |
| Import a saved title file as a template |
259 |
| Set or restore a default template |
259 |
| Rename or delete a template |
259 |
| Create a template from an open title |
259 |
| Import a title template from Resource Central |
260 |
| Show video behind the title |
260 |
| Creating and formatting text in titles |
260 |
| Enter text in titles |
260 |
| Type text without boundaries |
261 |
| Wrap text automatically |
261 |
| Type horizontal or vertical text in a text box |
261 |
| Type text along a path |
262 |
| Edit and select text |
262 |
| Format text in titles |
262 |
| Specify a font |
262 |
| Change the letters that appear in the Font Browser |
262 |
| Change the font size |
263 |
| Change text orientation |
263 |
| Specify text properties |
263 |
| Work with paragraph text |
264 |
| Change paragraph justification |
264 |
| Reflow paragraph text |
264 |
| Create tab stops in titles |
264 |
| Set and adjust a tab stop |
264 |
| Delete a tab stop |
265 |
| Drawing shapes in titles |
265 |
| Create shapes |
265 |
| Change the shape of a graphic object or a logo |
265 |
| Draw straight segments with Pen Tool |
266 |
| Draw curves with Pen Tool |
266 |
| Adjust object anchor points and curves |
267 |
| Add an object anchor point to a path |
267 |
| Delete an object anchor point |
267 |
| Adjust an object anchor point |
268 |
| Convert object anchor points from one type to another |
268 |
| Change the curve of a segment |
268 |
| Set options for open and closed Bezier shapes |
268 |
| Add images to titles |
269 |
| Place a logo in a title |
269 |
| Place a logo in a text box |
269 |
| Return a logo to its original size or aspect ratio |
269 |
| Working with text and objects in titles |
269 |
| Change the stacking order of objects in titles |
269 |
| Align and distribute objects in titles |
270 |
| Center objects in titles |
270 |
| Align objects in titles |
270 |
| Distribute objects in titles |
270 |
| Transform objects in titles |
271 |
| Adjust an object’s opacity |
271 |
| Adjust the position of objects |
271 |
| Scale objects |
271 |
| Change the rotation angle of objects |
271 |
| Distort an object or multiple objects |
272 |
| Fills, strokes, and shadows in titles |
272 |
| Set a fill for text and objects |
272 |
| Fill type options |
272 |
| Add a sheen |
273 |
| Add a texture for text or object |
273 |
| Add a stroke to text or object |
274 |
| Change the listing order of strokes |
275 |
| Delete strokes from an object or text |
275 |
| Create a drop shadow |
275 |
| Titler text styles |
276 |
| Modify the style swatch display |
276 |
| Change the default characters in swatches |
276 |
| Create a style |
276 |
| Apply a style to an object |
277 |
| Specify the characters in the Title Styles panel |
277 |
| Delete, duplicate, or rename, a style |
277 |
| Manage style libraries |
277 |
| Rolling and crawling titles |
277 |
| Create a rolling or crawling title |
278 |
| Roll/Crawl Timing options |
278 |
| Convert a title to another type |
278 |
| Chapter 11: Effects and transitions |
279 |
| About effects |
279 |
| Fixed effects |
279 |
| Standard effects |
280 |
| Clip-based and track-based effects |
280 |
| Effect plug-ins |
280 |
| GPU-accelerated effects |
281 |
| Disable or enable GPU acceleration of effects |
281 |
| List of GPU accelerated effects in Premiere Pro CS5 |
281 |
| List of GPU accelerated effects in Premiere Pro CS5.5 and later |
282 |
| High-bit-depth effects |
283 |
| Applying, removing, finding, and organizing effects |
283 |
| Find and group effects |
283 |
| Filter effects by type |
283 |
| Create bins of favorite effects |
284 |
| Remove a Custom bin |
284 |
| Apply effects to clips |
284 |
| Copy and paste clip effects |
285 |
| Remove selected effects from a clip |
285 |
| Remove all effects from a clip |
286 |
| Disable or enable effects in a clip |
286 |
| Viewing and adjusting effects and keyframes |
286 |
| View effects in the Effect Controls panel |
287 |
| View keyframes for an effect property in the Timeline panel |
288 |
| Adjust or reset controls in the Effect Controls panel |
288 |
| Applying effects to audio |
289 |
| Applying audio effects in the Audio Mixer |
289 |
| Apply a track effect in the Audio Mixer |
290 |
| Adjust audio track effects in a Timeline |
290 |
| Copy and paste track effects |
291 |
| Designate a track effect as pre-fader or post-fader |
291 |
| Remove or bypass a track effect in the Audio Mixer |
291 |
| Working with VST effects |
291 |
| Adjust a VST effect in a VST Editor panel |
292 |
| Select a preset for a VST effect |
293 |
| Working with audio transitions |
293 |
| Specify the default audio transition |
293 |
| Set the default duration for audio transitions |
293 |
| Crossfade between audio clips |
293 |
| Fade in or fade out clip audio |
293 |
| Adjust or customize an audio transition |
294 |
| Effect presets |
294 |
| Effect presets |
294 |
| Create and save an effect preset |
295 |
| Apply an effect preset |
295 |
| Work with a custom bins and preset bins |
296 |
| Creating common results |
296 |
| Fade in video |
297 |
| Picture-in-picture (PIP) and split screen |
297 |
| Zoom and pan a still image |
297 |
| Place lightning over part of a clip |
297 |
| Create a Jacob’s Ladder |
297 |
| Make reverb ring out |
298 |
| Motion: position, scale, and rotate a clip |
298 |
| Adjust position, scale, and rotation |
298 |
| Scale assets |
299 |
| Scale assets manually |
299 |
| Scale assets to frame size |
300 |
| Scale assets automatically |
300 |
| Animate motion in the Program Monitor |
300 |
| Animate a clip in the Program Monitor |
301 |
| Change Position keyframes in a motion path |
302 |
| Move a clip along a curve |
302 |
| Adjust or animate clip anchor points |
302 |
| Eliminate flicker |
303 |
| Duration and speed |
304 |
| View the total duration of selected clips |
304 |
| Change the default duration for still images |
304 |
| Change speed and duration for one or more clips |
304 |
| Change clip speed and duration with the Rate Stretch tool |
305 |
| Change clip speed and duration with Time Remapping |
306 |
| Vary changes to speed or direction with Time Remapping |
306 |
| Blend frames for smooth motion |
311 |
| Freeze a frame |
311 |
| Freeze a frame for a portion of a clip |
311 |
| Freeze a video frame for the duration of a clip |
313 |
| Interlacing and field order |
314 |
| Interlaced video, noninterlaced video, and progressive scanning |
314 |
| About field dominance and field reversal |
315 |
| Create interlaced or non-interlaced clips |
315 |
| Change the field order of a clip |
316 |
| Color correction and adjustment |
316 |
| Adjusting color and luminance |
316 |
| Set up a Color Correction workspace |
317 |
| Apply the Color Correction effects |
318 |
| Quickly remove a color cast |
319 |
| Make quick luminance corrections |
320 |
| Color balance, angle, and saturation controls |
321 |
| Adjust color balance and saturation |
322 |
| Adjust color and luminance using curves |
323 |
| Adjust luminance using levels |
325 |
| Select a color with the Adobe Color Picker |
326 |
| Define the tonal ranges in a clip |
328 |
| Specify a color or range of colors to adjust |
329 |
| Replace a color |
330 |
| Remove color in a clip |
331 |
| Mix color channels in a clip |
331 |
| Isolate a single color using Color Pass |
332 |
| Adjust edges, blurs and brightness using Convolution presets |
332 |
| Add Lighting Effects |
333 |
| Apply Lighting Effects textures |
335 |
| Transition overview: applying transitions |
335 |
| Clip handles and transitions |
336 |
| Single- and double-sided transitions |
337 |
| Applying transitions |
338 |
| Apply a transition between two clips |
338 |
| Apply a single-sided transition |
339 |
| Specify and apply default transitions |
339 |
| Specify a default transition |
339 |
| Set the duration of the default transition |
339 |
| Add the default transition between two clips |
339 |
| Apply default transitions between selected clips |
340 |
| Copy and paste a transition |
340 |
| Replace a transition |
340 |
| Modifying and customizing transitions |
340 |
| Display transitions in the Effect Controls panel |
340 |
| Adjust transition alignment |
341 |
| Align a transition in a Timeline panel |
341 |
| Align a transition using the Effect Controls panel |
342 |
| Move a cut and transition together |
342 |
| Change transition duration |
343 |
| Change transition duration in a Timeline panel |
343 |
| Change transition duration in the Effect Controls panel |
343 |
| Set the default duration for transitions |
343 |
| Reposition the center of a transition |
343 |
| Change transition settings |
344 |
| Effects and transitions reference |
344 |
| Effects and transitions list |
344 |
| Adjust effects |
344 |
| Blur and sharpen effects |
344 |
| Channel effects |
345 |
| Color correction effects |
345 |
| Distort effects |
346 |
| Generate effects |
346 |
| Image control effects |
346 |
| Keying effects |
346 |
| Noise and grain effects |
347 |
| Perspective effects |
347 |
| Stylize effects |
347 |
| Time effects |
348 |
| Transform effects |
348 |
| Transition effects |
348 |
| Utility effects |
348 |
| Video effects |
348 |
| Video dissolve transitions |
348 |
| Adjust effects |
349 |
| Auto Color, Auto Contrast, and Auto Levels effects |
349 |
| Convolution Kernel effect |
349 |
| Extract effect |
350 |
| Levels effect |
350 |
| Lighting Effects effect |
350 |
| ProcAmp effect |
350 |
| Shadow/Highlight effect |
351 |
| Blur and Sharpen effects |
352 |
| Antialias effect (Windows only) |
352 |
| Camera Blur effect (Windows only) |
352 |
| Channel Blur effect |
352 |
| Compound Blur effect |
352 |
| Directional Blur effect |
353 |
| Fast Blur effect |
353 |
| Gaussian Blur effect |
353 |
| Ghosting effect (Windows only) |
354 |
| Sharpen effect |
354 |
| Unsharp Mask effect |
354 |
| Channel effects |
354 |
| Arithmetic effect |
354 |
| Blend effect |
355 |
| Calculations effect |
355 |
| Compound Arithmetic effect |
356 |
| Invert (video) effect |
356 |
| Set Matte effect |
357 |
| Solid Composite effect |
357 |
| Color Correction effects |
357 |
| Brightness & Contrast effect |
358 |
| Broadcast Colors effect |
358 |
| Change Color effect |
358 |
| Change To Color effect |
359 |
| Channel Mixer effect |
360 |
| Color Balance effect |
360 |
| Color Balance (HLS) effect |
360 |
| Equalize effect |
361 |
| Fast Color Corrector effect |
361 |
| Leave Color effect |
362 |
| Luma Corrector effect |
363 |
| Luma Curve effect |
364 |
| RGB Color Corrector effect |
365 |
| RGB Curves effect |
366 |
| Three-Way Color Corrector effect |
368 |
| Tint effect |
370 |
| Video Limiter effect |
370 |
| Distort effects |
371 |
| Bend effect (Windows only) |
371 |
| Corner Pin effect |
371 |
| Lens Distortion effect (Windows only) |
372 |
| Magnify effect |
372 |
| Mirror effect |
373 |
| Offset effect |
373 |
| Spherize effect |
373 |
| Transform effect |
373 |
| Turbulent Displace effect |
374 |
| Twirl effect |
375 |
| Wave Warp effect |
375 |
| Generate effects |
375 |
| 4-Color Gradient effect |
375 |
| Cell Pattern effect |
376 |
| Checkerboard effect |
377 |
| Circle effect |
377 |
| Ellipse effect |
378 |
| Eyedropper Fill effect |
378 |
| Grid effect |
379 |
| Lens Flare effect |
379 |
| Lightning effect |
379 |
| Paint Bucket effect |
380 |
| Ramp effect |
382 |
| Write-on effect |
382 |
| Image Control effects |
383 |
| Black & White effect |
383 |
| Color Balance (RGB) effect |
383 |
| Color Pass effect (Windows only) |
383 |
| Color Replace effect (Windows only) |
383 |
| Gamma Correction effect |
383 |
| Keying effects |
383 |
| Alpha Adjust effect |
383 |
| Blue Screen Key effect (Windows only) |
384 |
| Chroma Key effect (Windows only) |
384 |
| Chromakey with the Ultra Key effect |
385 |
| Color Key effect |
386 |
| Difference Matte effect |
387 |
| Eight-Point, Four-Point, and Sixteen-Point Garbage Matte effects |
388 |
| Image Matte Key effect |
389 |
| Luma Key effect |
390 |
| Non Red Key effect |
391 |
| RGB Difference Key effect (Windows only) |
391 |
| Remove Matte effect |
392 |
| Track Matte Key effect |
392 |
| Noise & Grain effects |
394 |
| Dust & Scratches effect |
394 |
| Median effect |
394 |
| Noise effect |
395 |
| Noise Alpha effect |
395 |
| Noise HLS and Noise HLS Auto effects |
396 |
| Perspective effects |
396 |
| Basic 3D effect |
396 |
| Bevel Alpha effect |
397 |
| Bevel Edges effect |
397 |
| Drop Shadow effect |
397 |
| Radial Shadow effect |
398 |
| Stylize effects |
399 |
| Alpha Glow effect |
399 |
| Brush Strokes effect |
399 |
| Color Emboss effect |
400 |
| Emboss effect |
400 |
| Find Edges effect |
400 |
| Mosaic effect |
400 |
| Posterize effect |
400 |
| Replicate effect |
401 |
| Roughen Edges effect |
401 |
| Solarize effect |
402 |
| Strobe Light effect |
402 |
| Texturize effect |
402 |
| Threshold effect |
402 |
| Time effects |
403 |
| Echo effect |
403 |
| Posterize Time effect |
404 |
| Transform effects |
404 |
| Camera View effect (Windows only) |
404 |
| Crop effect |
404 |
| Edge Feather effect |
404 |
| Horizontal Flip effect |
405 |
| Horizontal Hold effect (Windows only) |
405 |
| Vertical Flip effect |
405 |
| Vertical Hold effect (Windows only) |
405 |
| Transition effects |
405 |
| Block Dissolve effect |
405 |
| Gradient Wipe effect |
405 |
| Linear Wipe effect |
406 |
| Radial Wipe effect |
407 |
| Venetian Blinds effect |
407 |
| Utility effects |
407 |
| Cineon Converter effect |
407 |
| Video effects |
408 |
| Timecode effect |
408 |
| Video dissolve transitions |
408 |
| Additive Dissolve transition |
408 |
| Cross Dissolve transition |
409 |
| Dip To Black transition |
409 |
| Dip To White transition |
409 |
| Dither Dissolve transition |
409 |
| Film Dissolve transition(CS5.5 and later) |
409 |
| Non-Additive Dissolve transition |
409 |
| Random Invert transition |
409 |
| Audio effects and transitions reference |
409 |
| Audio effects and transitions list |
409 |
| Audio effects |
409 |
| Audio crossfade transitions |
410 |
| Audio effects |
410 |
| Balance effect |
410 |
| Bandpass effect |
411 |
| Bass effect |
411 |
| Channel Volume effect |
411 |
| Chorus effect |
411 |
| DeClicker effect |
412 |
| DeCrackler effect |
412 |
| DeEsser effect |
412 |
| DeHummer effect |
413 |
| Delay effect |
413 |
| DeNoiser effect |
413 |
| Dynamics effect |
413 |
| EQ effect |
415 |
| Fill Left effect, Fill Right effect |
415 |
| Flanger effect |
415 |
| Highpass and Lowpass effects |
416 |
| Invert (audio) effect |
416 |
| MultibandCompressor effect |
416 |
| Multitap Delay effect |
416 |
| Notch effect |
417 |
| Parametric EQ effect |
417 |
| Phaser effect |
417 |
| PitchShifter effect |
417 |
| Reverb effect |
418 |
| Spectral Noise Reduction effect |
418 |
| Swap Channels effect |
418 |
| Treble effect |
418 |
| Volume effect |
419 |
| Audio crossfade transitions |
419 |
| Constant Gain transition |
419 |
| Constant Power transition |
419 |
| Exponential Fade transition |
419 |
| Chapter 12: Animation and keyframes |
420 |
| Adding, navigating, and setting keyframes |
420 |
| View keyframes and graphs |
420 |
| View keyframes in the Effect Controls panel |
420 |
| View keyframes and properties in a Timeline panel |
421 |
| Set keyframe display for a Timeline panel |
423 |
| Move the current-time indicator to a keyframe |
423 |
| Add, select, and delete keyframes |
424 |
| Add keyframes |
424 |
| Select keyframes |
425 |
| Delete keyframes |
425 |
| Modify keyframe values |
425 |
| Edit keyframe graphs in the Effect Controls panel |
426 |
| Edit keyframe graphs from a Timeline panel |
426 |
| Moving and copying keyframes |
427 |
| Move keyframes in time |
427 |
| Determine keyframe snapping |
427 |
| Copy and paste keyframes |
427 |
| Copy and paste keyframes in the Effect Controls panel |
428 |
| Copy and paste keyframes in a Timeline panel |
428 |
| Controlling effect changes using keyframe interpolation |
429 |
| About interpolation |
429 |
| Change the keyframe interpolation method |
429 |
| Control change using Bezier keyframe interpolation |
430 |
| Create Bezier keyframes |
431 |
| Adjust Bezier handles |
431 |
| Fine-tune the speed of an effect |
431 |
| Optimize keyframe automation |
433 |
| Chapter 13: Compositing |
434 |
| Compositing, alpha channels, and adjusting clip opacity |
434 |
| Alpha channels and mattes |
434 |
| About straight and premultiplied channels |
435 |
| About keying |
435 |
| Blend clips with a Garbage Matte effect |
435 |
| Blend clips with a matte using the Track Matte Key effect |
436 |
| Specify clip opacity in a Timeline panel |
436 |
| Compositing tips |
436 |
| Blending modes |
437 |
| Blend mode reference |
437 |
| Blending mode descriptions |
438 |
| Chapter 14: Exporting |
440 |
| Workflow and overview for exporting |
440 |
| Types of exporting |
440 |
| Adobe Media Encoder |
441 |
| Workflow for exporting video and audio files |
441 |
| Formats exported directly from Premiere Pro |
442 |
| Export to Panasonic P2 format |
442 |
| Exporting OMF files for Pro Tools |
444 |
| Export an OMF file for Pro Tools |
444 |
| Features supported in OMF files |
444 |
| Tips for importing OMF files into Pro Tools |
445 |
| Export a still image |
446 |
| Exporting to DVD or Blu-ray Disc |
446 |
| Choosing file formats for various discs |
446 |
| Send a sequence to Encore to create a DVD, Blu-ray Disc, or SWF |
447 |
| Exporting projects for other applications |
447 |
| Export a project as an EDL file |
447 |
| Exporting AAF files |
448 |
| Export an Advanced Authoring Format (AAF) project file |
448 |
| About the AAF plug-in |
448 |
| Export a Final Cut Pro project XML file |
449 |
| Exporting to videotape |
450 |
| Prepare for exporting to DV videotape |
450 |
| Export a sequence to tape with device control |
451 |
| Export a sequence to tape without device control |
452 |
| Exporting for the Web and mobile devices |
452 |
| Moving assets between Adobe Premiere Pro and Adobe Flash |
452 |
| Tips for creating FLV and F4V files |
453 |
| Tips for creating video for mobile devices |
455 |
| Chapter 15: Keyboard shortcuts |
456 |
| Finding and customizing keyboard shortcuts |
456 |
| Find keyboard shortcuts |
456 |
| Customize or load keyboard shortcuts |
456 |
| Remove shortcuts |
457 |
| Print keyboard shortcuts |
457 |
| Default keyboard shortcuts |
458 |
| Selecting tools (keyboard shortcuts) |
458 |
| Viewing panels (keyboard shortcuts) |
458 |
| Capture panel (keyboard shortcuts) |
459 |
| Multi-Camera Monitor (keyboard shortcuts) |
459 |
| Project panel (keyboard shortcuts) |
460 |
| Timeline panel (keyboard shortcuts) |
460 |
| Titler (keyboard shortcuts) |
463 |
| Trim panel (keyboard shortcuts) |
464 |

 1
1 264
264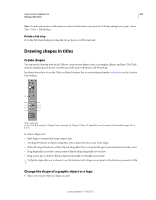 265
265 266
266 267
267 268
268 269
269 270
270 271
271 272
272 273
273 274
274

