Adobe 25520388 User Guide - Page 332
Isolate a single color using Color Pass, Adjust edges, blurs and brightness using Convolution presets
 |
UPC - 718659493202
View all Adobe 25520388 manuals
Add to My Manuals
Save this manual to your list of manuals |
Page 332 highlights
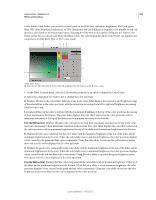
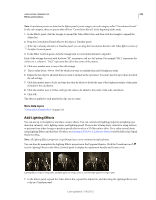
USING ADOBE PREMIERE PRO 327 Effects and transitions 3 Decrease or increase a channel's contribution to the output channel by doing any of the following to a source color channel: • Scrub an underlined value to the left or right. • Click an underlined value, type a value between -200% and +200% in the value box, and press Enter (Windows) or Return (Mac OS). • Click the triangle to expand the Channel Mixer controls, and drag the slider to the left or right. 4 (Optional) Drag the slider, scrub the underlined text, or type a value for the channel's constant value (Red-Const, Green-Const, or Blue-Const). This value adds a base amount of a channel to the output channel. 5 (Optional) Select the Monochrome option to create an image containing only gray values. This option achieves this result by applying the same settings to all the output channels. More Help topics "Channel Mixer effect" on page 355 Isolate a single color using Color Pass The Color Pass effect lets you isolate a single color or a range of colors. Adjustments are made in a dialog box showing the Clip Sample and Output Sample. You can also adjust the Color Pass effect properties in the Effect Controls panel. If you want to color correct a single color or range of colors in a clip, use the Secondary Color Correction controls in the Color Correction effects. 1 Drag the Color Pass effect to a clip. 2 In the Effect Controls panel, click the Setup icon for the Color Pass effect. 3 In the Color Pass Settings dialog box, do one of the following to select the color that you want to preserve: • Move the pointer into the Clip Sample (the pointer turns into an eyedropper) and click to select a color. • Click the color swatch, select a color in the Adobe Color Picker, and then click OK to close the Adobe Color Picker. The selected color appears in the Output Sample. 4 For the Similarity option, drag the slider or enter a value to increase or decrease the color range to be preserved. 5 To reverse the effect, so that all colors except the specified color are preserved, select the Reverse option. To animate this effect, use the keyframe features in the Effect Controls panel. More Help topics "Color Pass effect (Windows only)" on page 378 "Specify a color or range of colors to adjust" on page 324 Adjust edges, blurs and brightness using Convolution presets You can control the fine details of blurring, embossing, sharpening, and other effects by applying the Convolution Kernel effect or one of the convolution presets based on it. Convolution Kernel, and the presets based on it, overlays a matrix of numbers onto a matrix of pixels. You can set the values for each cell in the matrix using sliders in the Effect Controls panel, and you can use keyframes to change these values over time. To achieve a desired effect, it is often easier to apply one of the convolution presets and to modify it, than to apply and modify the Convolution Kernel effect itself. Last updated 1/16/2012
-
 1
1 -
2
-
3
-
4
-
5
-
6
-
7
-
8
-
9
-
10
-
11
-
12
-
13
-
14
-
15
-
16
-
17
-
18
-
19
-
20
-
21
-
22
-
23
-
24
-
25
-
26
-
27
-
28
-
29
-
30
-
31
-
32
-
33
-
34
-
35
-
36
-
37
-
38
-
39
-
40
-
41
-
42
-
43
-
44
-
45
-
46
-
47
-
48
-
49
-
50
-
51
-
52
-
53
-
54
-
55
-
56
-
57
-
58
-
59
-
60
-
61
-
62
-
63
-
64
-
65
-
66
-
67
-
68
-
69
-
70
-
71
-
72
-
73
-
74
-
75
-
76
-
77
-
78
-
79
-
80
-
81
-
82
-
83
-
84
-
85
-
86
-
87
-
88
-
89
-
90
-
91
-
92
-
93
-
94
-
95
-
96
-
97
-
98
-
99
-
100
-
101
-
102
-
103
-
104
-
105
-
106
-
107
-
108
-
109
-
110
-
111
-
112
-
113
-
114
-
115
-
116
-
117
-
118
-
119
-
120
-
121
-
122
-
123
-
124
-
125
-
126
-
127
-
128
-
129
-
130
-
131
-
132
-
133
-
134
-
135
-
136
-
137
-
138
-
139
-
140
-
141
-
142
-
143
-
144
-
145
-
146
-
147
-
148
-
149
-
150
-
151
-
152
-
153
-
154
-
155
-
156
-
157
-
158
-
159
-
160
-
161
-
162
-
163
-
164
-
165
-
166
-
167
-
168
-
169
-
170
-
171
-
172
-
173
-
174
-
175
-
176
-
177
-
178
-
179
-
180
-
181
-
182
-
183
-
184
-
185
-
186
-
187
-
188
-
189
-
190
-
191
-
192
-
193
-
194
-
195
-
196
-
197
-
198
-
199
-
200
-
201
-
202
-
203
-
204
-
205
-
206
-
207
-
208
-
209
-
210
-
211
-
212
-
213
-
214
-
215
-
216
-
217
-
218
-
219
-
220
-
221
-
222
-
223
-
224
-
225
-
226
-
227
-
228
-
229
-
230
-
231
-
232
-
233
-
234
-
235
-
236
-
237
-
238
-
239
-
240
-
241
-
242
-
243
-
244
-
245
-
246
-
247
-
248
-
249
-
250
-
251
-
252
-
253
-
254
-
255
-
256
-
257
-
258
-
259
-
260
-
261
-
262
-
263
-
264
-
265
-
266
-
267
-
268
-
269
-
270
-
271
-
272
-
273
-
274
-
275
-
276
-
277
-
278
-
279
-
280
-
281
-
282
-
283
-
284
-
285
-
286
-
287
-
288
-
289
-
290
-
291
-
292
-
293
-
294
-
295
-
296
-
297
-
298
-
299
-
300
-
301
-
302
-
303
-
304
-
305
-
306
-
307
-
308
-
309
-
310
-
311
-
312
-
313
-
314
-
315
-
316
-
317
-
318
-
319
-
320
-
321
-
322
-
323
-
324
-
325
-
326
-
 327
327 -
 328
328 -
 329
329 -
 330
330 -
 331
331 -
 332
332 -
 333
333 -
 334
334 -
 335
335 -
 336
336 -
 337
337 -
338
-
339
-
340
-
341
-
342
-
343
-
344
-
345
-
346
-
347
-
348
-
349
-
350
-
351
-
352
-
353
-
354
-
355
-
356
-
357
-
358
-
359
-
360
-
361
-
362
-
363
-
364
-
365
-
366
-
367
-
368
-
369
-
370
-
371
-
372
-
373
-
374
-
375
-
376
-
377
-
378
-
379
-
380
-
381
-
382
-
383
-
384
-
385
-
386
-
387
-
388
-
389
-
390
-
391
-
392
-
393
-
394
-
395
-
396
-
397
-
398
-
399
-
400
-
401
-
402
-
403
-
404
-
405
-
406
-
407
-
408
-
409
-
410
-
411
-
412
-
413
-
414
-
415
-
416
-
417
-
418
-
419
-
420
-
421
-
422
-
423
-
424
-
425
-
426
-
427
-
428
-
429
-
430
-
431
-
432
-
433
-
434
-
435
-
436
-
437
-
438
-
439
-
440
-
441
-
442
-
443
-
444
-
445
-
446
-
447
-
448
-
449
-
450
-
451
-
452
-
453
-
454
-
455
-
456
-
457
-
458
-
459
-
460
-
461
-
462
-
463
-
464
 |
 |