Adobe 25520388 User Guide - Page 237
Set the location for captured audio, Preparing the audio input channel for recording
 |
UPC - 718659493202
View all Adobe 25520388 manuals
Add to My Manuals
Save this manual to your list of manuals |
Page 237 highlights
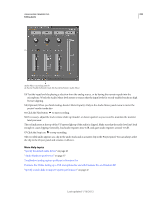
USING ADOBE PREMIERE PRO 232 Editing Audio Set the location for captured audio 1 Choose Project > Project Settings > Scratch Disks. 2 For Captured Audio, select a location and click OK. Preparing the audio input channel for recording When you enable recording for a track, the track can record from the Default Device channel specified in the Audio Hardware section of the Preferences dialog box. This dialog box includes the ASIO Settings button (Windows only), which you use to enable audio inputs connected to the computer. Submix and master tracks always receive audio from tracks within the sequence, so recording and track input options are unavailable for them. More Help topics "Specify the default audio device" on page 46 "Specify ASIO device settings (Windows only)" on page 47 Record audio from a microphone or another analog source 1 Make sure that you have specified the Input audio device. For more information, see "Specify the default audio device" on page 46. 2 Make sure that the input device (microphone or other audio device) is connected properly to the computer or sound card. If recording from a microphone, check the documentation for your computer or sound card to determine whether the microphone jack is for a monaural or stereo microphone. Use the appropriate microphone for the jack. Noise, the loss of a channel, intermittent sound, and no sound all can result from plugging a mono microphone into a stereo jack or a stereo microphone into a mono jack. 3 If recording from a microphone, turn off your computer speakers to prevent feedback and echo. 4 (Optional) If necessary, add an audio track to a Timeline appropriate for the number of channels you will record. For example, if you're recording voice with a single monaural microphone, you should record to a mono audio track. See "Work with tracks" on page 138. A track will appear in the Audio Mixer for each track you add to a Timeline. 5 In the Audio Mixer, click the Enable Track For Recording icon for the track you added for your audio device. 6 Choose the recording input channel from the Track Input Channel menu. Note: The Track Input Channel menu appears after you click the Enable Track For Recording icon. 7 Repeat steps 3 and 4 as necessary if you're recording to multiple tracks. 8 (Optional) Create a new sequence. Note: It's also possible to record to an existing sequence. Doing so is useful for recording voice-overs. You can record your voice while watching the playback of the sequence. When you record voice-overs to an existing sequence, it's good practice to click the Solo Track icon in the Audio Mixer for the track that you're recording to. Clicking the icon mutes the other audio tracks. 9 (Optional) Select the audio track that you want to record to. 10 (Optional) Adjust the levels on the input device to achieve the proper recording level. 11 Select Meter Input(s) Only in the Audio Mixer panel menu to meter only the sound card's inputs. 12 Click the Record button at the bottom of the Audio Mixer to enter Record mode. Last updated 1/16/2012
-
 1
1 -
2
-
3
-
4
-
5
-
6
-
7
-
8
-
9
-
10
-
11
-
12
-
13
-
14
-
15
-
16
-
17
-
18
-
19
-
20
-
21
-
22
-
23
-
24
-
25
-
26
-
27
-
28
-
29
-
30
-
31
-
32
-
33
-
34
-
35
-
36
-
37
-
38
-
39
-
40
-
41
-
42
-
43
-
44
-
45
-
46
-
47
-
48
-
49
-
50
-
51
-
52
-
53
-
54
-
55
-
56
-
57
-
58
-
59
-
60
-
61
-
62
-
63
-
64
-
65
-
66
-
67
-
68
-
69
-
70
-
71
-
72
-
73
-
74
-
75
-
76
-
77
-
78
-
79
-
80
-
81
-
82
-
83
-
84
-
85
-
86
-
87
-
88
-
89
-
90
-
91
-
92
-
93
-
94
-
95
-
96
-
97
-
98
-
99
-
100
-
101
-
102
-
103
-
104
-
105
-
106
-
107
-
108
-
109
-
110
-
111
-
112
-
113
-
114
-
115
-
116
-
117
-
118
-
119
-
120
-
121
-
122
-
123
-
124
-
125
-
126
-
127
-
128
-
129
-
130
-
131
-
132
-
133
-
134
-
135
-
136
-
137
-
138
-
139
-
140
-
141
-
142
-
143
-
144
-
145
-
146
-
147
-
148
-
149
-
150
-
151
-
152
-
153
-
154
-
155
-
156
-
157
-
158
-
159
-
160
-
161
-
162
-
163
-
164
-
165
-
166
-
167
-
168
-
169
-
170
-
171
-
172
-
173
-
174
-
175
-
176
-
177
-
178
-
179
-
180
-
181
-
182
-
183
-
184
-
185
-
186
-
187
-
188
-
189
-
190
-
191
-
192
-
193
-
194
-
195
-
196
-
197
-
198
-
199
-
200
-
201
-
202
-
203
-
204
-
205
-
206
-
207
-
208
-
209
-
210
-
211
-
212
-
213
-
214
-
215
-
216
-
217
-
218
-
219
-
220
-
221
-
222
-
223
-
224
-
225
-
226
-
227
-
228
-
229
-
230
-
231
-
 232
232 -
 233
233 -
 234
234 -
 235
235 -
 236
236 -
 237
237 -
 238
238 -
 239
239 -
 240
240 -
 241
241 -
 242
242 -
243
-
244
-
245
-
246
-
247
-
248
-
249
-
250
-
251
-
252
-
253
-
254
-
255
-
256
-
257
-
258
-
259
-
260
-
261
-
262
-
263
-
264
-
265
-
266
-
267
-
268
-
269
-
270
-
271
-
272
-
273
-
274
-
275
-
276
-
277
-
278
-
279
-
280
-
281
-
282
-
283
-
284
-
285
-
286
-
287
-
288
-
289
-
290
-
291
-
292
-
293
-
294
-
295
-
296
-
297
-
298
-
299
-
300
-
301
-
302
-
303
-
304
-
305
-
306
-
307
-
308
-
309
-
310
-
311
-
312
-
313
-
314
-
315
-
316
-
317
-
318
-
319
-
320
-
321
-
322
-
323
-
324
-
325
-
326
-
327
-
328
-
329
-
330
-
331
-
332
-
333
-
334
-
335
-
336
-
337
-
338
-
339
-
340
-
341
-
342
-
343
-
344
-
345
-
346
-
347
-
348
-
349
-
350
-
351
-
352
-
353
-
354
-
355
-
356
-
357
-
358
-
359
-
360
-
361
-
362
-
363
-
364
-
365
-
366
-
367
-
368
-
369
-
370
-
371
-
372
-
373
-
374
-
375
-
376
-
377
-
378
-
379
-
380
-
381
-
382
-
383
-
384
-
385
-
386
-
387
-
388
-
389
-
390
-
391
-
392
-
393
-
394
-
395
-
396
-
397
-
398
-
399
-
400
-
401
-
402
-
403
-
404
-
405
-
406
-
407
-
408
-
409
-
410
-
411
-
412
-
413
-
414
-
415
-
416
-
417
-
418
-
419
-
420
-
421
-
422
-
423
-
424
-
425
-
426
-
427
-
428
-
429
-
430
-
431
-
432
-
433
-
434
-
435
-
436
-
437
-
438
-
439
-
440
-
441
-
442
-
443
-
444
-
445
-
446
-
447
-
448
-
449
-
450
-
451
-
452
-
453
-
454
-
455
-
456
-
457
-
458
-
459
-
460
-
461
-
462
-
463
-
464
 |
 |