Adobe 25520388 User Guide - Page 318
Apply the Color Correction effects, Vectorscope, YC Waveform, YCbCr Parade, RGB Parade, All Scopes
 |
UPC - 718659493202
View all Adobe 25520388 manuals
Add to My Manuals
Save this manual to your list of manuals |
Page 318 highlights
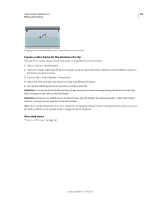
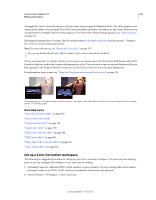
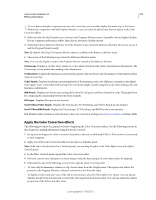
USING ADOBE PREMIERE PRO 313 Effects and transitions To see a before and after comparison of your color correction, you can either display the master clip in the Source Monitor for comparison with the Program Monitor, or you can select the Split Screen Preview option in the Color Correction effects. 3 Make sure that the Draft Quality is not chosen in the Program Monitor menu. If possible, choose Highest Quality. If your computer performance suffers, then choose Automatic Quality instead. 4 (Optional) Choose Reference Monitor from the Window menu. Move the Reference Monitor where you can see it and the Program Monitor easily. Note: By default, the Gang To Program Monitor option is enabled in the Reference Monitor menu. 5 Choose any of the following scopes from the Reference Monitor menu: Note: You can also display a scope in the Program Monitor instead of the Reference Monitor. Vectorscope Displays a circular chart, similar to a color wheel, that shows the video's chrominance information. The Vectorscope is very useful when making color adjustments. YC Waveform Displays the luminance (represented as green in the waveform) and chrominance (represented as blue) values in your clip. YCbCr Parade Displays waveforms representing levels of the luminance and color difference channels in the digital video signal. Users comfortable with viewing YUV waveforms might consider using this scope when making color and luminance adjustments. RGB Parade Displays waveforms representing the levels of the red, green, and blue channels in a clip. This graph is best for comparing the relationship between the three channels. All Scopes Displays all scopes in one monitor. Vect/YC Wave/YCbCr Parade Displays the Vectorscope, YC Waveform, and YCbCr Parade in one monitor. Vect/YC Wave/RGB Parade Displays the Vectorscope, YC Waveform, and RGB Parade in one monitor. Phil Hawkins offers a hands-on introduction to the color correction workspace in this tutorial video at Infinite Skills. Apply the Color Correction effects The following procedure is a general overview of applying the Color Correction effects. See the following sections in this chapter for making adjustments using the specific controls. 1 Set up your workspace for color correction. If possible, make sure a calibrated NTSC or PAL monitor is connected to your computer. 2 Apply one of the Color Correction effects to the clip in a Timeline panel. Note: If the clip is already selected in a Timeline panel, you can drag the effect to the Video Effects area of the Effect Controls panel. 3 In the Effect Controls panel, expand the Color Correction effect. 4 Move the current-time indicator to a frame that provides the best example of colors that need to be adjusted. 5 (Optional) Do any of the following to set preview options when correcting color: • To view only the luminance values in a clip, choose Luma from the Output menu. This option only affects the preview in the Program Monitor, it doesn't remove the color from the video. • To display a before and after view of the clip in one monitor, select the Show Split View option. You can specify whether the split view is horizontal or vertical by choosing from the Layout menu. You can also adjust the relative proportion of the before and after views. Last updated 1/16/2012
-
 1
1 -
2
-
3
-
4
-
5
-
6
-
7
-
8
-
9
-
10
-
11
-
12
-
13
-
14
-
15
-
16
-
17
-
18
-
19
-
20
-
21
-
22
-
23
-
24
-
25
-
26
-
27
-
28
-
29
-
30
-
31
-
32
-
33
-
34
-
35
-
36
-
37
-
38
-
39
-
40
-
41
-
42
-
43
-
44
-
45
-
46
-
47
-
48
-
49
-
50
-
51
-
52
-
53
-
54
-
55
-
56
-
57
-
58
-
59
-
60
-
61
-
62
-
63
-
64
-
65
-
66
-
67
-
68
-
69
-
70
-
71
-
72
-
73
-
74
-
75
-
76
-
77
-
78
-
79
-
80
-
81
-
82
-
83
-
84
-
85
-
86
-
87
-
88
-
89
-
90
-
91
-
92
-
93
-
94
-
95
-
96
-
97
-
98
-
99
-
100
-
101
-
102
-
103
-
104
-
105
-
106
-
107
-
108
-
109
-
110
-
111
-
112
-
113
-
114
-
115
-
116
-
117
-
118
-
119
-
120
-
121
-
122
-
123
-
124
-
125
-
126
-
127
-
128
-
129
-
130
-
131
-
132
-
133
-
134
-
135
-
136
-
137
-
138
-
139
-
140
-
141
-
142
-
143
-
144
-
145
-
146
-
147
-
148
-
149
-
150
-
151
-
152
-
153
-
154
-
155
-
156
-
157
-
158
-
159
-
160
-
161
-
162
-
163
-
164
-
165
-
166
-
167
-
168
-
169
-
170
-
171
-
172
-
173
-
174
-
175
-
176
-
177
-
178
-
179
-
180
-
181
-
182
-
183
-
184
-
185
-
186
-
187
-
188
-
189
-
190
-
191
-
192
-
193
-
194
-
195
-
196
-
197
-
198
-
199
-
200
-
201
-
202
-
203
-
204
-
205
-
206
-
207
-
208
-
209
-
210
-
211
-
212
-
213
-
214
-
215
-
216
-
217
-
218
-
219
-
220
-
221
-
222
-
223
-
224
-
225
-
226
-
227
-
228
-
229
-
230
-
231
-
232
-
233
-
234
-
235
-
236
-
237
-
238
-
239
-
240
-
241
-
242
-
243
-
244
-
245
-
246
-
247
-
248
-
249
-
250
-
251
-
252
-
253
-
254
-
255
-
256
-
257
-
258
-
259
-
260
-
261
-
262
-
263
-
264
-
265
-
266
-
267
-
268
-
269
-
270
-
271
-
272
-
273
-
274
-
275
-
276
-
277
-
278
-
279
-
280
-
281
-
282
-
283
-
284
-
285
-
286
-
287
-
288
-
289
-
290
-
291
-
292
-
293
-
294
-
295
-
296
-
297
-
298
-
299
-
300
-
301
-
302
-
303
-
304
-
305
-
306
-
307
-
308
-
309
-
310
-
311
-
312
-
 313
313 -
 314
314 -
 315
315 -
 316
316 -
 317
317 -
 318
318 -
 319
319 -
 320
320 -
 321
321 -
 322
322 -
 323
323 -
324
-
325
-
326
-
327
-
328
-
329
-
330
-
331
-
332
-
333
-
334
-
335
-
336
-
337
-
338
-
339
-
340
-
341
-
342
-
343
-
344
-
345
-
346
-
347
-
348
-
349
-
350
-
351
-
352
-
353
-
354
-
355
-
356
-
357
-
358
-
359
-
360
-
361
-
362
-
363
-
364
-
365
-
366
-
367
-
368
-
369
-
370
-
371
-
372
-
373
-
374
-
375
-
376
-
377
-
378
-
379
-
380
-
381
-
382
-
383
-
384
-
385
-
386
-
387
-
388
-
389
-
390
-
391
-
392
-
393
-
394
-
395
-
396
-
397
-
398
-
399
-
400
-
401
-
402
-
403
-
404
-
405
-
406
-
407
-
408
-
409
-
410
-
411
-
412
-
413
-
414
-
415
-
416
-
417
-
418
-
419
-
420
-
421
-
422
-
423
-
424
-
425
-
426
-
427
-
428
-
429
-
430
-
431
-
432
-
433
-
434
-
435
-
436
-
437
-
438
-
439
-
440
-
441
-
442
-
443
-
444
-
445
-
446
-
447
-
448
-
449
-
450
-
451
-
452
-
453
-
454
-
455
-
456
-
457
-
458
-
459
-
460
-
461
-
462
-
463
-
464
 |
 |