Adobe 25520388 User Guide - Page 436
Blend clips with a matte using the Track Matte Key effect, Specify clip opacity in a Timeline panel
 |
UPC - 718659493202
View all Adobe 25520388 manuals
Add to My Manuals
Save this manual to your list of manuals |
Page 436 highlights
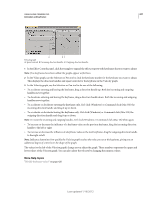
USING ADOBE PREMIERE PRO 431 Compositing Blend clips with a matte using the Track Matte Key effect You can blend clips with a matte (typically, a black and white image, or an image from the Titler.) using the Track Matte Key effect. For more information, see Blend clips with a matte using the Track Matte Key effect. This video shows how to create a track matte effect. Specify clip opacity in a Timeline panel 1 Expand the view of a track, if necessary, by clicking the triangle next to the track name to expand its options. 2 If necessary, click the Show Keyframes button , or the Hide Keyframes button , and choose Show Opacity Handles from the menu. A horizontal opacity control rubber band appears in all the clips of the track. Note: If no keyframes exist on the track, the rubber band appears as a straight horizontal line across the entire track. 3 In a Timeline panel, do one of the following: • Select the Selection tool, and drag the opacity control rubber band up or down. • Select the Pen tool, and drag the opacity control rubber band up or down. The opacity value and current time appear as a tool tip as you drag. 4 (Optional) To animate the Opacity effect over time, first set keyframes. Select the Pen tool. Ctrl-click (Windows) or Command-click (Mac OS) on the opacity control rubber band with the Pen tool wherever you want to set a keyframe. Then drag each keyframe up or down to set its value. For example, to fade a clip in, create a keyframe at the beginning of the clip and another a few seconds later. Drag the first down to the bottom of the clip at 0 opacity. Drag the second up to 100%. For information about adjusting opacity in the Effect Controls tab in the Source panel, see "Opacity" on the page: Fixed effects. You can use either the Selection tool or the Pen tool to move keyframes or Opacity handles. To adjust the smoothness of the animation, change the keyframe interpolation from linear to Bezier. Compositing tips Keep the following guidelines in mind when compositing clips and tracks: • If you want to apply the same amount of transparency to an entire clip, simply adjust the clip's opacity in the Effect Controls panel. • It's often most efficient to import a source file already containing an alpha channel defining the areas that you want to be transparent. Because the transparency information is stored with the file, Premiere Pro preserves and displays the clip with its transparency in all sequences where you use the file as a clip. • If a clip's source file doesn't contain an alpha channel, you must manually apply transparency to individual clip instances where you want transparency. You can apply transparency to a video clip in a sequence by adjusting clip opacity or by applying effects. • Applications such as Adobe After Effects, Adobe Photoshop, and Adobe Illustrator can save clips with their original alpha channels, or add alpha channels, when the file is saved to a format that supports an alpha channel. For more information about compositing in Premiere Pro, see this video by Learn by Video and Video2Brain by Jan Ozer Eran Stern has a half-hour tutorial on compositing in Premiere Pro using the Ultra Key and Track Matte Key effects. Last updated 1/16/2012
-
 1
1 -
2
-
3
-
4
-
5
-
6
-
7
-
8
-
9
-
10
-
11
-
12
-
13
-
14
-
15
-
16
-
17
-
18
-
19
-
20
-
21
-
22
-
23
-
24
-
25
-
26
-
27
-
28
-
29
-
30
-
31
-
32
-
33
-
34
-
35
-
36
-
37
-
38
-
39
-
40
-
41
-
42
-
43
-
44
-
45
-
46
-
47
-
48
-
49
-
50
-
51
-
52
-
53
-
54
-
55
-
56
-
57
-
58
-
59
-
60
-
61
-
62
-
63
-
64
-
65
-
66
-
67
-
68
-
69
-
70
-
71
-
72
-
73
-
74
-
75
-
76
-
77
-
78
-
79
-
80
-
81
-
82
-
83
-
84
-
85
-
86
-
87
-
88
-
89
-
90
-
91
-
92
-
93
-
94
-
95
-
96
-
97
-
98
-
99
-
100
-
101
-
102
-
103
-
104
-
105
-
106
-
107
-
108
-
109
-
110
-
111
-
112
-
113
-
114
-
115
-
116
-
117
-
118
-
119
-
120
-
121
-
122
-
123
-
124
-
125
-
126
-
127
-
128
-
129
-
130
-
131
-
132
-
133
-
134
-
135
-
136
-
137
-
138
-
139
-
140
-
141
-
142
-
143
-
144
-
145
-
146
-
147
-
148
-
149
-
150
-
151
-
152
-
153
-
154
-
155
-
156
-
157
-
158
-
159
-
160
-
161
-
162
-
163
-
164
-
165
-
166
-
167
-
168
-
169
-
170
-
171
-
172
-
173
-
174
-
175
-
176
-
177
-
178
-
179
-
180
-
181
-
182
-
183
-
184
-
185
-
186
-
187
-
188
-
189
-
190
-
191
-
192
-
193
-
194
-
195
-
196
-
197
-
198
-
199
-
200
-
201
-
202
-
203
-
204
-
205
-
206
-
207
-
208
-
209
-
210
-
211
-
212
-
213
-
214
-
215
-
216
-
217
-
218
-
219
-
220
-
221
-
222
-
223
-
224
-
225
-
226
-
227
-
228
-
229
-
230
-
231
-
232
-
233
-
234
-
235
-
236
-
237
-
238
-
239
-
240
-
241
-
242
-
243
-
244
-
245
-
246
-
247
-
248
-
249
-
250
-
251
-
252
-
253
-
254
-
255
-
256
-
257
-
258
-
259
-
260
-
261
-
262
-
263
-
264
-
265
-
266
-
267
-
268
-
269
-
270
-
271
-
272
-
273
-
274
-
275
-
276
-
277
-
278
-
279
-
280
-
281
-
282
-
283
-
284
-
285
-
286
-
287
-
288
-
289
-
290
-
291
-
292
-
293
-
294
-
295
-
296
-
297
-
298
-
299
-
300
-
301
-
302
-
303
-
304
-
305
-
306
-
307
-
308
-
309
-
310
-
311
-
312
-
313
-
314
-
315
-
316
-
317
-
318
-
319
-
320
-
321
-
322
-
323
-
324
-
325
-
326
-
327
-
328
-
329
-
330
-
331
-
332
-
333
-
334
-
335
-
336
-
337
-
338
-
339
-
340
-
341
-
342
-
343
-
344
-
345
-
346
-
347
-
348
-
349
-
350
-
351
-
352
-
353
-
354
-
355
-
356
-
357
-
358
-
359
-
360
-
361
-
362
-
363
-
364
-
365
-
366
-
367
-
368
-
369
-
370
-
371
-
372
-
373
-
374
-
375
-
376
-
377
-
378
-
379
-
380
-
381
-
382
-
383
-
384
-
385
-
386
-
387
-
388
-
389
-
390
-
391
-
392
-
393
-
394
-
395
-
396
-
397
-
398
-
399
-
400
-
401
-
402
-
403
-
404
-
405
-
406
-
407
-
408
-
409
-
410
-
411
-
412
-
413
-
414
-
415
-
416
-
417
-
418
-
419
-
420
-
421
-
422
-
423
-
424
-
425
-
426
-
427
-
428
-
429
-
430
-
 431
431 -
 432
432 -
 433
433 -
 434
434 -
 435
435 -
 436
436 -
 437
437 -
 438
438 -
 439
439 -
 440
440 -
 441
441 -
442
-
443
-
444
-
445
-
446
-
447
-
448
-
449
-
450
-
451
-
452
-
453
-
454
-
455
-
456
-
457
-
458
-
459
-
460
-
461
-
462
-
463
-
464
 |
 |