Adobe 25520388 User Guide - Page 420
Animation and keyframes, Adding, navigating, and setting keyframes
 |
UPC - 718659493202
View all Adobe 25520388 manuals
Add to My Manuals
Save this manual to your list of manuals |
Page 420 highlights
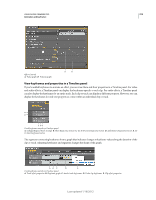
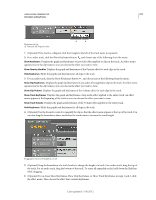
415 Chapter 12: Animation and keyframes Adding, navigating, and setting keyframes To animate a property is to change its value over time. In Premiere Pro, effect properties can be animated by assigning keyframes to them. A keyframe marks the point in time where you specify a value, such as spatial position, opacity, or audio volume. Values between keyframes are interpolated. To create a change in a property over time, you set at least two keyframes- one keyframe for the value at the beginning of the change, and another keyframe for the value at the end of the change. Maxim Jago explains and demonstrates animating using keyframes in a video from "Getting Started with Adobe Premiere Pro" on the Video2Brain website. View keyframes and graphs The Effect Controls panel and Timeline panels let you adjust the timing and values of keyframes, but they work in different ways. The Effect Controls panel displays all effect properties, keyframes, and interpolation methods at once. Clips in a Timeline panel show only one effect property at a time. In the Effect Controls panel, you have complete control over keyframe values. In a Timeline panel, you have limited control. For example, you can't change values that use x and y coordinates, such as Position, in a Timeline. However, you can make keyframe adjustments without moving to the Effect Controls panel. The graphs in the Timeline and Effect Controls panels display the values of each keyframe and the interpolated values between keyframes. When the graph of an effect property is level, the value of the property is unchanged between keyframes. When the graph goes up or down, the value of a property increases or decreases between keyframes. You can affect the speed and smoothness of the property changes from one keyframe to the next. Just change the interpolation method and adjust Bezier curves. More Help topics "Modify keyframe values" on page 420 View keyframes in the Effect Controls panel If you've added keyframes to a sequence clip, you can view them in the Effect Controls panel. Any effect containing keyframed properties displays Summary Keyframe icons when the effect is collapsed. Summary keyframes appear across from the effect heading and correspond to all the individual property keyframes contained in the effect. You cannot manipulate summary keyframes; they appear for reference only. 1 Select a clip in a Timeline panel. 2 If necessary, click the Show/Hide Timeline View button in the Effect Controls panel to show the effects timeline. If necessary, widen the Effect Controls panel to make the Show/Hide Timeline View button visible. 3 In the Effect Controls panel, click the triangle to the left of the effect name to expand the effect you want to view. The keyframes display in the Effect Controls timeline. 4 (Optional) To view the Value and Velocity graphs of an effect property, click the triangle next to the Toggle Animation icon . Last updated 1/16/2012
-
 1
1 -
2
-
3
-
4
-
5
-
6
-
7
-
8
-
9
-
10
-
11
-
12
-
13
-
14
-
15
-
16
-
17
-
18
-
19
-
20
-
21
-
22
-
23
-
24
-
25
-
26
-
27
-
28
-
29
-
30
-
31
-
32
-
33
-
34
-
35
-
36
-
37
-
38
-
39
-
40
-
41
-
42
-
43
-
44
-
45
-
46
-
47
-
48
-
49
-
50
-
51
-
52
-
53
-
54
-
55
-
56
-
57
-
58
-
59
-
60
-
61
-
62
-
63
-
64
-
65
-
66
-
67
-
68
-
69
-
70
-
71
-
72
-
73
-
74
-
75
-
76
-
77
-
78
-
79
-
80
-
81
-
82
-
83
-
84
-
85
-
86
-
87
-
88
-
89
-
90
-
91
-
92
-
93
-
94
-
95
-
96
-
97
-
98
-
99
-
100
-
101
-
102
-
103
-
104
-
105
-
106
-
107
-
108
-
109
-
110
-
111
-
112
-
113
-
114
-
115
-
116
-
117
-
118
-
119
-
120
-
121
-
122
-
123
-
124
-
125
-
126
-
127
-
128
-
129
-
130
-
131
-
132
-
133
-
134
-
135
-
136
-
137
-
138
-
139
-
140
-
141
-
142
-
143
-
144
-
145
-
146
-
147
-
148
-
149
-
150
-
151
-
152
-
153
-
154
-
155
-
156
-
157
-
158
-
159
-
160
-
161
-
162
-
163
-
164
-
165
-
166
-
167
-
168
-
169
-
170
-
171
-
172
-
173
-
174
-
175
-
176
-
177
-
178
-
179
-
180
-
181
-
182
-
183
-
184
-
185
-
186
-
187
-
188
-
189
-
190
-
191
-
192
-
193
-
194
-
195
-
196
-
197
-
198
-
199
-
200
-
201
-
202
-
203
-
204
-
205
-
206
-
207
-
208
-
209
-
210
-
211
-
212
-
213
-
214
-
215
-
216
-
217
-
218
-
219
-
220
-
221
-
222
-
223
-
224
-
225
-
226
-
227
-
228
-
229
-
230
-
231
-
232
-
233
-
234
-
235
-
236
-
237
-
238
-
239
-
240
-
241
-
242
-
243
-
244
-
245
-
246
-
247
-
248
-
249
-
250
-
251
-
252
-
253
-
254
-
255
-
256
-
257
-
258
-
259
-
260
-
261
-
262
-
263
-
264
-
265
-
266
-
267
-
268
-
269
-
270
-
271
-
272
-
273
-
274
-
275
-
276
-
277
-
278
-
279
-
280
-
281
-
282
-
283
-
284
-
285
-
286
-
287
-
288
-
289
-
290
-
291
-
292
-
293
-
294
-
295
-
296
-
297
-
298
-
299
-
300
-
301
-
302
-
303
-
304
-
305
-
306
-
307
-
308
-
309
-
310
-
311
-
312
-
313
-
314
-
315
-
316
-
317
-
318
-
319
-
320
-
321
-
322
-
323
-
324
-
325
-
326
-
327
-
328
-
329
-
330
-
331
-
332
-
333
-
334
-
335
-
336
-
337
-
338
-
339
-
340
-
341
-
342
-
343
-
344
-
345
-
346
-
347
-
348
-
349
-
350
-
351
-
352
-
353
-
354
-
355
-
356
-
357
-
358
-
359
-
360
-
361
-
362
-
363
-
364
-
365
-
366
-
367
-
368
-
369
-
370
-
371
-
372
-
373
-
374
-
375
-
376
-
377
-
378
-
379
-
380
-
381
-
382
-
383
-
384
-
385
-
386
-
387
-
388
-
389
-
390
-
391
-
392
-
393
-
394
-
395
-
396
-
397
-
398
-
399
-
400
-
401
-
402
-
403
-
404
-
405
-
406
-
407
-
408
-
409
-
410
-
411
-
412
-
413
-
414
-
 415
415 -
 416
416 -
 417
417 -
 418
418 -
 419
419 -
 420
420 -
 421
421 -
 422
422 -
 423
423 -
 424
424 -
 425
425 -
426
-
427
-
428
-
429
-
430
-
431
-
432
-
433
-
434
-
435
-
436
-
437
-
438
-
439
-
440
-
441
-
442
-
443
-
444
-
445
-
446
-
447
-
448
-
449
-
450
-
451
-
452
-
453
-
454
-
455
-
456
-
457
-
458
-
459
-
460
-
461
-
462
-
463
-
464
 |
 |