Epson Stylus Pro 10600 - UltraChrome Ink Printer Guide - Page 133
Running a Cleaning Cycle, Printing a Nozzle Check Pattern
 |
View all Epson Stylus Pro 10600 - UltraChrome Ink manuals
Add to My Manuals
Save this manual to your list of manuals |
Page 133 highlights
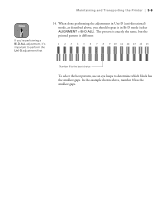
5-4 | Maintaining and Transporting the Printer Running a Cleaning Cycle If your printed image is unexpectedly light or faint or dots are missing from the image, you may need to run a cleaning cycle. This unclogs the print head nozzles so they can deliver ink properly. The cleaning cycle uses ink, so you should run it only if print quality declines. To determine whether a cleaning cycle is necessary, print a nozzle check first. You should also print a nozzle check after cleaning the print head to see if the cleaning cycle was successful. There are two ways to run a nozzle check and cleaning cycle: • Using the printer's control panel buttons, as described below • Using the utilities in your printer software, as described on page 1-36 (not available if you're accessing the printer over a network) If the cleaning cycle described in this section doesn't work, you can try the SSCL cleaning cycle (described on page 5-6). Perform the SSCL cleaning cycle only as a last resort, since it takes more time and consumes more ink than the standard cleaning. TIP You can use plain paper or coated ink jet paper to print this pattern. Printing a Nozzle Check Pattern Follow these steps to print a nozzle check using the control panel buttons: 1. Make sure the printer is turned on but not printing, and letter-size paper is loaded. (You can use roll paper or larger-size sheets, but it will use more paper.) 2. Press the SelecType button on the control panel until you see TEST PRINT MENU on the display. 3. Press the Item button. You see NOZZLE CHECK=PRINT on the display. 5-4
-
 1
1 -
2
-
3
-
4
-
5
-
6
-
7
-
8
-
9
-
10
-
11
-
12
-
13
-
14
-
15
-
16
-
17
-
18
-
19
-
20
-
21
-
22
-
23
-
24
-
25
-
26
-
27
-
28
-
29
-
30
-
31
-
32
-
33
-
34
-
35
-
36
-
37
-
38
-
39
-
40
-
41
-
42
-
43
-
44
-
45
-
46
-
47
-
48
-
49
-
50
-
51
-
52
-
53
-
54
-
55
-
56
-
57
-
58
-
59
-
60
-
61
-
62
-
63
-
64
-
65
-
66
-
67
-
68
-
69
-
70
-
71
-
72
-
73
-
74
-
75
-
76
-
77
-
78
-
79
-
80
-
81
-
82
-
83
-
84
-
85
-
86
-
87
-
88
-
89
-
90
-
91
-
92
-
93
-
94
-
95
-
96
-
97
-
98
-
99
-
100
-
101
-
102
-
103
-
104
-
105
-
106
-
107
-
108
-
109
-
110
-
111
-
112
-
113
-
114
-
115
-
116
-
117
-
118
-
119
-
120
-
121
-
122
-
123
-
124
-
125
-
126
-
127
-
 128
128 -
 129
129 -
 130
130 -
 131
131 -
 132
132 -
 133
133 -
 134
134 -
 135
135 -
 136
136 -
 137
137 -
 138
138 -
139
-
140
-
141
-
142
-
143
-
144
-
145
-
146
-
147
-
148
-
149
-
150
-
151
-
152
-
153
-
154
-
155
-
156
-
157
-
158
-
159
-
160
-
161
-
162
-
163
-
164
-
165
-
166
-
167
-
168
-
169
-
170
-
171
-
172
-
173
-
174
-
175
-
176
-
177
-
178
-
179
-
180
-
181
-
182
-
183
 |
 |