Epson Stylus Pro 10600 - UltraChrome Ink Printer Guide - Page 35
appears on the control panel, display. Even if you don
 |
View all Epson Stylus Pro 10600 - UltraChrome Ink manuals
Add to My Manuals
Save this manual to your list of manuals |
Page 35 highlights
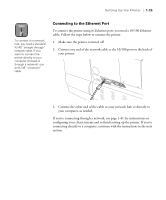
1-20 | Setting Up the Printer 9. Turn the roll back to remove any slack. Then align the paper with the two rows of holes at the paper exit. 10. Push the paper set lever all the way in, then close the roll paper cover. PRESS PAUSE BUTTON appears briefly on the control panel display. Caution To avoid damaging the printer, never move the paper set lever while the Operate or Pause light is flashing. 11. Press the Pause button. The print head moves and the paper feeds into printing position automatically. READY appears on the control panel display. (Even if you don't press Pause, the paper and printer move into printing position automatically after 10 seconds.) 1-20
-
 1
1 -
2
-
3
-
4
-
5
-
6
-
7
-
8
-
9
-
10
-
11
-
12
-
13
-
14
-
15
-
16
-
17
-
18
-
19
-
20
-
21
-
22
-
23
-
24
-
25
-
26
-
27
-
28
-
29
-
 30
30 -
 31
31 -
 32
32 -
 33
33 -
 34
34 -
 35
35 -
 36
36 -
 37
37 -
 38
38 -
 39
39 -
 40
40 -
41
-
42
-
43
-
44
-
45
-
46
-
47
-
48
-
49
-
50
-
51
-
52
-
53
-
54
-
55
-
56
-
57
-
58
-
59
-
60
-
61
-
62
-
63
-
64
-
65
-
66
-
67
-
68
-
69
-
70
-
71
-
72
-
73
-
74
-
75
-
76
-
77
-
78
-
79
-
80
-
81
-
82
-
83
-
84
-
85
-
86
-
87
-
88
-
89
-
90
-
91
-
92
-
93
-
94
-
95
-
96
-
97
-
98
-
99
-
100
-
101
-
102
-
103
-
104
-
105
-
106
-
107
-
108
-
109
-
110
-
111
-
112
-
113
-
114
-
115
-
116
-
117
-
118
-
119
-
120
-
121
-
122
-
123
-
124
-
125
-
126
-
127
-
128
-
129
-
130
-
131
-
132
-
133
-
134
-
135
-
136
-
137
-
138
-
139
-
140
-
141
-
142
-
143
-
144
-
145
-
146
-
147
-
148
-
149
-
150
-
151
-
152
-
153
-
154
-
155
-
156
-
157
-
158
-
159
-
160
-
161
-
162
-
163
-
164
-
165
-
166
-
167
-
168
-
169
-
170
-
171
-
172
-
173
-
174
-
175
-
176
-
177
-
178
-
179
-
180
-
181
-
182
-
183
 |
 |

1-20
1-20
|
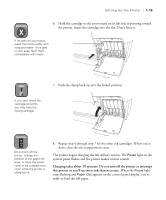
Setting Up the Printer
9.
Turn the roll back to remove any slack. Then align the paper with the
two rows of holes at the paper exit.
10.
Push the paper set lever all the way in, then close the roll paper cover.
PRESS PAUSE BUTTON
appears briefly on the control panel display.
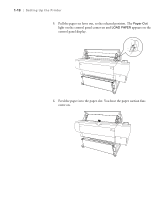
11.
Press the
Pause
button. The print head moves and the paper feeds into
printing position automatically.
READY
appears on the control panel
display. (Even if you don
’
t press
Pause
, the paper and printer move into
printing position automatically after 10 seconds.)
Caution
To avoid damaging the
printer, never move the
paper set lever while the
Operate
or
Pause
light
is flashing.