Epson Stylus Pro 10600 - UltraChrome Ink Printer Guide - Page 63
and follow the messages on the screen to complete, When done setting up your network connection
 |
View all Epson Stylus Pro 10600 - UltraChrome Ink manuals
Add to My Manuals
Save this manual to your list of manuals |
Page 63 highlights
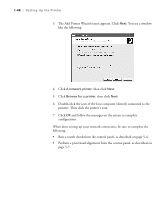
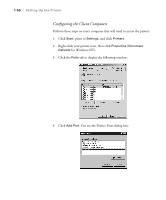
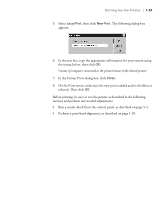
1-48 | Setting Up the Printer 3. The Add Printer Wizard screen appears. Click Next. You see a window like the following: 4. Click A network printer, then click Next. 5. Click Browse for a printer, then click Next. 6. Double-click the icon of the host computer (directly connected to the printer). Then click the printer's icon. 7. Click OK and follow the messages on the screen to complete configuration. When done setting up your network connection, be sure to complete the following: • Run a nozzle check from the control panel, as described on page 5-4. • Perform a print head alignment from the control panel, as described on page 5-7. 1-48
-
 1
1 -
2
-
3
-
4
-
5
-
6
-
7
-
8
-
9
-
10
-
11
-
12
-
13
-
14
-
15
-
16
-
17
-
18
-
19
-
20
-
21
-
22
-
23
-
24
-
25
-
26
-
27
-
28
-
29
-
30
-
31
-
32
-
33
-
34
-
35
-
36
-
37
-
38
-
39
-
40
-
41
-
42
-
43
-
44
-
45
-
46
-
47
-
48
-
49
-
50
-
51
-
52
-
53
-
54
-
55
-
56
-
57
-
 58
58 -
 59
59 -
 60
60 -
 61
61 -
 62
62 -
 63
63 -
 64
64 -
 65
65 -
 66
66 -
 67
67 -
 68
68 -
69
-
70
-
71
-
72
-
73
-
74
-
75
-
76
-
77
-
78
-
79
-
80
-
81
-
82
-
83
-
84
-
85
-
86
-
87
-
88
-
89
-
90
-
91
-
92
-
93
-
94
-
95
-
96
-
97
-
98
-
99
-
100
-
101
-
102
-
103
-
104
-
105
-
106
-
107
-
108
-
109
-
110
-
111
-
112
-
113
-
114
-
115
-
116
-
117
-
118
-
119
-
120
-
121
-
122
-
123
-
124
-
125
-
126
-
127
-
128
-
129
-
130
-
131
-
132
-
133
-
134
-
135
-
136
-
137
-
138
-
139
-
140
-
141
-
142
-
143
-
144
-
145
-
146
-
147
-
148
-
149
-
150
-
151
-
152
-
153
-
154
-
155
-
156
-
157
-
158
-
159
-
160
-
161
-
162
-
163
-
164
-
165
-
166
-
167
-
168
-
169
-
170
-
171
-
172
-
173
-
174
-
175
-
176
-
177
-
178
-
179
-
180
-
181
-
182
-
183
 |
 |

1-48
1-48
|
Setting Up the Printer
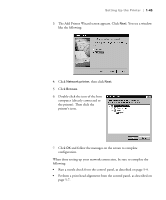
3.
The Add Printer Wizard screen appears. Click
Next
. You see a window
like the following:
4.
Click
A network printer
, then click
Next
.
5.
Click
Browse for a printer
, then click
Next
.
6.
Double-click the icon of the host computer (directly connected to the
printer). Then click the printer
’
s icon.
7.
Click
OK
and follow the messages on the screen to complete
configuration.
When done setting up your network connection, be sure to complete the
following:
•
Run a nozzle check from the control panel, as described on page 5-4.
•
Perform a print head alignment from the control panel, as described on
page 5-7.