Epson Stylus Pro 10600 - UltraChrome Ink Printer Guide - Page 52
Aligning the Print Head, and not deflected. You may need to use an eye loupe to check
 |
View all Epson Stylus Pro 10600 - UltraChrome Ink manuals
Add to My Manuals
Save this manual to your list of manuals |
Page 52 highlights
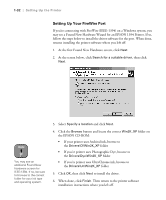
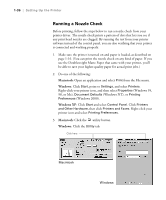
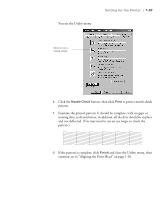
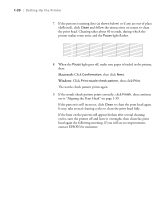
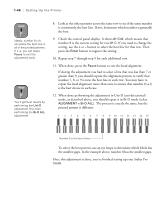
You see the Utility menu: Setting Up the Printer | 1-37 Click to run a nozzle check 4. Click the Nozzle Check button, then click Print to print a nozzle check pattern. 5. Examine the printed pattern. It should be complete, with no gaps or missing dots, as shown below; in addition, all the dots should be in place and not deflected. (You may need to use an eye loupe to check the pattern.) 6. If the pattern is complete, click Finish and close the Utility menu, then continue on to "Aligning the Print Head" on page 1-39. 1-37
-
 1
1 -
2
-
3
-
4
-
5
-
6
-
7
-
8
-
9
-
10
-
11
-
12
-
13
-
14
-
15
-
16
-
17
-
18
-
19
-
20
-
21
-
22
-
23
-
24
-
25
-
26
-
27
-
28
-
29
-
30
-
31
-
32
-
33
-
34
-
35
-
36
-
37
-
38
-
39
-
40
-
41
-
42
-
43
-
44
-
45
-
46
-
 47
47 -
 48
48 -
 49
49 -
 50
50 -
 51
51 -
 52
52 -
 53
53 -
 54
54 -
 55
55 -
 56
56 -
 57
57 -
58
-
59
-
60
-
61
-
62
-
63
-
64
-
65
-
66
-
67
-
68
-
69
-
70
-
71
-
72
-
73
-
74
-
75
-
76
-
77
-
78
-
79
-
80
-
81
-
82
-
83
-
84
-
85
-
86
-
87
-
88
-
89
-
90
-
91
-
92
-
93
-
94
-
95
-
96
-
97
-
98
-
99
-
100
-
101
-
102
-
103
-
104
-
105
-
106
-
107
-
108
-
109
-
110
-
111
-
112
-
113
-
114
-
115
-
116
-
117
-
118
-
119
-
120
-
121
-
122
-
123
-
124
-
125
-
126
-
127
-
128
-
129
-
130
-
131
-
132
-
133
-
134
-
135
-
136
-
137
-
138
-
139
-
140
-
141
-
142
-
143
-
144
-
145
-
146
-
147
-
148
-
149
-
150
-
151
-
152
-
153
-
154
-
155
-
156
-
157
-
158
-
159
-
160
-
161
-
162
-
163
-
164
-
165
-
166
-
167
-
168
-
169
-
170
-
171
-
172
-
173
-
174
-
175
-
176
-
177
-
178
-
179
-
180
-
181
-
182
-
183
 |
 |

1-37
Setting Up the Printer
|
1-37
You see the Utility menu:
4.
Click the
Nozzle
Check
button, then click
Print
to print a nozzle check
pattern.
5.
Examine the printed pattern. It should be complete, with no gaps or
missing dots, as shown below; in addition, all the dots should be in place
and not deflected. (You may need to use an eye loupe to check the
pattern.)
6.
If the pattern is complete, click
Finish
and close the Utility menu, then
continue on to
“
Aligning the Print Head
”
on page 1-39.
Click to run a
nozzle check