Epson Stylus Pro 10600 - UltraChrome Ink Printer Guide - Page 51
Running a Nozzle Check, Macintosh, Windows
 |
View all Epson Stylus Pro 10600 - UltraChrome Ink manuals
Add to My Manuals
Save this manual to your list of manuals |
Page 51 highlights
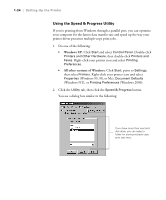
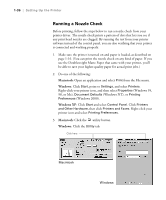
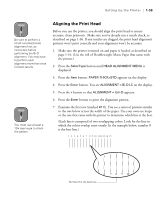
1-36 | Setting Up the Printer Running a Nozzle Check Before printing, follow the steps below to run a nozzle check from your printer driver. The nozzle check prints a pattern of dots that lets you see if any print head nozzles are clogged. By running the test from your printer software instead of the control panel, you are also verifying that your printer is connected and working properly. 1. Make sure the printer is turned on and paper is loaded, as described on page 1-16. (You can print the nozzle check on any kind of paper. If you use the Doubleweight Matte Paper that came with your printer, you'll be able to save your higher-quality paper for actual print jobs.) 2. Do one of the following: Macintosh: Open an application and select Print from the File menu. Windows: Click Start, point to Settings, and select Printers. Right-click your printer icon, and then select Properties (Windows 95, 98, or Me), Document Defaults (Windows NT), or Printing Preferences (Windows 2000). Windows XP: Click Start and select Control Panel. Click Printers and Other Hardware, then click Printers and Faxes. Right-click your printer icon and select Printing Preferences. 3. Macintosh: Click the utility button. Windows: Click the Utility tab. Click here Macintosh Windows 1-36
-
 1
1 -
2
-
3
-
4
-
5
-
6
-
7
-
8
-
9
-
10
-
11
-
12
-
13
-
14
-
15
-
16
-
17
-
18
-
19
-
20
-
21
-
22
-
23
-
24
-
25
-
26
-
27
-
28
-
29
-
30
-
31
-
32
-
33
-
34
-
35
-
36
-
37
-
38
-
39
-
40
-
41
-
42
-
43
-
44
-
45
-
 46
46 -
 47
47 -
 48
48 -
 49
49 -
 50
50 -
 51
51 -
 52
52 -
 53
53 -
 54
54 -
 55
55 -
 56
56 -
57
-
58
-
59
-
60
-
61
-
62
-
63
-
64
-
65
-
66
-
67
-
68
-
69
-
70
-
71
-
72
-
73
-
74
-
75
-
76
-
77
-
78
-
79
-
80
-
81
-
82
-
83
-
84
-
85
-
86
-
87
-
88
-
89
-
90
-
91
-
92
-
93
-
94
-
95
-
96
-
97
-
98
-
99
-
100
-
101
-
102
-
103
-
104
-
105
-
106
-
107
-
108
-
109
-
110
-
111
-
112
-
113
-
114
-
115
-
116
-
117
-
118
-
119
-
120
-
121
-
122
-
123
-
124
-
125
-
126
-
127
-
128
-
129
-
130
-
131
-
132
-
133
-
134
-
135
-
136
-
137
-
138
-
139
-
140
-
141
-
142
-
143
-
144
-
145
-
146
-
147
-
148
-
149
-
150
-
151
-
152
-
153
-
154
-
155
-
156
-
157
-
158
-
159
-
160
-
161
-
162
-
163
-
164
-
165
-
166
-
167
-
168
-
169
-
170
-
171
-
172
-
173
-
174
-
175
-
176
-
177
-
178
-
179
-
180
-
181
-
182
-
183
 |
 |