Epson Stylus Pro 10600 - UltraChrome Ink Printer Guide - Page 136
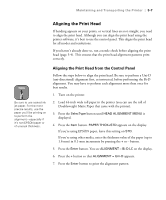
Aligning the Print Head, Aligning the Print Head from the Control Panel
 |
View all Epson Stylus Pro 10600 - UltraChrome Ink manuals
Add to My Manuals
Save this manual to your list of manuals |
Page 136 highlights
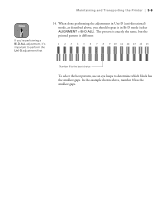
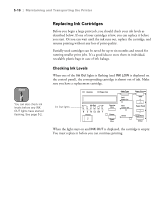
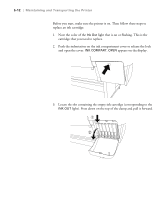
Maintaining and Transporting the Printer | 5-7 Aligning the Print Head If banding appears on your prints, or vertical lines are not straight, you need to align the print head. Although you can align the print head using the printer software, it's best to use the control panel. This aligns the print head for all modes and resolutions. If you haven't already done so, run a nozzle check before aligning the print head (page 5-4). This ensures that the print head alignment patterns print correctly. Note Be sure to use coated ink jet paper. For the most precise results, use the paper you'll be printing on to perform the alignment-especially if it's non-EPSON paper or of unusual thickness. Aligning the Print Head from the Control Panel Follow the steps below to align the print head. Be sure to perform a Uni-D (uni-directional) alignment first, as instructed, before performing the Bi-D alignment. You may have to perform each alignment more than once for best results. 1. Turn on the printer. 2. Load 44-inch wide roll paper in the printer (you can use the roll of Doubleweight Matte Paper that came with the printer). 3. Press the SelecType button until HEAD ALIGNMENT MENU is displayed. 4. Press the Item button. PAPER THICK=STD appears on the display. If you're using EPSON paper, leave this setting on STD. If you're using other media, enter the thickness value of the paper (up to 1.6 mm) in 0.1-mm increments by pressing the + or - button. 5. Press the Enter button. You see ALIGNMENT = Bi-D LC on the display. 6. Press the + button so that ALIGNMENT = Uni-D appears. 7. Press the Enter button to print the alignment pattern. 5-7
-
 1
1 -
2
-
3
-
4
-
5
-
6
-
7
-
8
-
9
-
10
-
11
-
12
-
13
-
14
-
15
-
16
-
17
-
18
-
19
-
20
-
21
-
22
-
23
-
24
-
25
-
26
-
27
-
28
-
29
-
30
-
31
-
32
-
33
-
34
-
35
-
36
-
37
-
38
-
39
-
40
-
41
-
42
-
43
-
44
-
45
-
46
-
47
-
48
-
49
-
50
-
51
-
52
-
53
-
54
-
55
-
56
-
57
-
58
-
59
-
60
-
61
-
62
-
63
-
64
-
65
-
66
-
67
-
68
-
69
-
70
-
71
-
72
-
73
-
74
-
75
-
76
-
77
-
78
-
79
-
80
-
81
-
82
-
83
-
84
-
85
-
86
-
87
-
88
-
89
-
90
-
91
-
92
-
93
-
94
-
95
-
96
-
97
-
98
-
99
-
100
-
101
-
102
-
103
-
104
-
105
-
106
-
107
-
108
-
109
-
110
-
111
-
112
-
113
-
114
-
115
-
116
-
117
-
118
-
119
-
120
-
121
-
122
-
123
-
124
-
125
-
126
-
127
-
128
-
129
-
130
-
 131
131 -
 132
132 -
 133
133 -
 134
134 -
 135
135 -
 136
136 -
 137
137 -
 138
138 -
 139
139 -
 140
140 -
 141
141 -
142
-
143
-
144
-
145
-
146
-
147
-
148
-
149
-
150
-
151
-
152
-
153
-
154
-
155
-
156
-
157
-
158
-
159
-
160
-
161
-
162
-
163
-
164
-
165
-
166
-
167
-
168
-
169
-
170
-
171
-
172
-
173
-
174
-
175
-
176
-
177
-
178
-
179
-
180
-
181
-
182
-
183
 |
 |