HP 6500 User Guide - Page 170
Something on the is missing or incorrect, Placement of the text or graphics is wrong
 |
UPC - 884420425137
View all HP 6500 manuals
Add to My Manuals
Save this manual to your list of manuals |
Page 170 highlights
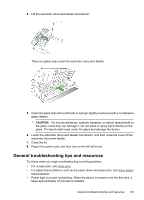
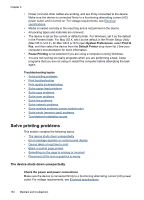
Chapter 9 Check the media settings • Make sure you select the correct print quality settings in the printer driver for the media loaded in the trays. • Make sure the page settings in the printer driver match the page size of media loaded in the tray. More than one page is being picked For more information on paper-feed problems, see Solve paper-feed problems. There is a blank page in the file Check the file to make sure there is no blank page. Something on the page is missing or incorrect Check the ink cartridges Make sure the correct ink cartridges are installed and the ink cartridges are not low on ink. For more information, see Manage the device and Check the estimated ink levels. NOTE: Turn off the HP all-in-one by pressing the Power button located on the product. Wait until the Power light turns off before unplugging the power cord or turning off a power strip. If you improperly turn off the HP all-in-one, the print carriage might not return to the correct position causing problems with the ink cartridges and print quality issues. Check the margin settings Make sure the margin settings for the document do not exceed the printable area of the device. For more information, see Set minimum margins. Check the color print settings Make sure Print in Grayscale is not selected in the print driver. Check the device location and length of USB cable High electromagnetic fields (such as those generated by USB cables) can sometimes cause slight distortions to printouts. Move the device away from the source of the electromagnetic fields. Also, it is recommended that you use a USB cable that is less than 3 meters (9.8 feet) long to minimize the effects of these electromagnetic fields. Placement of the text or graphics is wrong Check how the media is loaded Make sure the media width and length guides fit snugly against the edges of the stack of media, and make sure the tray is not overloaded. For more information, see Load media. 166 Maintain and troubleshoot
-
 1
1 -
2
-
3
-
4
-
5
-
6
-
7
-
8
-
9
-
10
-
11
-
12
-
13
-
14
-
15
-
16
-
17
-
18
-
19
-
20
-
21
-
22
-
23
-
24
-
25
-
26
-
27
-
28
-
29
-
30
-
31
-
32
-
33
-
34
-
35
-
36
-
37
-
38
-
39
-
40
-
41
-
42
-
43
-
44
-
45
-
46
-
47
-
48
-
49
-
50
-
51
-
52
-
53
-
54
-
55
-
56
-
57
-
58
-
59
-
60
-
61
-
62
-
63
-
64
-
65
-
66
-
67
-
68
-
69
-
70
-
71
-
72
-
73
-
74
-
75
-
76
-
77
-
78
-
79
-
80
-
81
-
82
-
83
-
84
-
85
-
86
-
87
-
88
-
89
-
90
-
91
-
92
-
93
-
94
-
95
-
96
-
97
-
98
-
99
-
100
-
101
-
102
-
103
-
104
-
105
-
106
-
107
-
108
-
109
-
110
-
111
-
112
-
113
-
114
-
115
-
116
-
117
-
118
-
119
-
120
-
121
-
122
-
123
-
124
-
125
-
126
-
127
-
128
-
129
-
130
-
131
-
132
-
133
-
134
-
135
-
136
-
137
-
138
-
139
-
140
-
141
-
142
-
143
-
144
-
145
-
146
-
147
-
148
-
149
-
150
-
151
-
152
-
153
-
154
-
155
-
156
-
157
-
158
-
159
-
160
-
161
-
162
-
163
-
164
-
 165
165 -
 166
166 -
 167
167 -
 168
168 -
 169
169 -
 170
170 -
 171
171 -
 172
172 -
 173
173 -
 174
174 -
 175
175 -
176
-
177
-
178
-
179
-
180
-
181
-
182
-
183
-
184
-
185
-
186
-
187
-
188
-
189
-
190
-
191
-
192
-
193
-
194
-
195
-
196
-
197
-
198
-
199
-
200
-
201
-
202
-
203
-
204
-
205
-
206
-
207
-
208
-
209
-
210
-
211
-
212
-
213
-
214
-
215
-
216
-
217
-
218
-
219
-
220
-
221
-
222
-
223
-
224
-
225
-
226
-
227
-
228
-
229
-
230
-
231
-
232
-
233
-
234
-
235
-
236
-
237
-
238
-
239
-
240
-
241
-
242
-
243
-
244
-
245
-
246
-
247
-
248
-
249
-
250
-
251
-
252
-
253
-
254
-
255
-
256
-
257
-
258
-
259
-
260
-
261
-
262
-
263
-
264
-
265
-
266
-
267
-
268
-
269
-
270
-
271
-
272
-
273
-
274
-
275
-
276
-
277
-
278
-
279
-
280
-
281
-
282
-
283
-
284
-
285
-
286
-
287
-
288
-
289
-
290
-
291
-
292
-
293
-
294
 |
 |