HP 6500 User Guide - Page 21
Connection information, START PC COPY Color - officejet all in one printer
 |
UPC - 884420425137
View all HP 6500 manuals
Add to My Manuals
Save this manual to your list of manuals |
Page 21 highlights
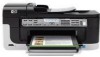
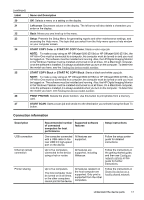
(continued) Label 20 21 22 23 24 25 26 27 Name and Description OK: Selects a menu or a setting on the display. Left arrow: Decreases values on the display. The left arrow will also delete a characters you enter on the display. Back: Moves you one level up in the menu. Setup: Presents the Setup Menu for generating reports and other maintenance settings, and accessing the Help menu. The topic that you select from the Help menu opens a help window on your computer screen. START COPY Color or START PC COPY Color: Starts a color copy job. NOTE: To make a copy using an HP Officejet 6500 (E709d) or HP Officejet 6500 (E709r), the HP All-in-One must be connected to a computer, the computer must be turned on and you must be logged on. The software must be installed and running. Also, the HP Digital Imaging Monitor in the Windows Taskbar must be installed and turned on at all times. On a Macintosh computer, once the software is installed, it is always available when you turn on the computer. To determine the model you have, see the Finding the device model number. START COPY Black or START PC COPY Black: Starts a black-and-white copy job. NOTE: To make a copy using an HP Officejet 6500 (E709d) or HP Officejet 6500 (E709r), the HP All-in-One must be connected to a computer, the computer must be turned on and you must be logged on. The software must be installed and running. Also, the HP Digital Imaging Monitor in the Windows Taskbar must be installed and turned on at all times. On a Macintosh computer, once the software is installed, it is always available when you turn on the computer. To determine the model you have, see Finding the device model number. PRINT PHOTOS: Selects the photo function. Use this button to print photos from a memory card. START SCAN: Starts a scan job and sends it to the destination you selected using the Scan To button. Connection information Description USB connection Ethernet (wired) connection Printer sharing Recommended number of connected computers for best performance Supported software features Setup instructions One computer connected with a USB cable to the rear USB 2.0 high-speed port on the device. All features are supported. Follow the setup poster guide for detailed instructions. Up to five computers connected to the device using a hub or router. All features are supported, including Webscan. Follow the instructions in the getting started guide, and then see Configure network options in this guide for further instructions. Up to five computers. The host computer must be turned on at all times, or the other computers cannot print to the device. All features resident on the host computer are supported. Only print is supported from the other computers. Follow the instructions in Share the device on a locally shared network. Understand the device parts 17
-
 1
1 -
2
-
3
-
4
-
5
-
6
-
7
-
8
-
9
-
10
-
11
-
12
-
13
-
14
-
15
-
 16
16 -
 17
17 -
 18
18 -
 19
19 -
 20
20 -
 21
21 -
 22
22 -
 23
23 -
 24
24 -
 25
25 -
 26
26 -
27
-
28
-
29
-
30
-
31
-
32
-
33
-
34
-
35
-
36
-
37
-
38
-
39
-
40
-
41
-
42
-
43
-
44
-
45
-
46
-
47
-
48
-
49
-
50
-
51
-
52
-
53
-
54
-
55
-
56
-
57
-
58
-
59
-
60
-
61
-
62
-
63
-
64
-
65
-
66
-
67
-
68
-
69
-
70
-
71
-
72
-
73
-
74
-
75
-
76
-
77
-
78
-
79
-
80
-
81
-
82
-
83
-
84
-
85
-
86
-
87
-
88
-
89
-
90
-
91
-
92
-
93
-
94
-
95
-
96
-
97
-
98
-
99
-
100
-
101
-
102
-
103
-
104
-
105
-
106
-
107
-
108
-
109
-
110
-
111
-
112
-
113
-
114
-
115
-
116
-
117
-
118
-
119
-
120
-
121
-
122
-
123
-
124
-
125
-
126
-
127
-
128
-
129
-
130
-
131
-
132
-
133
-
134
-
135
-
136
-
137
-
138
-
139
-
140
-
141
-
142
-
143
-
144
-
145
-
146
-
147
-
148
-
149
-
150
-
151
-
152
-
153
-
154
-
155
-
156
-
157
-
158
-
159
-
160
-
161
-
162
-
163
-
164
-
165
-
166
-
167
-
168
-
169
-
170
-
171
-
172
-
173
-
174
-
175
-
176
-
177
-
178
-
179
-
180
-
181
-
182
-
183
-
184
-
185
-
186
-
187
-
188
-
189
-
190
-
191
-
192
-
193
-
194
-
195
-
196
-
197
-
198
-
199
-
200
-
201
-
202
-
203
-
204
-
205
-
206
-
207
-
208
-
209
-
210
-
211
-
212
-
213
-
214
-
215
-
216
-
217
-
218
-
219
-
220
-
221
-
222
-
223
-
224
-
225
-
226
-
227
-
228
-
229
-
230
-
231
-
232
-
233
-
234
-
235
-
236
-
237
-
238
-
239
-
240
-
241
-
242
-
243
-
244
-
245
-
246
-
247
-
248
-
249
-
250
-
251
-
252
-
253
-
254
-
255
-
256
-
257
-
258
-
259
-
260
-
261
-
262
-
263
-
264
-
265
-
266
-
267
-
268
-
269
-
270
-
271
-
272
-
273
-
274
-
275
-
276
-
277
-
278
-
279
-
280
-
281
-
282
-
283
-
284
-
285
-
286
-
287
-
288
-
289
-
290
-
291
-
292
-
293
-
294
 |
 |