HP LaserJet 4350 HP LaserJet 4250/4350 Series - User Guide - Page 155
Do not use a sharp object to clear media from the fuser area. You might damage the fuser.
 |
View all HP LaserJet 4350 manuals
Add to My Manuals
Save this manual to your list of manuals |
Page 155 highlights
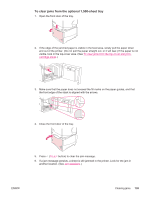
5. Firmly grasp each side of the fuser. Push the blue levers upward and pull the fuser straight out of the printer. 6. Remove the jammed media. If necessary, lift the black plastic guide that is located on the top of the fuser to gain access to the jammed sheet. You can also turn the jamclearing wheel that is located on the side of the fuser to attempt to eject the jammed sheet. CAUTION Do not use a sharp object to clear media from the fuser area. You might damage the fuser. 7. Push the fuser firmly into the printer until the blue levers on both sides click into place. 8. Install the rear output bin. Pull gently on the bin to make sure that the hinge pins are fully inserted. 1 1 2 ENWW Clearing jams 143
-
 1
1 -
2
-
3
-
4
-
5
-
6
-
7
-
8
-
9
-
10
-
11
-
12
-
13
-
14
-
15
-
16
-
17
-
18
-
19
-
20
-
21
-
22
-
23
-
24
-
25
-
26
-
27
-
28
-
29
-
30
-
31
-
32
-
33
-
34
-
35
-
36
-
37
-
38
-
39
-
40
-
41
-
42
-
43
-
44
-
45
-
46
-
47
-
48
-
49
-
50
-
51
-
52
-
53
-
54
-
55
-
56
-
57
-
58
-
59
-
60
-
61
-
62
-
63
-
64
-
65
-
66
-
67
-
68
-
69
-
70
-
71
-
72
-
73
-
74
-
75
-
76
-
77
-
78
-
79
-
80
-
81
-
82
-
83
-
84
-
85
-
86
-
87
-
88
-
89
-
90
-
91
-
92
-
93
-
94
-
95
-
96
-
97
-
98
-
99
-
100
-
101
-
102
-
103
-
104
-
105
-
106
-
107
-
108
-
109
-
110
-
111
-
112
-
113
-
114
-
115
-
116
-
117
-
118
-
119
-
120
-
121
-
122
-
123
-
124
-
125
-
126
-
127
-
128
-
129
-
130
-
131
-
132
-
133
-
134
-
135
-
136
-
137
-
138
-
139
-
140
-
141
-
142
-
143
-
144
-
145
-
146
-
147
-
148
-
149
-
 150
150 -
 151
151 -
 152
152 -
 153
153 -
 154
154 -
 155
155 -
 156
156 -
 157
157 -
 158
158 -
 159
159 -
 160
160 -
161
-
162
-
163
-
164
-
165
-
166
-
167
-
168
-
169
-
170
-
171
-
172
-
173
-
174
-
175
-
176
-
177
-
178
-
179
-
180
-
181
-
182
-
183
-
184
-
185
-
186
-
187
-
188
-
189
-
190
-
191
-
192
-
193
-
194
-
195
-
196
-
197
-
198
-
199
-
200
-
201
-
202
-
203
-
204
-
205
-
206
-
207
-
208
-
209
-
210
-
211
-
212
-
213
-
214
-
215
-
216
-
217
-
218
-
219
-
220
-
221
-
222
-
223
-
224
-
225
-
226
-
227
-
228
-
229
-
230
-
231
-
232
-
233
-
234
-
235
-
236
-
237
-
238
-
239
-
240
-
241
-
242
-
243
-
244
-
245
-
246
-
247
-
248
-
249
-
250
-
251
-
252
-
253
-
254
-
255
-
256
-
257
-
258
-
259
-
260
-
261
-
262
-
263
-
264
-
265
-
266
-
267
-
268
-
269
-
270
-
271
-
272
-
273
-
274
-
275
-
276
-
277
-
278
-
279
-
280
-
281
-
282
-
283
-
284
-
285
-
286
-
287
-
288
-
289
-
290
-
291
-
292
-
293
-
294
-
295
-
296
-
297
-
298
-
299
-
300
-
301
-
302
-
303
-
304
 |
 |

5.
Firmly grasp each side of the fuser. Push the blue levers upward and pull the fuser
straight out of the printer.
6.
Remove the jammed media. If necessary, lift the black plastic guide that is located on
the top of the fuser to gain access to the jammed sheet. You can also turn the jam-
clearing wheel that is located on the side of the fuser to attempt to eject the jammed
sheet.
CAUTION
Do not use a sharp object to clear media from the fuser area. You might damage the fuser.
7.
Push the fuser firmly into the printer until the blue levers on both sides click into place.
8.
Install the rear output bin. Pull gently on the bin to make sure that the hinge pins are fully
inserted.
1
2
1
ENWW
Clearing jams
143