HP LaserJet 4350 HP LaserJet 4250/4350 Series - User Guide - Page 85
Layout options for printing on both sides of paper - windows 7 driver
 |
View all HP LaserJet 4350 manuals
Add to My Manuals
Save this manual to your list of manuals |
Page 85 highlights
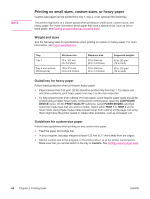
Layout options for printing on both sides of paper The four duplex orientation options are shown below. These options can be selected in the printer driver (the preferred method) or at the printer control panel. (If you use the printer control panel, go to Configure Device menu, then the Printing submenu. Select DUPLEX BINDING. On the PCL submenu, select a setting for ORIENTATION.) 1 2 3 4 2 2 3 5 3 5 2 2 3 5 3 5 CAUTION ENWW 1. Long-edge landscape* 2. Short-edge landscape 3. Long-edge portrait 4. Short-edge portrait* This layout is often used in accounting, data processing, and spreadsheet programs. Every other printed image is oriented upside-down. Facing pages are read continuously from top to bottom. Each printed image is oriented right-side-up. Facing pages are read from top to bottom on the left page, then from top to bottom on the right page. This is the default printer setting, and the most common layout used, with every printed image oriented right-side-up. Facing pages are read from top to bottom on the left page, then from top to bottom on the right page. This layout is often used with clipboards. Every other printed image is oriented upside-down. Facing pages are read continuously from top to bottom. * When using Windows drivers, select Flip Pages Up to get the designated binding options. To duplex with the optional duplex-printing accessory 1. Insert enough paper into one of the trays to accommodate the print job. If you are loading special paper such as letterhead, load it in one of the following ways: ● For tray 1, load the letterhead paper with the front side down, bottom-edge first. ● For all other trays, load the letterhead paper with front side up, and the top edge toward the back of the tray. Do not load paper that is heavier than 105 g/m2 (28 lb bond). Jamming could result. 2. Open the printer driver (see Changing the settings for a print job). 3. On the Finishing tab, click Print on Both Sides. For Macintosh, click File, click Print, and then click Layout. Printing on both sides of paper (optional duplexer) 73
-
 1
1 -
2
-
3
-
4
-
5
-
6
-
7
-
8
-
9
-
10
-
11
-
12
-
13
-
14
-
15
-
16
-
17
-
18
-
19
-
20
-
21
-
22
-
23
-
24
-
25
-
26
-
27
-
28
-
29
-
30
-
31
-
32
-
33
-
34
-
35
-
36
-
37
-
38
-
39
-
40
-
41
-
42
-
43
-
44
-
45
-
46
-
47
-
48
-
49
-
50
-
51
-
52
-
53
-
54
-
55
-
56
-
57
-
58
-
59
-
60
-
61
-
62
-
63
-
64
-
65
-
66
-
67
-
68
-
69
-
70
-
71
-
72
-
73
-
74
-
75
-
76
-
77
-
78
-
79
-
 80
80 -
 81
81 -
 82
82 -
 83
83 -
 84
84 -
 85
85 -
 86
86 -
 87
87 -
 88
88 -
 89
89 -
 90
90 -
91
-
92
-
93
-
94
-
95
-
96
-
97
-
98
-
99
-
100
-
101
-
102
-
103
-
104
-
105
-
106
-
107
-
108
-
109
-
110
-
111
-
112
-
113
-
114
-
115
-
116
-
117
-
118
-
119
-
120
-
121
-
122
-
123
-
124
-
125
-
126
-
127
-
128
-
129
-
130
-
131
-
132
-
133
-
134
-
135
-
136
-
137
-
138
-
139
-
140
-
141
-
142
-
143
-
144
-
145
-
146
-
147
-
148
-
149
-
150
-
151
-
152
-
153
-
154
-
155
-
156
-
157
-
158
-
159
-
160
-
161
-
162
-
163
-
164
-
165
-
166
-
167
-
168
-
169
-
170
-
171
-
172
-
173
-
174
-
175
-
176
-
177
-
178
-
179
-
180
-
181
-
182
-
183
-
184
-
185
-
186
-
187
-
188
-
189
-
190
-
191
-
192
-
193
-
194
-
195
-
196
-
197
-
198
-
199
-
200
-
201
-
202
-
203
-
204
-
205
-
206
-
207
-
208
-
209
-
210
-
211
-
212
-
213
-
214
-
215
-
216
-
217
-
218
-
219
-
220
-
221
-
222
-
223
-
224
-
225
-
226
-
227
-
228
-
229
-
230
-
231
-
232
-
233
-
234
-
235
-
236
-
237
-
238
-
239
-
240
-
241
-
242
-
243
-
244
-
245
-
246
-
247
-
248
-
249
-
250
-
251
-
252
-
253
-
254
-
255
-
256
-
257
-
258
-
259
-
260
-
261
-
262
-
263
-
264
-
265
-
266
-
267
-
268
-
269
-
270
-
271
-
272
-
273
-
274
-
275
-
276
-
277
-
278
-
279
-
280
-
281
-
282
-
283
-
284
-
285
-
286
-
287
-
288
-
289
-
290
-
291
-
292
-
293
-
294
-
295
-
296
-
297
-
298
-
299
-
300
-
301
-
302
-
303
-
304
 |
 |
