HP LaserJet 4350 HP LaserJet 4250/4350 Series - User Guide - Page 84
Orientation of paper for duplexing, DUPLEX=ON, CON DEVICE, PRINTING, DUPLEX BINDING, LONG EDGE
 |
View all HP LaserJet 4350 manuals
Add to My Manuals
Save this manual to your list of manuals |
Page 84 highlights
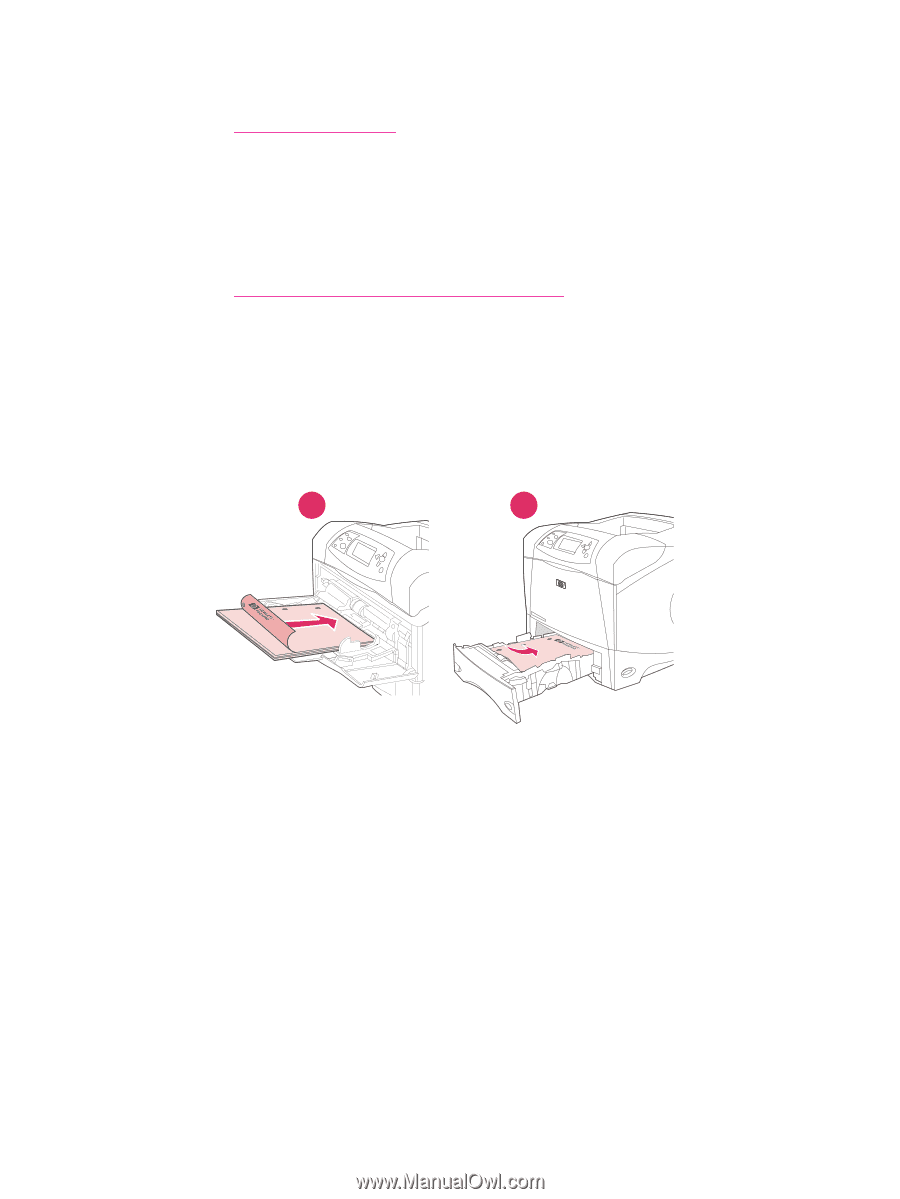
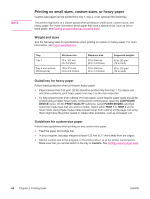
Note the following guidelines: ● Before using the duplexer, ensure that the printer driver is set to recognize it. The procedure varies according to the operating system that you are using. For details, see Using the printer drivers. Look for the instructions in the column labeled "To change configuration settings." ● To print on both sides of paper, make the selection in your program or the printer driver. (See the printer driver online Help.) ● If you do not use the printer driver that came with the printer, you might need to change the duplex setting at the printer control panel, set DUPLEX=ON on the CONFIGURE DEVICE menu in the PRINTING submenu. Also on the PRINTING submenu, set DUPLEX BINDING to LONG EDGE or SHORT EDGE. (For more information, see Layout options for printing on both sides of paper.) ● The rear output bin must be closed to use the duplexer. Opening the rear output bin disables the duplexer. Orientation of paper for duplexing Several kinds of paper (such as letterhead, preprinted paper, prepunched paper, and paper with watermarks) require a specific orientation for duplex printing. The duplexer prints the second side of paper first. The proper orientation of the paper in the trays is shown below. 1 2 1 Tray 1 2 All other trays For tray 1, load the front side facing down and the top edge toward you. For all other trays, load the front side facing up and the top edge toward the printer. 72 Chapter 2 Printing tasks ENWW
-
 1
1 -
2
-
3
-
4
-
5
-
6
-
7
-
8
-
9
-
10
-
11
-
12
-
13
-
14
-
15
-
16
-
17
-
18
-
19
-
20
-
21
-
22
-
23
-
24
-
25
-
26
-
27
-
28
-
29
-
30
-
31
-
32
-
33
-
34
-
35
-
36
-
37
-
38
-
39
-
40
-
41
-
42
-
43
-
44
-
45
-
46
-
47
-
48
-
49
-
50
-
51
-
52
-
53
-
54
-
55
-
56
-
57
-
58
-
59
-
60
-
61
-
62
-
63
-
64
-
65
-
66
-
67
-
68
-
69
-
70
-
71
-
72
-
73
-
74
-
75
-
76
-
77
-
78
-
 79
79 -
 80
80 -
 81
81 -
 82
82 -
 83
83 -
 84
84 -
 85
85 -
 86
86 -
 87
87 -
 88
88 -
 89
89 -
90
-
91
-
92
-
93
-
94
-
95
-
96
-
97
-
98
-
99
-
100
-
101
-
102
-
103
-
104
-
105
-
106
-
107
-
108
-
109
-
110
-
111
-
112
-
113
-
114
-
115
-
116
-
117
-
118
-
119
-
120
-
121
-
122
-
123
-
124
-
125
-
126
-
127
-
128
-
129
-
130
-
131
-
132
-
133
-
134
-
135
-
136
-
137
-
138
-
139
-
140
-
141
-
142
-
143
-
144
-
145
-
146
-
147
-
148
-
149
-
150
-
151
-
152
-
153
-
154
-
155
-
156
-
157
-
158
-
159
-
160
-
161
-
162
-
163
-
164
-
165
-
166
-
167
-
168
-
169
-
170
-
171
-
172
-
173
-
174
-
175
-
176
-
177
-
178
-
179
-
180
-
181
-
182
-
183
-
184
-
185
-
186
-
187
-
188
-
189
-
190
-
191
-
192
-
193
-
194
-
195
-
196
-
197
-
198
-
199
-
200
-
201
-
202
-
203
-
204
-
205
-
206
-
207
-
208
-
209
-
210
-
211
-
212
-
213
-
214
-
215
-
216
-
217
-
218
-
219
-
220
-
221
-
222
-
223
-
224
-
225
-
226
-
227
-
228
-
229
-
230
-
231
-
232
-
233
-
234
-
235
-
236
-
237
-
238
-
239
-
240
-
241
-
242
-
243
-
244
-
245
-
246
-
247
-
248
-
249
-
250
-
251
-
252
-
253
-
254
-
255
-
256
-
257
-
258
-
259
-
260
-
261
-
262
-
263
-
264
-
265
-
266
-
267
-
268
-
269
-
270
-
271
-
272
-
273
-
274
-
275
-
276
-
277
-
278
-
279
-
280
-
281
-
282
-
283
-
284
-
285
-
286
-
287
-
288
-
289
-
290
-
291
-
292
-
293
-
294
-
295
-
296
-
297
-
298
-
299
-
300
-
301
-
302
-
303
-
304
 |
 |