Hitachi DZ GX5020A Owners Guide - Page 119
Creating Dvd-video Using Images Recorded On Disc
 |
UPC - 050585223875
View all Hitachi DZ GX5020A manuals
Add to My Manuals
Save this manual to your list of manuals |
Page 119 highlights
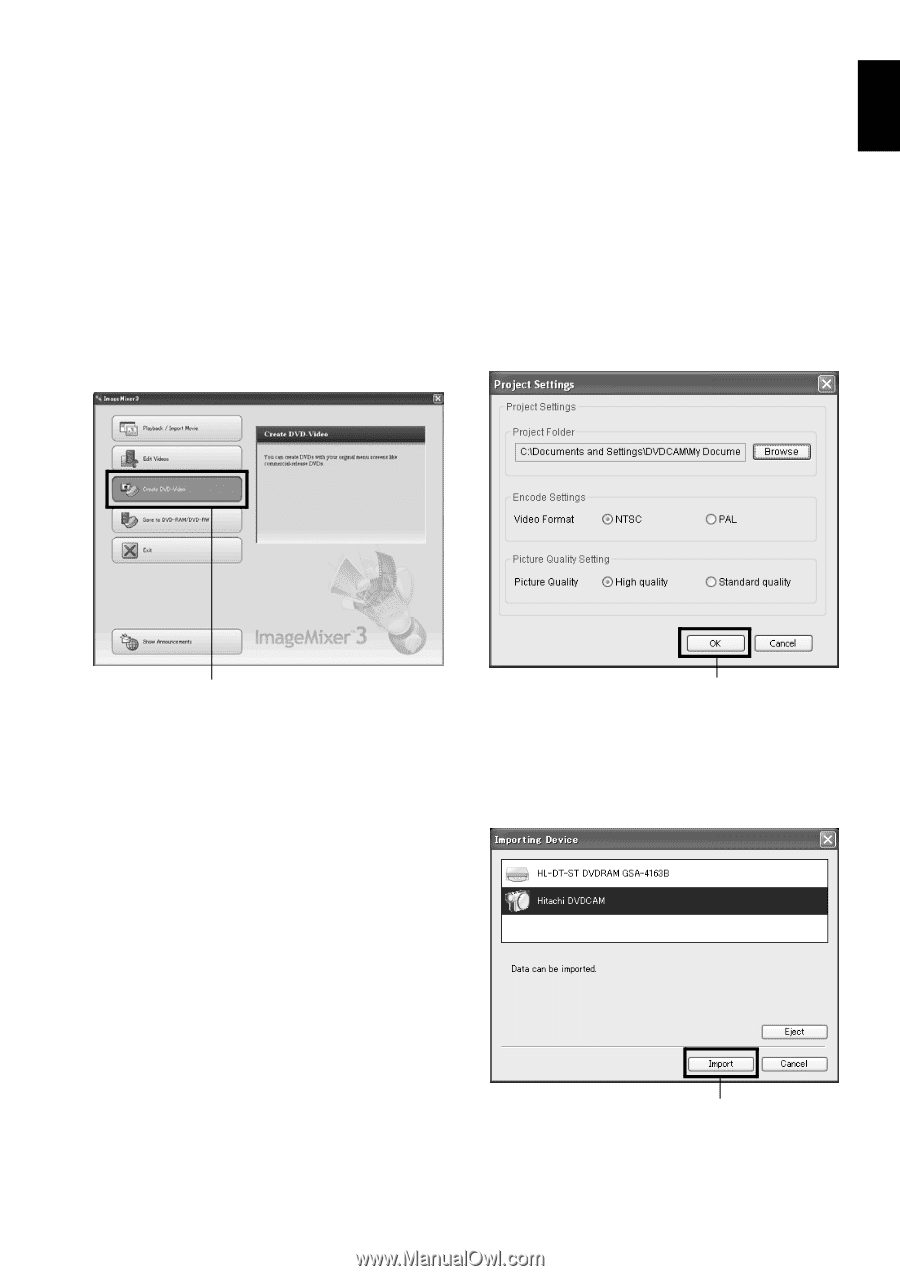
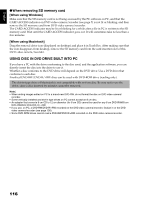
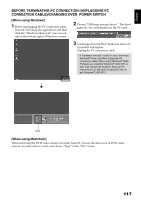
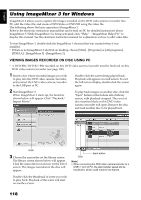
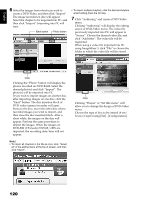
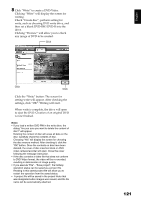
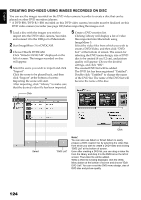
English CREATING DVD-VIDEO USING IMAGES RECORDED ON DISC You can use the images recorded on the DVD video camera/recorder to create a disc that can be viewed on DVD recorders/players. * A DVD-RW/DVD-R/+RW recorded on this DVD video camera/recorder must be finalized on this DVD video camera/recorder (see page 100). 1 Insert a disc with the recorded images to be saved into the DVD video camera/recorder, and connect the DVD video camera/recorder to a USB port of PC. 2 Start ImageMixer 3. When ImageMixer 3 starts up, the launcher shown below will appear: Click "Create DVD-Video". 4 Setting up project. Set up a project. You can set up the designated save location of edited contents and image quality. Be sure to choose "NTSC" for the video system. After setting up the project, click the "OK" button. Click 3 Click "Create New DVD". Click 5 The screen for choosing the device to be read will appear: Choose "Hitachi DVDCAM". A list of devices that are built into or connected to PC will appear: Choose "Hitachi DVDCAM", and then click "Import". Click 119
-
 1
1 -
2
-
3
-
4
-
5
-
6
-
7
-
8
-
9
-
10
-
11
-
12
-
13
-
14
-
15
-
16
-
17
-
18
-
19
-
20
-
21
-
22
-
23
-
24
-
25
-
26
-
27
-
28
-
29
-
30
-
31
-
32
-
33
-
34
-
35
-
36
-
37
-
38
-
39
-
40
-
41
-
42
-
43
-
44
-
45
-
46
-
47
-
48
-
49
-
50
-
51
-
52
-
53
-
54
-
55
-
56
-
57
-
58
-
59
-
60
-
61
-
62
-
63
-
64
-
65
-
66
-
67
-
68
-
69
-
70
-
71
-
72
-
73
-
74
-
75
-
76
-
77
-
78
-
79
-
80
-
81
-
82
-
83
-
84
-
85
-
86
-
87
-
88
-
89
-
90
-
91
-
92
-
93
-
94
-
95
-
96
-
97
-
98
-
99
-
100
-
101
-
102
-
103
-
104
-
105
-
106
-
107
-
108
-
109
-
110
-
111
-
112
-
113
-
 114
114 -
 115
115 -
 116
116 -
 117
117 -
 118
118 -
 119
119 -
 120
120 -
 121
121 -
 122
122 -
 123
123 -
 124
124 -
125
-
126
-
127
-
128
-
129
-
130
-
131
-
132
-
133
-
134
-
135
-
136
-
137
-
138
-
139
-
140
-
141
-
142
-
143
-
144
-
145
-
146
-
147
-
148
-
149
-
150
-
151
-
152
-
153
-
154
-
155
-
156
-
157
-
158
 |
 |