Hitachi DZ GX5020A Owners Guide - Page 56
Setting Up Camera Functions
 |
UPC - 050585223875
View all Hitachi DZ GX5020A manuals
Add to My Manuals
Save this manual to your list of manuals |
Page 56 highlights
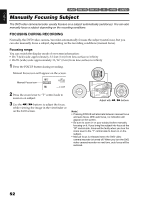
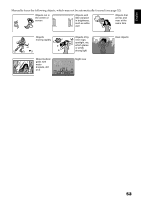
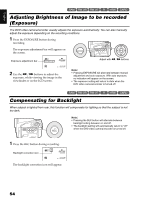
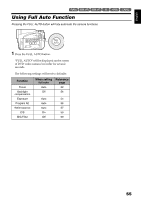
English 12/3 Setting Up Camera Functions Before You Begin • See page 48 for how to set. SELECTING SHOOTING MODE TO MATCH THE SUBJECT (SWITCHING PROGRAM AE MODE) This DVD video camera/recorder automatically detects the status of subject and surrounding situation and records the optimum image: If you choose the shooting mode to match the recording conditions, clearer images will be recorded. 1 Press the MENU button, use the f/e/ d/c buttons to choose "Program AE" on the "Camera Functions Setup" screen, and then press the A button. The options will appear on the right of "Program AE". 2 Use the f/e/d/c buttons to choose the desired option, and then press the A button: The selected option will be set. 3 Press the MENU button to end the setting. The menu screen will disappear. Note: • You can check the selected AE mode by the onscreen information display. However, nothing will appear in the Auto mode. • The shooting mode set as above will be stored in memory even if the DVD video camera/recorder is turned off. • When recording in a dark area, an after-image will appear when filming a moving subject or if camera shake occurs (it is therefore recommended that you use a tripod in such cases). • If the Sports mode is used under a fluorescent light, the image may flicker: In this case, use the Auto mode for recording. Auto : The camera/recorder automatically judges the subject and surrounding environment for optimum recording. Sports : Reduces blurring when recording rapidly moving subjects such as in golf or tennis. Portrait : Makes a subject, such as a person or a creature, stand out from a blurred background. Spotlight : Prevents overexposure of subject portrait face, etc. when strong light strikes the subject, as in a wedding or on stage. Sand & Snow : Prevents underexposure of subject portrait face, etc. in a place where reflection of light is intense, such as at the seaside in midsummer or on a ski slope. Low Light : Allows user to record in a dark place even with decreased lighting. Turn the LCD monitor 180º during recording: The LCD monitor light can then be used for recording. 56
-
 1
1 -
2
-
3
-
4
-
5
-
6
-
7
-
8
-
9
-
10
-
11
-
12
-
13
-
14
-
15
-
16
-
17
-
18
-
19
-
20
-
21
-
22
-
23
-
24
-
25
-
26
-
27
-
28
-
29
-
30
-
31
-
32
-
33
-
34
-
35
-
36
-
37
-
38
-
39
-
40
-
41
-
42
-
43
-
44
-
45
-
46
-
47
-
48
-
49
-
50
-
 51
51 -
 52
52 -
 53
53 -
 54
54 -
 55
55 -
 56
56 -
 57
57 -
 58
58 -
 59
59 -
 60
60 -
 61
61 -
62
-
63
-
64
-
65
-
66
-
67
-
68
-
69
-
70
-
71
-
72
-
73
-
74
-
75
-
76
-
77
-
78
-
79
-
80
-
81
-
82
-
83
-
84
-
85
-
86
-
87
-
88
-
89
-
90
-
91
-
92
-
93
-
94
-
95
-
96
-
97
-
98
-
99
-
100
-
101
-
102
-
103
-
104
-
105
-
106
-
107
-
108
-
109
-
110
-
111
-
112
-
113
-
114
-
115
-
116
-
117
-
118
-
119
-
120
-
121
-
122
-
123
-
124
-
125
-
126
-
127
-
128
-
129
-
130
-
131
-
132
-
133
-
134
-
135
-
136
-
137
-
138
-
139
-
140
-
141
-
142
-
143
-
144
-
145
-
146
-
147
-
148
-
149
-
150
-
151
-
152
-
153
-
154
-
155
-
156
-
157
-
158
 |
 |