Kyocera TASKalfa 3501i Kyocera Command Center RX User Guide Rev-2013.02 - Page 14
Deleting a Document, Moving a Document from Box to Box, Joining Documents in One
 |
View all Kyocera TASKalfa 3501i manuals
Add to My Manuals
Save this manual to your list of manuals |
Page 14 highlights
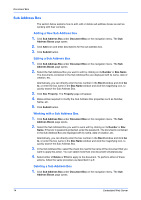
Document Box First select the document to apply any of the above actions by following the steps below: 1. Click Custom Box under Document Box on the navigation menu. The Custom Boxes page opens. 2. Select the custom box you want to work with by clicking on its Number or Box Name. If the box is password-protected, enter the password. The documents contained in the Custom Box are displayed with its name, date of creation, size, etc. You can choose List View or Thumbnail to view the box contents. Alternatively, you can open the list of the user boxes, directly enter the box number in the Box # window and click Go to, or enter the box name in the Box Name window and click the magnifying glass icon, to quickly search the custom box. 3. In the custom box, select the check box next to the name of the document that you want to apply the action. You can select more than one document simultaneously. Deleting a Document 1. Select the document to delete as described above. 2. Click Delete icon. Moving a Document from Box to Box 1. Select the document to move as described above. 2. Click Move icon. The Move Settings page opens. The selected file is shown in Selected Files. 3. Select the box to move the document to in Destination. If the box is password- protected, enter the password. 4. Click Move button. The document is moved to the box. Copying a Document from Box to Box 1. Select the document to copy as described above. 2. Click Copy icon. The Copy Settings page opens. The selected file is shown in Selected Files. 3. Select the box to store the copied document in Destination. If the box is password- protected, enter the password. 4. Click Copy button. The document is copied into the box. Joining Documents in One 1. Select the documents to join as described above. 2. Click Join icon. The Join Settings page opens. The selected file is shown in Selected Files (Join Order). 3. If desired, change the order of the documents to be joined by clicking Top, Up, Down, and Bottom. You can exclude a document from the Selected Files (Join Order) list by clicking Delete. 4. Name the new document which the documents selected are joined in File Name. 5. Click Join button. The documents are joined in the new document. 10 Embedded Web Server
-
 1
1 -
2
-
3
-
4
-
5
-
6
-
7
-
8
-
 9
9 -
 10
10 -
 11
11 -
 12
12 -
 13
13 -
 14
14 -
 15
15 -
 16
16 -
 17
17 -
 18
18 -
 19
19 -
20
-
21
-
22
-
23
-
24
-
25
-
26
-
27
-
28
-
29
-
30
-
31
-
32
-
33
-
34
-
35
-
36
-
37
-
38
-
39
-
40
-
41
-
42
-
43
-
44
-
45
-
46
-
47
-
48
-
49
-
50
-
51
-
52
-
53
-
54
-
55
-
56
-
57
-
58
-
59
-
60
-
61
-
62
-
63
-
64
-
65
-
66
-
67
-
68
-
69
-
70
-
71
-
72
-
73
-
74
-
75
-
76
-
77
-
78
-
79
-
80
-
81
-
82
-
83
-
84
-
85
-
86
-
87
-
88
-
89
-
90
-
91
-
92
-
93
-
94
-
95
-
96
 |
 |
