Kyocera TASKalfa 3501i Kyocera Command Center RX User Guide Rev-2013.02 - Page 27
Original Settings, Energy Saver/Timer, Paper Detail Settings, Original Auto Detect
 |
View all Kyocera TASKalfa 3501i manuals
Add to My Manuals
Save this manual to your list of manuals |
Page 27 highlights
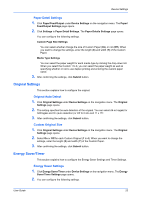
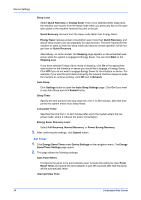
Device Settings Paper Detail Settings 1. Click Paper/Feed/Output under Device Settings on the navigation menu. The Paper/ Feed/Output Settings page opens. 2. Click Settings in Paper Detail Settings. The Paper Details Settings page opens. You can configure the following settings. Custom Page Size Settings You can select whether change the size of Custom Paper (On) or not (Off). When you want to change the settings, enter the length (X) and width (Y) of the Custom Paper. Media Type Settings You can select the paper weight for each media type by clicking the drop-down list. When you select the Custom 1 to 8, you can select the paper weight as well as specifying whether or not to use duplex printing and entering the custom paper name. 3. After confirming the settings, click Submit button. Original Settings This section explains how to configure the original. Original Auto Detect 1. Click Original Settings under Device Settings on the navigation menu. The Original Settings page opens. 2. This setting specifies the auto detection of the original. You can select A6 or Hagaki for A6/Hagaki and On (auto detection) or Off for Folio and 11 x 15". 3. After confirming the settings, click Submit button. Custom Original Size 1. Click Original Settings under Device Settings on the navigation menu. The Original Settings page opens. 2. Select On or Off for each Custom Original (1 to 4). When you want to change the settings, enter the length (X) and width (Y) of the Custom Paper. 3. After confirming the settings, click Submit button. Energy Saver/Timer This section explains how to configure the Energy Saver Settings and Timer Settings. Energy Saver Settings 1. Click Energy Saver/Timer under Device Settings on the navigation menu. The Energy Saver/Timer Settings page opens. 2. You can configure the following settings. User Guide 23
-
 1
1 -
2
-
3
-
4
-
5
-
6
-
7
-
8
-
9
-
10
-
11
-
12
-
13
-
14
-
15
-
16
-
17
-
18
-
19
-
20
-
21
-
 22
22 -
 23
23 -
 24
24 -
 25
25 -
 26
26 -
 27
27 -
 28
28 -
 29
29 -
 30
30 -
 31
31 -
 32
32 -
33
-
34
-
35
-
36
-
37
-
38
-
39
-
40
-
41
-
42
-
43
-
44
-
45
-
46
-
47
-
48
-
49
-
50
-
51
-
52
-
53
-
54
-
55
-
56
-
57
-
58
-
59
-
60
-
61
-
62
-
63
-
64
-
65
-
66
-
67
-
68
-
69
-
70
-
71
-
72
-
73
-
74
-
75
-
76
-
77
-
78
-
79
-
80
-
81
-
82
-
83
-
84
-
85
-
86
-
87
-
88
-
89
-
90
-
91
-
92
-
93
-
94
-
95
-
96
 |
 |