Kyocera TASKalfa 3501i Kyocera Command Center RX User Guide Rev-2013.02 - Page 47
Send and Forward, General, Destination
 |
View all Kyocera TASKalfa 3501i manuals
Add to My Manuals
Save this manual to your list of manuals |
Page 47 highlights
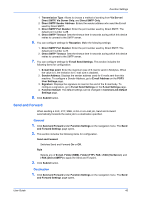
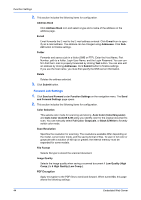
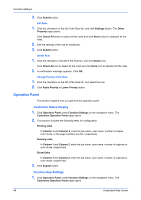
Function Settings 1. Transmission Type: Allows to choose a method of sending from Via Server/ Direct SMTP, Via Server Only, and Direct SMTP Only. 2. Direct SMTP Sender Address: Enters the sender address who send the E-mail used by Direct SMTP. 3. Direct SMTP Port Number: Enter the port number used by Direct SMTP. The default port number is 25. 4. Direct SMTP Timeout: Sets the timeout time in seconds during which this device retries to connect to the SMTP server. 6. You can configure settings for Reception. Make the following settings: 1. Direct SMTP Port Number: Enter the port number used by Direct SMTP. The default port number is 25. 2. Direct SMTP Timeout: Sets the timeout time in seconds during which this device retries to connect to the SMTP server. 7. You can configure settings for E-mail Send Settings. This section includes the following items for configuration: 1. E-mail Size Limit: Enter the maximum size of E-mail to send in Kilobytes. When the value is 0, the limitation for E-mail size is disabled. 2. Sender Address: Displays the sender address used for E-mails sent from this machine. To configure a Sender Address, go to E-mail Address on the POP3 User Settings page. 3. Signature: Displays the signature to insert in the end of the E-mail body. To configure a signature, go to E-mail Send Settings on the E-mail Settings page. 4. Function Default: The default settings can be changed in Common/Job Default Settings page. 8. Click Submit button. Send and Forward When sending a FAX, FTP, SMB, i-FAX or a E-mail job, Send and Forward automatically forwards the same job to a destination specified. General 1. Click Send and Forward under Function Settings on the navigation menu. The Send and Forward Settings page opens. 2. This section includes the following items for configuration. Send and Forward Switches Send and Forward On or Off. Rule Selects any of E-mail, Folder (SMB), Folder (FTP), FAX, i-FAX (Via Server), and i-FAX (Direct SMTP) to apply the Send and Forward. 3. Click Submit button. Destination 1. Click Send and Forward under Function Settings on the navigation menu. The Send and Forward Settings page opens. User Guide 43
-
 1
1 -
2
-
3
-
4
-
5
-
6
-
7
-
8
-
9
-
10
-
11
-
12
-
13
-
14
-
15
-
16
-
17
-
18
-
19
-
20
-
21
-
22
-
23
-
24
-
25
-
26
-
27
-
28
-
29
-
30
-
31
-
32
-
33
-
34
-
35
-
36
-
37
-
38
-
39
-
40
-
41
-
 42
42 -
 43
43 -
 44
44 -
 45
45 -
 46
46 -
 47
47 -
 48
48 -
 49
49 -
 50
50 -
 51
51 -
 52
52 -
53
-
54
-
55
-
56
-
57
-
58
-
59
-
60
-
61
-
62
-
63
-
64
-
65
-
66
-
67
-
68
-
69
-
70
-
71
-
72
-
73
-
74
-
75
-
76
-
77
-
78
-
79
-
80
-
81
-
82
-
83
-
84
-
85
-
86
-
87
-
88
-
89
-
90
-
91
-
92
-
93
-
94
-
95
-
96
 |
 |