Kyocera TASKalfa 3501i Kyocera Command Center RX User Guide Rev-2013.02 - Page 79
ID Card, ID Card Settings
 |
View all Kyocera TASKalfa 3501i manuals
Add to My Manuals
Save this manual to your list of manuals |
Page 79 highlights
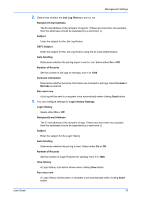
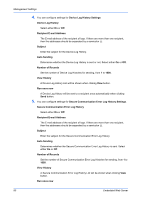
Management Settings ID Card Access Level Select either Administrator or User for privilege. Account Name From the drop-down list that is displayed by clicking Account List button, select an account name followed by Submit button. E-mail Address Add a user's e-mail address. To enable sending e-mail, add your e-mail address. The e-mail address will be automatically selected whenever an e-mail notice is required by functionality. Language Select either English, Deutsch, Français, Español, Italiano, Nederlands or for the user interface language, from the drop-down list. Default Screen Select an item for the default screen from the drop-down list. Default Screen (Send/FAX) In Default Screen (Send/FAX), when clicking Address Book to open a drop-down list, this item appears. Select either Destination or Address Book from the dropdown list. Address Book Type In Default Screen (Send/FAX), click Address Book to open a drop-down list. Select either Machine Address Book or External Address Book. Authorization Configure settings for Authorization by referring step 7 of Settings on page 72. 3. Click Submit button. Delete 1. Click the checkbox to the left of the user name. To select all items at once, click Check All icon. 2. Click Delete icon once. This section includes advanced settings for ID Card authentication. ID Card Settings To use the ID Card authentication, you must first make the ID Card settings. 1. Click ID Card under Management Settings on the navigation menu. The ID Card Settings page opens. 2. Configure the Authentication Settings. User Guide 75
-
 1
1 -
2
-
3
-
4
-
5
-
6
-
7
-
8
-
9
-
10
-
11
-
12
-
13
-
14
-
15
-
16
-
17
-
18
-
19
-
20
-
21
-
22
-
23
-
24
-
25
-
26
-
27
-
28
-
29
-
30
-
31
-
32
-
33
-
34
-
35
-
36
-
37
-
38
-
39
-
40
-
41
-
42
-
43
-
44
-
45
-
46
-
47
-
48
-
49
-
50
-
51
-
52
-
53
-
54
-
55
-
56
-
57
-
58
-
59
-
60
-
61
-
62
-
63
-
64
-
65
-
66
-
67
-
68
-
69
-
70
-
71
-
72
-
73
-
 74
74 -
 75
75 -
 76
76 -
 77
77 -
 78
78 -
 79
79 -
 80
80 -
 81
81 -
 82
82 -
 83
83 -
 84
84 -
85
-
86
-
87
-
88
-
89
-
90
-
91
-
92
-
93
-
94
-
95
-
96
 |
 |
