Kyocera TASKalfa 3501i Kyocera Command Center RX User Guide Rev-2013.02 - Page 45
i-FAX Settings, FAX SMTP & POP3
 |
View all Kyocera TASKalfa 3501i manuals
Add to My Manuals
Save this manual to your list of manuals |
Page 45 highlights
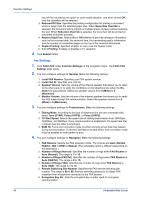
Function Settings 7. RX Start Speed: Selects the speed rate at starting reception from 33600 bps, 14400 bps, and 9600 bps. Once communication is established, the speed rate that is slower than the other is employed. 8. ECM RX: Turns error correction mode on which corrects error that may happen during communication. To let the ECM feature to take effect, error correction mode must be enabled on both parties in prior. 5. You can configure settings for Encryption Key. Make the following settings: 1. Encryption Key Registration: Click Settings button. The Encryption Key Registration page opens. Specifies the encryption key in hexadecimal. The length of the encryption key is 16 digits. Enter the encryption key including the numbers 0-9 and the letters A-F. 2. Click Submit button. 6. You can configure settings for Remote Settings. Make the following settings: 1. FAX Remote Diagnostics: Activate or deactivate the remote FAX diagnosis. 2. Remote Diagnostics ID: Enter the ID (four digits) specified from the customer center when you activate the FAX Remote Diagnostics. 7. You can configure settings for TX/RX Restriction. Make the following settings: 1. Transmit Restriction: Selects the transmitting restriction from Off and Permit List + Address Book. 2. Receive Restriction: Selects the reception restriction from Off, Permit List + Address Book, and Reject List. 3. Unknown Number Reception: Selects Reject or Permit when you select Reject List from Receive Restriction. 4. Permit No. List: Permit No. List page allows to add the permitted fax numbers and delete the fax numbers specified. Clicking List will display Permit No. List page. Enter the FAX number to add, then click Submit button. To delete a fax number from Permit No. List, delete the number from Permit No. List page, then click Submit button. 5. Permit ID List: Permit ID List page allows to add the permitted fax IDs and delete the fax IDs specified. Clicking List will display Permit ID List page. Enter the FAX ID to add, then click Submit button. To delete a fax ID from Permit ID List, delete the fax ID from Permit ID List page, then click Submit button. 6. Reject No. List: Reject No. List page allows to add the prohibited fax numbers and delete the prohibited fax numbers specified. Clicking List will display the Reject No. List page. Enter the FAX number to add, then click Submit button. To delete a fax number from Reject No. List, delete the number from Reject No. List page, then click Submit button. 7. The default settings can be changed in Common/Job Default Settings page. 8. Click Submit button. i-FAX Settings 1. Click FAX/i-FAX under Function Settings on the navigation menu. The FAX/i-FAX Settings page opens. 2. You can configure settings for TX/RX. Make the following settings: 1. i-FAX Protocol: Display whether an i-FAX connection is available or not. Set iFAX (SMTP & POP3) to On on the Protocol Settings page. 3. Configures SMTP. Make the following settings: User Guide 41
-
 1
1 -
2
-
3
-
4
-
5
-
6
-
7
-
8
-
9
-
10
-
11
-
12
-
13
-
14
-
15
-
16
-
17
-
18
-
19
-
20
-
21
-
22
-
23
-
24
-
25
-
26
-
27
-
28
-
29
-
30
-
31
-
32
-
33
-
34
-
35
-
36
-
37
-
38
-
39
-
 40
40 -
 41
41 -
 42
42 -
 43
43 -
 44
44 -
 45
45 -
 46
46 -
 47
47 -
 48
48 -
 49
49 -
 50
50 -
51
-
52
-
53
-
54
-
55
-
56
-
57
-
58
-
59
-
60
-
61
-
62
-
63
-
64
-
65
-
66
-
67
-
68
-
69
-
70
-
71
-
72
-
73
-
74
-
75
-
76
-
77
-
78
-
79
-
80
-
81
-
82
-
83
-
84
-
85
-
86
-
87
-
88
-
89
-
90
-
91
-
92
-
93
-
94
-
95
-
96
 |
 |