LG LGLS840 Owners Manual - English - Page 89
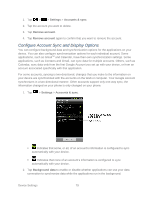
Con Data Synchronization Settings, Auto-sync, Settings, Accounts & sync, Sync now
 |
View all LG LGLS840 manuals
Add to My Manuals
Save this manual to your list of manuals |
Page 89 highlights
If you disable this option, the Gmail and Calendar applications will not automatically receive updates until they are manually refreshed (using their respective options menu). 3. Tap Auto-sync to enable or disable whether changes you make to information on the device or on the web are automatically synced with each other. For example, when this option is enabled, changes that you make in the Contacts application on your device are automatically made to your web-based Google Contacts™. If you uncheck this option, you may be able to use an application's tools to sync data manually. To Sync Information Manually: 1. Tap > > Settings > Accounts & sync. 2. Tap the account whose data you want to sync. 3. Tap Sync now. To Change Sync Settings: 1. Tap > > Settings > Accounts & sync. 2. Tap the account whose data you want to change. The Data and synchronization screen will open, displaying a list of the types of data the account can sync. 3. Tap the items you want to sync. (A green checkmark indicates that synchronization has been enabled.) By disabling synchronization for an item, it will not remove the previously synchronized data from your device, it will simply stop future synching. To remove the information previously synced for the account, you must remove the account. Configure Data Synchronization Settings This feature allows you to determine which current applications are synchronized with the external server and at what intervals. 1. Tap > > Settings > Accounts & sync. These settings can affect data minute usage, please refer to your current data plan for more details. 2. Tap any of the following options: Background data: Allows data synchronization to occur as a background function and does not affect any current use of the device. Device Settings 80
-
 1
1 -
2
-
3
-
4
-
5
-
6
-
7
-
8
-
9
-
10
-
11
-
12
-
13
-
14
-
15
-
16
-
17
-
18
-
19
-
20
-
21
-
22
-
23
-
24
-
25
-
26
-
27
-
28
-
29
-
30
-
31
-
32
-
33
-
34
-
35
-
36
-
37
-
38
-
39
-
40
-
41
-
42
-
43
-
44
-
45
-
46
-
47
-
48
-
49
-
50
-
51
-
52
-
53
-
54
-
55
-
56
-
57
-
58
-
59
-
60
-
61
-
62
-
63
-
64
-
65
-
66
-
67
-
68
-
69
-
70
-
71
-
72
-
73
-
74
-
75
-
76
-
77
-
78
-
79
-
80
-
81
-
82
-
83
-
 84
84 -
 85
85 -
 86
86 -
 87
87 -
 88
88 -
 89
89 -
 90
90 -
 91
91 -
 92
92 -
 93
93 -
 94
94 -
95
-
96
-
97
-
98
-
99
-
100
-
101
-
102
-
103
-
104
-
105
-
106
-
107
-
108
-
109
-
110
-
111
-
112
-
113
-
114
-
115
-
116
-
117
-
118
-
119
-
120
-
121
-
122
-
123
-
124
-
125
-
126
-
127
-
128
-
129
-
130
-
131
-
132
-
133
-
134
-
135
-
136
-
137
-
138
-
139
-
140
-
141
-
142
-
143
-
144
-
145
-
146
-
147
-
148
-
149
-
150
-
151
-
152
-
153
-
154
-
155
-
156
-
157
-
158
-
159
-
160
-
161
-
162
-
163
-
164
-
165
-
166
-
167
-
168
-
169
-
170
-
171
-
172
-
173
-
174
-
175
-
176
-
177
-
178
-
179
-
180
-
181
-
182
-
183
-
184
-
185
-
186
-
187
-
188
 |
 |