Lexmark Optra C710 User's Guide - Page 120
Pull the paper tray completely out of the printer., Squeeze the snap lock on the end of the rear paper
 |
View all Lexmark Optra C710 manuals
Add to My Manuals
Save this manual to your list of manuals |
Page 120 highlights
Note: If you load transparencies in tray 1 or the multipurpose feeder, make sure you change the Paper Type setting to transparencies for that location. If you attached an optional drawer unit, the instructions are the same for loading paper in those trays. However, load only paper in those trays. To load the tray: 1 Pull the paper tray completely out of the printer. 2 Set the paper tray on a flat surface. Note: If you are loading A4 or letter size paper, the tray may already be set up for the appropriate paper size. 3 Squeeze the snap lock on the end of the rear paper guide. 4 Lift the rear paper guide from the tray. 5 Align the rear paper guide with the position for the paper size you are loading. 106 Chapter 6: Loading paper in the trays
-
 1
1 -
2
-
3
-
4
-
5
-
6
-
7
-
8
-
9
-
10
-
11
-
12
-
13
-
14
-
15
-
16
-
17
-
18
-
19
-
20
-
21
-
22
-
23
-
24
-
25
-
26
-
27
-
28
-
29
-
30
-
31
-
32
-
33
-
34
-
35
-
36
-
37
-
38
-
39
-
40
-
41
-
42
-
43
-
44
-
45
-
46
-
47
-
48
-
49
-
50
-
51
-
52
-
53
-
54
-
55
-
56
-
57
-
58
-
59
-
60
-
61
-
62
-
63
-
64
-
65
-
66
-
67
-
68
-
69
-
70
-
71
-
72
-
73
-
74
-
75
-
76
-
77
-
78
-
79
-
80
-
81
-
82
-
83
-
84
-
85
-
86
-
87
-
88
-
89
-
90
-
91
-
92
-
93
-
94
-
95
-
96
-
97
-
98
-
99
-
100
-
101
-
102
-
103
-
104
-
105
-
106
-
107
-
108
-
109
-
110
-
111
-
112
-
113
-
114
-
 115
115 -
 116
116 -
 117
117 -
 118
118 -
 119
119 -
 120
120 -
 121
121 -
 122
122 -
 123
123 -
 124
124 -
 125
125 -
126
-
127
-
128
-
129
-
130
-
131
-
132
-
133
-
134
-
135
-
136
-
137
-
138
-
139
-
140
-
141
-
142
-
143
-
144
-
145
-
146
-
147
-
148
-
149
-
150
-
151
-
152
-
153
-
154
-
155
-
156
-
157
-
158
-
159
-
160
-
161
-
162
-
163
-
164
-
165
-
166
-
167
-
168
-
169
-
170
-
171
-
172
-
173
-
174
-
175
-
176
-
177
-
178
-
179
-
180
-
181
-
182
-
183
-
184
-
185
-
186
-
187
-
188
-
189
-
190
-
191
-
192
-
193
-
194
-
195
-
196
-
197
-
198
-
199
-
200
-
201
-
202
-
203
-
204
-
205
-
206
-
207
-
208
-
209
-
210
-
211
-
212
-
213
-
214
-
215
-
216
-
217
-
218
-
219
-
220
-
221
-
222
-
223
-
224
-
225
-
226
-
227
-
228
-
229
-
230
-
231
-
232
-
233
-
234
-
235
-
236
-
237
-
238
-
239
-
240
-
241
-
242
-
243
-
244
-
245
-
246
-
247
-
248
-
249
-
250
-
251
-
252
-
253
-
254
-
255
-
256
-
257
-
258
-
259
-
260
-
261
-
262
-
263
-
264
-
265
-
266
-
267
-
268
-
269
-
270
-
271
-
272
-
273
-
274
-
275
-
276
-
277
-
278
-
279
-
280
-
281
-
282
-
283
 |
 |

106
Chapter 6: Loading paper in the trays
Note:
If you load transparen-
cies in tray 1 or the multipurpose
feeder, make sure you change
the Paper Type setting to trans-
parencies for that location.
If you attached an optional drawer unit, the instructions
are the same for loading paper in those trays. However,
load
only
paper in those trays.
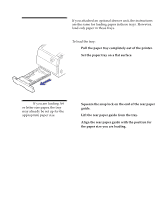
To load the tray:
1
Pull the paper tray completely out of the printer.
2
Set the paper tray on a flat surface.
Note:
If you are loading A4
or letter size paper, the tray
may already be set up for the
appropriate paper size.
3
Squeeze the snap lock on the end of the rear paper
guide.
4
Lift the rear paper guide from the tray.
5
Align the rear paper guide with the position for
the paper size you are loading.