Lexmark X6570 User's Guide - Page 110
Scanning clear images from magazines or newspapers, Changing the Productivity Studio scan settings
 |
UPC - 836367002285
View all Lexmark X6570 manuals
Add to My Manuals
Save this manual to your list of manuals |
Page 110 highlights
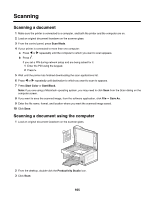
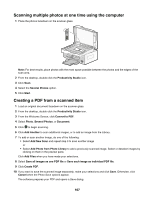
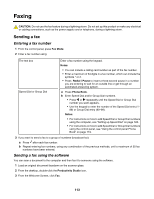
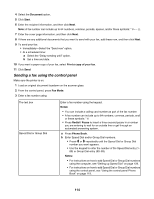
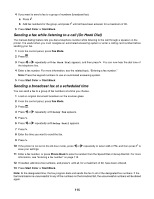
2 Close the top cover. 3 From the desktop, double-click the Productivity Studio icon. 4 Click Scan. 5 Select the Photo or Several Photos option. 6 Click Start. 7 From the Save or Edit screen menu bar, click Save. 8 To save to another folder, click Browse, and select a folder. Click OK. 9 To rename the file, enter the name in the File Name area. To assign the name as a prefix to all of your photos, select the Start all photos with File Name check box. 10 To save the photo as another file type, select the file type from the File Type drop-down list. 11 To select a date for the photo, click the drop-down list, and select a date from the calendar. 12 Click Save. Scanning clear images from magazines or newspapers Use the descreening feature to help remove wavy patterns from images scanned from magazines or newspapers. 1 Make sure the printer is connected to a computer, and both the printer and the computer are on. 2 Load an original document faceup into the Automatic Document Feeder (ADF) or facedown on the scanner glass. Note: Do not load postcards, photos, small items, transparencies, photo paper, or thin media (such as magazine clippings) into the Automatic Document Feeder (ADF). Place these items on the scanner glass. 3 From the desktop, double-click the Productivity Studio icon. 4 From the Welcome Screen, click Scan. 5 Click Display Advanced Scan Settings. 6 Select the Image Patterns tab. 7 Select the Remove image patterns from magazine/newspaper (descreen) check box. 8 From the "What was scanned?" menu, select Magazine or Newspaper. 9 Click OK. 10 From the "Send scanned image to" menu, select the destination to which you want to send the scan. 11 Click Scan Now. Changing the Productivity Studio scan settings 1 From the desktop, double-click the Productivity Studio icon. 2 From the Tools menu, click Preferences. 3 Click Scan Settings. • Select Always use simple scan settings to use the default scan settings. • Select Always start scanning with the settings below to customize the remaining scan settings. 110
-
 1
1 -
2
-
3
-
4
-
5
-
6
-
7
-
8
-
9
-
10
-
11
-
12
-
13
-
14
-
15
-
16
-
17
-
18
-
19
-
20
-
21
-
22
-
23
-
24
-
25
-
26
-
27
-
28
-
29
-
30
-
31
-
32
-
33
-
34
-
35
-
36
-
37
-
38
-
39
-
40
-
41
-
42
-
43
-
44
-
45
-
46
-
47
-
48
-
49
-
50
-
51
-
52
-
53
-
54
-
55
-
56
-
57
-
58
-
59
-
60
-
61
-
62
-
63
-
64
-
65
-
66
-
67
-
68
-
69
-
70
-
71
-
72
-
73
-
74
-
75
-
76
-
77
-
78
-
79
-
80
-
81
-
82
-
83
-
84
-
85
-
86
-
87
-
88
-
89
-
90
-
91
-
92
-
93
-
94
-
95
-
96
-
97
-
98
-
99
-
100
-
101
-
102
-
103
-
104
-
 105
105 -
 106
106 -
 107
107 -
 108
108 -
 109
109 -
 110
110 -
 111
111 -
 112
112 -
 113
113 -
 114
114 -
 115
115 -
116
-
117
-
118
-
119
-
120
-
121
-
122
-
123
-
124
-
125
-
126
-
127
-
128
-
129
-
130
-
131
-
132
-
133
-
134
-
135
-
136
-
137
-
138
-
139
-
140
-
141
-
142
-
143
-
144
-
145
-
146
-
147
-
148
-
149
-
150
-
151
-
152
-
153
-
154
-
155
-
156
-
157
-
158
-
159
-
160
-
161
-
162
-
163
-
164
-
165
-
166
-
167
-
168
-
169
-
170
-
171
-
172
-
173
-
174
-
175
-
176
-
177
-
178
-
179
-
180
-
181
-
182
-
183
-
184
-
185
-
186
-
187
-
188
-
189
-
190
-
191
-
192
-
193
-
194
-
195
-
196
-
197
-
198
-
199
-
200
-
201
-
202
-
203
-
204
-
205
-
206
-
207
-
208
-
209
-
210
-
211
-
212
-
213
-
214
-
215
-
216
-
217
-
218
-
219
-
220
-
221
-
222
-
223
 |
 |