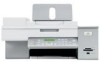
Lexmark X6570 User's Guide - Page 36
Setting up to fax while behind a PBX, Using a digital phone service, Understanding the control panel - install
 |
UPC - 836367002285
View all Lexmark X6570 manuals
Add to My Manuals
Save this manual to your list of manuals |
Page 36 highlights
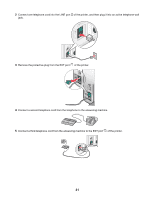
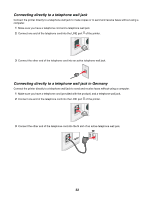
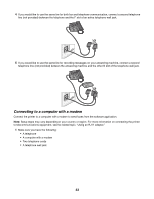
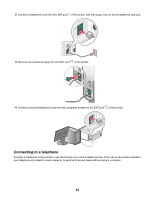
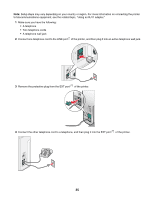
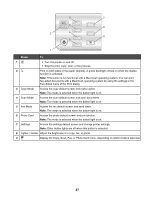
Setting up to fax while behind a PBX If the printer is being used in a business or office, it may be connected to a Private Branch Exchange (PBX) telephone system. Ordinarily, when dialing a fax number, the printer waits to recognize the dial tone and then dials the fax number. However, this method of dialing may not work if the PBX telephone system uses a dial tone that is not recognizable to most fax machines. The "Dialing while behind a PBX" feature enables the printer to dial the fax number without waiting to recognize the dial tone. 1 From the desktop, double-click the Productivity Studio icon. 2 From the Settings area of the Welcome Screen, click Fax History and Settings. 3 From the "I Want To" menu, click Adjust speed dial list and other fax settings. 4 Click the Dialing and Sending tab. 5 From the "Dialing on your phone line" area, select Behind PBX from the Dialing Method drop-down list. 6 Click OK to save the setting. Using a digital phone service The fax modem is an analog device. Certain devices can be connected to the printer so that digital telephone services can be used. • If you are using an ISDN telephone service, connect the printer to an analog telephone port (an R-interface port) on an ISDN terminal adapter. For more information and to request an R-interface port, contact your ISDN provider. • If you are using DSL, connect to a DSL filter or router that will support analog use. For more information, contact your DSL provider. • If you are using a PBX telephone service, make sure you are connecting to an analog connection on the PBX. If none exists, consider installing an analog telephone line for the fax machine. For more information on faxing when using a PBX telephone service, see the related topic, "Setting up to fax while behind a PBX." Understanding the control panel Using the control panel The control panel contains: • Power on/off button • Two-line display to show the printer status, messages, and menu items • 30 buttons A 1 2 3 4 5 6 7 8 9 0 The following diagrams explain the sections of the control panel: 36
-
 1
1 -
2
-
3
-
4
-
5
-
6
-
7
-
8
-
9
-
10
-
11
-
12
-
13
-
14
-
15
-
16
-
17
-
18
-
19
-
20
-
21
-
22
-
23
-
24
-
25
-
26
-
27
-
28
-
29
-
30
-
 31
31 -
 32
32 -
 33
33 -
 34
34 -
 35
35 -
 36
36 -
 37
37 -
 38
38 -
 39
39 -
 40
40 -
 41
41 -
42
-
43
-
44
-
45
-
46
-
47
-
48
-
49
-
50
-
51
-
52
-
53
-
54
-
55
-
56
-
57
-
58
-
59
-
60
-
61
-
62
-
63
-
64
-
65
-
66
-
67
-
68
-
69
-
70
-
71
-
72
-
73
-
74
-
75
-
76
-
77
-
78
-
79
-
80
-
81
-
82
-
83
-
84
-
85
-
86
-
87
-
88
-
89
-
90
-
91
-
92
-
93
-
94
-
95
-
96
-
97
-
98
-
99
-
100
-
101
-
102
-
103
-
104
-
105
-
106
-
107
-
108
-
109
-
110
-
111
-
112
-
113
-
114
-
115
-
116
-
117
-
118
-
119
-
120
-
121
-
122
-
123
-
124
-
125
-
126
-
127
-
128
-
129
-
130
-
131
-
132
-
133
-
134
-
135
-
136
-
137
-
138
-
139
-
140
-
141
-
142
-
143
-
144
-
145
-
146
-
147
-
148
-
149
-
150
-
151
-
152
-
153
-
154
-
155
-
156
-
157
-
158
-
159
-
160
-
161
-
162
-
163
-
164
-
165
-
166
-
167
-
168
-
169
-
170
-
171
-
172
-
173
-
174
-
175
-
176
-
177
-
178
-
179
-
180
-
181
-
182
-
183
-
184
-
185
-
186
-
187
-
188
-
189
-
190
-
191
-
192
-
193
-
194
-
195
-
196
-
197
-
198
-
199
-
200
-
201
-
202
-
203
-
204
-
205
-
206
-
207
-
208
-
209
-
210
-
211
-
212
-
213
-
214
-
215
-
216
-
217
-
218
-
219
-
220
-
221
-
222
-
223
 |
 |