Lexmark X6570 User's Guide - Page 192
Cartridge Error (1102 - clear carrier jam error
 |
UPC - 836367002285
View all Lexmark X6570 manuals
Add to My Manuals
Save this manual to your list of manuals |
Page 192 highlights
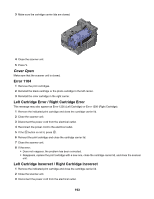
Cartridge Error (1102, 1203, 1204, or 120F) 1 Remove the print cartridges, and close the cartridge carrier lids. 2 Close the scanner unit. 3 Disconnect the power cord from the electrical outlet. 4 Reconnect the power cord to the electrical outlet. 5 If the button is not lit, press . 6 Reinsert the print cartridges and close the cartridge carrier lids. 7 Close the scanner unit. If the error does not reappear, the problem has been corrected. If the problem reappears, one of the cartridges is not working properly. Continue with the following procedure to determine which cartridge is not working properly. 1 Remove the print cartridges, and close the cartridge carrier lids. 2 Close the scanner unit. 3 Disconnect the power cord from the electrical outlet. 4 Reconnect the power cord to the electrical outlet. 5 If the button is not lit, press . 6 Reinsert the black (or photo) print cartridge and close the cartridge carrier lid. 7 Close the scanner unit. 8 If the error: • Reappears, replace the black (or photo) print cartridge with a new one, close the cartridge carrier lid, and close the scanner unit. • Does not reappear, reinsert the color print cartridge, close the cartridge carrier lid, and close the scanner unit. 9 If the error reappears, replace the color print cartridge with a new one, close the cartridge carrier lid, and close the scanner unit. Black Ink Low / Color Ink Low / Photo Ink Low 1 Check the indicated ink level or levels, and install a new print cartridge or cartridges if necessary. To order supplies, see "Ordering paper and other supplies" on page 136. 2 Press to continue. Clear Carrier Jam Remove any obstructions 1 Raise the scanner unit. 2 Remove any objects blocking the path of the print cartridge carrier. 192
-
 1
1 -
2
-
3
-
4
-
5
-
6
-
7
-
8
-
9
-
10
-
11
-
12
-
13
-
14
-
15
-
16
-
17
-
18
-
19
-
20
-
21
-
22
-
23
-
24
-
25
-
26
-
27
-
28
-
29
-
30
-
31
-
32
-
33
-
34
-
35
-
36
-
37
-
38
-
39
-
40
-
41
-
42
-
43
-
44
-
45
-
46
-
47
-
48
-
49
-
50
-
51
-
52
-
53
-
54
-
55
-
56
-
57
-
58
-
59
-
60
-
61
-
62
-
63
-
64
-
65
-
66
-
67
-
68
-
69
-
70
-
71
-
72
-
73
-
74
-
75
-
76
-
77
-
78
-
79
-
80
-
81
-
82
-
83
-
84
-
85
-
86
-
87
-
88
-
89
-
90
-
91
-
92
-
93
-
94
-
95
-
96
-
97
-
98
-
99
-
100
-
101
-
102
-
103
-
104
-
105
-
106
-
107
-
108
-
109
-
110
-
111
-
112
-
113
-
114
-
115
-
116
-
117
-
118
-
119
-
120
-
121
-
122
-
123
-
124
-
125
-
126
-
127
-
128
-
129
-
130
-
131
-
132
-
133
-
134
-
135
-
136
-
137
-
138
-
139
-
140
-
141
-
142
-
143
-
144
-
145
-
146
-
147
-
148
-
149
-
150
-
151
-
152
-
153
-
154
-
155
-
156
-
157
-
158
-
159
-
160
-
161
-
162
-
163
-
164
-
165
-
166
-
167
-
168
-
169
-
170
-
171
-
172
-
173
-
174
-
175
-
176
-
177
-
178
-
179
-
180
-
181
-
182
-
183
-
184
-
185
-
186
-
 187
187 -
 188
188 -
 189
189 -
 190
190 -
 191
191 -
 192
192 -
 193
193 -
 194
194 -
 195
195 -
 196
196 -
 197
197 -
198
-
199
-
200
-
201
-
202
-
203
-
204
-
205
-
206
-
207
-
208
-
209
-
210
-
211
-
212
-
213
-
214
-
215
-
216
-
217
-
218
-
219
-
220
-
221
-
222
-
223
 |
 |