Oki ML591 MICROLINE Reference Manual - Page 78
Custom Character Commands, Custom Character Commands: 9-Pin Printers
 |
View all Oki ML591 manuals
Add to My Manuals
Save this manual to your list of manuals |
Page 78 highlights
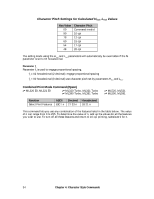
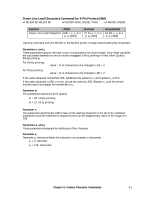
Chapter 5: Custom Character Commands Your printer's custom (down line loadable) character feature enables you to design your own characters and symbols, even entire character sets if you choose, and download them from your computer to the printer. You can design and store multiple characters. The actual designing of these characters requires some work on your part and can become tedious. We strongly recommend using a commercial software package to help you create new characters and download them to your printer. There are also packages that provide character sets that have already been designed for you. This chapter describes the custom character commands for your printer, including • ROM to RAM Copy Commands • Down Line Loading Commands • Custom Character Set Commands • Select DLL Font Commands The chapter is divided into two sections: one for the 9-pin printers and one for the 24-pin printers. Custom Character Commands: 9-Pin Printers Designing a Custom Character for 9-Pin Printers The technique of designing your own custom characters is much like that of designing a graphic image, but on a much smaller scale. You can design characters in either Utility or Near Letter Quality mode: simply activate the desired mode before you download the characters. Begin by designing your character on a grid. The height of the grid for a normal character is 7 dots, each corresponding to a pin on the printer's printhead. The width of the grid usable for a character is a maximum of 11 dots (the twelfth dot in the grid width is reserved as blank). The 7-dot grid can be adjusted up or down several dot positions by using the attribute byte in the print command. This byte specifies whether the character is an ascender (top 7 rows) or a descender (bottom 7 rows). The attribute byte also contains other information about the character, as explained later. The character's baseline lies below the seventh dot from the top if it is an ascender, or below the sixth dot from the top if it is a descender. The columns of the matrix to the left and right of your character affect where it will appear in relation to the characters on either side of it. There is one mandatory blank column at the end of the character (column 12). If you don't leave blank columns, adjacent characters may appear to run right into your character. Chapter 5: Custom Character Commands 39
-
 1
1 -
2
-
3
-
4
-
5
-
6
-
7
-
8
-
9
-
10
-
11
-
12
-
13
-
14
-
15
-
16
-
17
-
18
-
19
-
20
-
21
-
22
-
23
-
24
-
25
-
26
-
27
-
28
-
29
-
30
-
31
-
32
-
33
-
34
-
35
-
36
-
37
-
38
-
39
-
40
-
41
-
42
-
43
-
44
-
45
-
46
-
47
-
48
-
49
-
50
-
51
-
52
-
53
-
54
-
55
-
56
-
57
-
58
-
59
-
60
-
61
-
62
-
63
-
64
-
65
-
66
-
67
-
68
-
69
-
70
-
71
-
72
-
 73
73 -
 74
74 -
 75
75 -
 76
76 -
 77
77 -
 78
78 -
 79
79 -
 80
80 -
 81
81 -
 82
82 -
 83
83 -
84
-
85
-
86
-
87
-
88
-
89
-
90
-
91
-
92
-
93
-
94
-
95
-
96
-
97
-
98
-
99
-
100
-
101
-
102
-
103
-
104
-
105
-
106
-
107
-
108
-
109
-
110
-
111
-
112
-
113
-
114
-
115
-
116
-
117
-
118
-
119
-
120
-
121
-
122
-
123
-
124
-
125
-
126
-
127
-
128
-
129
-
130
-
131
-
132
-
133
-
134
-
135
-
136
-
137
-
138
-
139
-
140
-
141
-
142
-
143
-
144
-
145
-
146
-
147
-
148
-
149
-
150
-
151
-
152
-
153
-
154
-
155
-
156
-
157
-
158
-
159
-
160
-
161
-
162
-
163
-
164
-
165
-
166
-
167
-
168
-
169
-
170
-
171
-
172
-
173
-
174
-
175
-
176
-
177
-
178
-
179
-
180
 |
 |