Samsung SPH-D600 User Manual (user Manual) (ver.f7) (English) - Page 110
Configuring Calendar Settings, 2F. Calendar & Tools
 |
View all Samsung SPH-D600 manuals
Add to My Manuals
Save this manual to your list of manuals |
Page 110 highlights
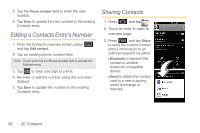
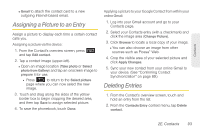
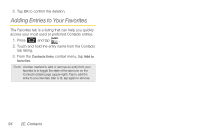
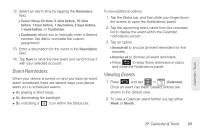
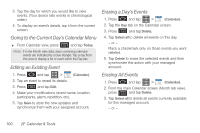
4. Tap Sync Calendar to activate the synchronization of calendar events between your device and the remote exchange server. A green checkmark indicates the feature is enabled. Note: It might be necessary to toggle the feature on and off to force a re-sync. To manually sync your calendar events to a managed corporate account: 1. Press > > > Accounts & sync. 2. Tap within the Corporate account field. 3. Tap the green checkmark to toggle it off then back on. (See "Synchronizing Your Corporate Account" on page 69.) Configuring Calendar Settings 1. Press and tap > (Calendar). 2. Tap > Settings. 3. Tap an onscreen option: Ⅲ Calendars displays the currently managed accounts. Tap an entry to change the sync state of the account. 96 2F. Calendar & Tools Ⅲ Default calendar allows you to select a calendar from the list that will automatically display when opening the Calendar. Ⅲ Default view configures the current Calendar default view for events. Month view is the default. Choose from: Month, Week, Day or List. Ⅲ Day view configures how the available events are displayed onscreen. Choose from Time grid or Event list. Ⅲ First day of week sets the calendar week to start with either Sunday or Monday. Ⅲ Hide declined events hides (checked) or displays (unchecked) those events that have been declined via the calendar application. Ⅲ Lock time zone allows you to maintain your selected timezone even if you move into a different one. Ⅲ Select time zone allows you to select a specific time zone. Ⅲ Set alerts & notifications allows you to choose whether or not you receive a status bar notification.
-
 1
1 -
2
-
3
-
4
-
5
-
6
-
7
-
8
-
9
-
10
-
11
-
12
-
13
-
14
-
15
-
16
-
17
-
18
-
19
-
20
-
21
-
22
-
23
-
24
-
25
-
26
-
27
-
28
-
29
-
30
-
31
-
32
-
33
-
34
-
35
-
36
-
37
-
38
-
39
-
40
-
41
-
42
-
43
-
44
-
45
-
46
-
47
-
48
-
49
-
50
-
51
-
52
-
53
-
54
-
55
-
56
-
57
-
58
-
59
-
60
-
61
-
62
-
63
-
64
-
65
-
66
-
67
-
68
-
69
-
70
-
71
-
72
-
73
-
74
-
75
-
76
-
77
-
78
-
79
-
80
-
81
-
82
-
83
-
84
-
85
-
86
-
87
-
88
-
89
-
90
-
91
-
92
-
93
-
94
-
95
-
96
-
97
-
98
-
99
-
100
-
101
-
102
-
103
-
104
-
 105
105 -
 106
106 -
 107
107 -
 108
108 -
 109
109 -
 110
110 -
 111
111 -
 112
112 -
 113
113 -
 114
114 -
 115
115 -
116
-
117
-
118
-
119
-
120
-
121
-
122
-
123
-
124
-
125
-
126
-
127
-
128
-
129
-
130
-
131
-
132
-
133
-
134
-
135
-
136
-
137
-
138
-
139
-
140
-
141
-
142
-
143
-
144
-
145
-
146
-
147
-
148
-
149
-
150
-
151
-
152
-
153
-
154
-
155
-
156
-
157
-
158
-
159
-
160
-
161
-
162
-
163
-
164
-
165
-
166
-
167
-
168
-
169
-
170
-
171
-
172
-
173
-
174
-
175
-
176
-
177
-
178
-
179
-
180
-
181
-
182
-
183
-
184
-
185
-
186
-
187
-
188
-
189
-
190
-
191
-
192
-
193
-
194
-
195
-
196
-
197
-
198
-
199
-
200
-
201
-
202
-
203
-
204
-
205
-
206
-
207
-
208
-
209
-
210
-
211
-
212
-
213
-
214
-
215
-
216
-
217
-
218
-
219
-
220
-
221
-
222
-
223
-
224
-
225
-
226
-
227
-
228
-
229
-
230
-
231
-
232
-
233
-
234
-
235
-
236
-
237
-
238
-
239
-
240
-
241
-
242
-
243
-
244
-
245
-
246
-
247
-
248
-
249
-
250
 |
 |
