Yamaha PSR-9000 Owner's Manual - Page 123
Volume/EQ, Filter, Effect Depth, Voice, the [UPPER OCTAVE] button.
 |
View all Yamaha PSR-9000 manuals
Add to My Manuals
Save this manual to your list of manuals |
Page 123 highlights
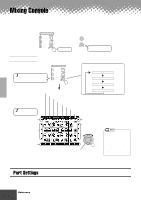
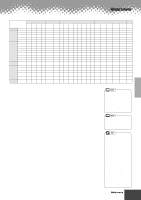
Mixing Console Volume/EQ Filter Effect Depth Tune Voice VOLUME PAN- EQ EQ BRIGHT- HARMONIC REVERB CHORUS DSP DSP DSP DSP DSP DSP TRANS- TUNING OCTAVE PITCH PORTAMENTO VOICE POT LOW HIGH NESS CONTENT (1) (2) (3) (4) (5) (6) (7) (8) POSE BEND TIME * RANGE Master Overall - - - - - - - - ------ O - - - - - Keyboard All Voices - - - - - - - - ------ O - - - - - VOICE R1 O O O O O O O O -O- - - - - O O O O - VOICE R2 O O O O O O O O - -O- - - - O O O O - VOICE R3 O O O O O O O O - - -O- - - O O O O - VOICE L O O O O O O O O - - - -O- - O O O O - Auto All Tracks O O O O - - O OO- - - - - - - - - Accompaniment (Style) RHYTHM 1 O O O O O O O OO- - - - - - - - - RHYTHM 2 O O O O O O O OO- - - - - - - - - - - - O - O BASS OOOO O O O OO- - - - - - - - - - O CHORD 1 O O O O O O O OO- - - - - - - - - - O CHORD 2 O O O O O O O OO- - - - - - - - - - O PAD OOOO O O O OO- - - - - - - - - - O PHRASE 1 O O O O O O O OO- - - - - - - - - - O PHRASE 2 O O O O O O O OO- - - - - - - - - - O Multi Pad Multi OOOO - - OO------ - - - - - - Pad 1~4 Song All Tracks O O O O - - O OO- - - - - O - - - - - TRACK 1 O O O O O O O OO- - - - - - - - - - O TRACK 2 O O O O O O O OO- - - - - - - - - - O • • • • • • • • • • • • • • • • • • • • • • • • • • • • • • TRACK 16 O O O O O O O OO- - - - - - - - - - O Microphone MIC OO - - - - O O - - - - -O - - - - - - Sound O : available * : Same as the [KEYBOARD TRANSPOSE] button (page 138) q Volume/EQ • Volume This lets you change the volume of each part and adjust the relative balance among all the parts. • Panpot Positions the sound of the specified voice or track from left to right in the stereo sound field. • Equalizer The EQ High and EQ Low controls function in the same way as the treble and bass controls on a sound system, boosting or cutting the high or low frequency ranges by the specified amount. q Filter • Brightness This increases or decreases the brightness of the sound. • Harmonic Content..This increases or decreases the harmonic content, giving the sound more or less "punch." q Effect Depth This parameter sets the effect depth for the corresponding part. See the next page for details about Effects. q Tune • Transpose Allows the pitch to be transposed up or down in semitone increments. • Tuning Sets the pitch for the corresponding part. • Octave Shifts the pitch of the specified part up or down by one or two octaves. The value of this parameter is added to the value set via the [UPPER OCTAVE] button. • Pitch Bend Range ..Sets the range of the PITCH BEND wheel for the corresponding part. The range is from "0" to "12" with each step corresponding to one semitone. • Portamento Time....Sets the portamento time for the corresponding part only when the part is set to "MONO" (page 55). The higher the value the longer the portamento time. The portamento effect (a smooth slide between notes) is produced when the notes are played legato: i.e., a note is held while the next note is played. q Voice This lets you change the voice for each part. • Make the desired Right 1 voice, Effect Type and Depth, and EQ settings from the Mixing Console, then call up the Custom Voice display to store the settings. The Mixing Console parameters can be stored together with the Custom Voice parameters. • Certain voices may produce excessive noise, depending on the Harmonic Content and/or Brightness settings of the Mixing Console Filter. • As indicated in the chart above, in addition to the Master Transpose setting, there are two other transpose controls: Keyboard Transpose and Song Transpose. These can be used to match both the song and your keyboard performance to a certain key. For example, let's say you wish to both play and sing along with a certain recorded song. The song data is in F, but you feel most comfortable singing in D, and you are accustomed to playing the keyboard part in C. To match up the keys, set the Master Transpose to "0," the Keyboard Transpose to "2," and the Song Transpose to "-3." This brings the keyboard part up and the song data down to your comfortable singing key. q q q q q q q q q q q q q q q q q q q q q q q q q q q q q q q q q q q q q q q q q q q Reference 123 121
-
 1
1 -
2
-
3
-
4
-
5
-
6
-
7
-
8
-
9
-
10
-
11
-
12
-
13
-
14
-
15
-
16
-
17
-
18
-
19
-
20
-
21
-
22
-
23
-
24
-
25
-
26
-
27
-
28
-
29
-
30
-
31
-
32
-
33
-
34
-
35
-
36
-
37
-
38
-
39
-
40
-
41
-
42
-
43
-
44
-
45
-
46
-
47
-
48
-
49
-
50
-
51
-
52
-
53
-
54
-
55
-
56
-
57
-
58
-
59
-
60
-
61
-
62
-
63
-
64
-
65
-
66
-
67
-
68
-
69
-
70
-
71
-
72
-
73
-
74
-
75
-
76
-
77
-
78
-
79
-
80
-
81
-
82
-
83
-
84
-
85
-
86
-
87
-
88
-
89
-
90
-
91
-
92
-
93
-
94
-
95
-
96
-
97
-
98
-
99
-
100
-
101
-
102
-
103
-
104
-
105
-
106
-
107
-
108
-
109
-
110
-
111
-
112
-
113
-
114
-
115
-
116
-
117
-
 118
118 -
 119
119 -
 120
120 -
 121
121 -
 122
122 -
 123
123 -
 124
124 -
 125
125 -
 126
126 -
 127
127 -
 128
128 -
129
-
130
-
131
-
132
-
133
-
134
-
135
-
136
-
137
-
138
-
139
-
140
-
141
-
142
-
143
-
144
-
145
-
146
-
147
-
148
-
149
-
150
-
151
-
152
-
153
-
154
-
155
-
156
-
157
-
158
-
159
-
160
-
161
-
162
-
163
-
164
-
165
-
166
-
167
-
168
-
169
-
170
-
171
-
172
-
173
-
174
-
175
-
176
-
177
-
178
-
179
-
180
-
181
-
182
-
183
-
184
-
185
-
186
-
187
-
188
-
189
-
190
-
191
-
192
-
193
-
194
-
195
-
196
-
197
-
198
-
199
-
200
-
201
-
202
-
203
-
204
-
205
-
206
-
207
-
208
-
209
-
210
-
211
-
212
-
213
-
214
 |
 |
